
Project Summary
I’ve been really looking forward to putting this game tutorial together. My grandchildren just love to play these simple games where you see how many balloons you can pop before too many of those balloons escape. The catch, of course, is that the balloons start to come faster and faster, the more you pop. So…I thought this would be a great introductory game to highlight use of the Defold engine within a ‘real’ game (well, close to a real game). I’ll be demonstrating the use of several key features, to include: (a) use of multiple Atlases, (b) use of several Lua Modules, such as timer, hash_utils and animationFunctions, (c) many lessons learned in using multiple collections to represent the levels of the game and (d) multiple Graphic User Interfaces (GUI) supporting main menu, level controls, information panel and exit menu. I hope you enjoy the tutorial.
Introduction: GAME OVERVIEW
Balloon Pop! is a fun game – primarily targeted at younger children. The game objective is pretty simple — try to ‘pop’ as many moving balloons as you can before three of them escape off the screen. The balloons are spawned at random times, with random locations to make it a little more challenging — leveraging parameter driven speed and inter-spawning times. Additionally, as you increase from Level 1 to Level2 – the speeds and inter-spawning times get even quicker. My goal was to introduce a relatively simple game that uses the basic components we introduced in the Enhanced Defold Game Template (prior tutorial). You’ll find the following features closely parallel the work accomplished in the Enhanced Template Tutorial:
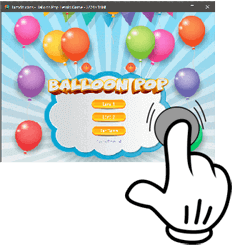
Here’s what the final Balloon Pop Game looks like:
- RANDOMIZATION FEATURES – Balloon Game Objects invoke randomly selected sprite images and are spawned at random x-positions across the bottom of the screen; spawn times and traverse speeds are also randomly invoked.
- CURSOR BASED COLLISIONS – A cursor Game Object (unique to each level) is used to trigger user clicks on a Balloon Game Object.
- SCORE KEEPING – The project includes flag variables which display how many balloons have escaped, and how many have been popped.
- USE OF LUA MODULES FOR UTILITY CODE – This project incorporates three common Lua Modules: (a) animationFunctions, supporting button, popup and GUI node animations, (b) hash_utils, part of Defold’s DefTable assets, providing manipulation of hash-like tables, and (c) timer, pulled from Britzl’s GitHubGist, which is used to get a callback when a certain amount of time has elapsed.
- GAME LEVEL MENU – The project presents the user with a main menu, enabling the selection of a specific game level, or exiting from the game. I’ve only included two game levels, but Level 2 increases difficulty, due to increased speed and spawning frequency.
- MULTIPLE CROSS-COLLECTION GUIs – Several GUI components are included (main_menu, level_controls, info_panel and exit_menu).
- BALLOON POP! USES MANY ENHANCED TEMPLATE FEATURES – The game includes many of the key features highlighted in the previous tutorial (Enhanced Defold Game Template), to include: (a) a Popup Help Panel, (b) animated splashscreen logos, (c) a custom render script, and (d) custom fonts. Additionally, a canvas resizing function has been added to the index.html file created during the Defold HTML5 Build process — to enable dynamic resizing of the game world when embedded within an iFrame.
High-Level Design Description
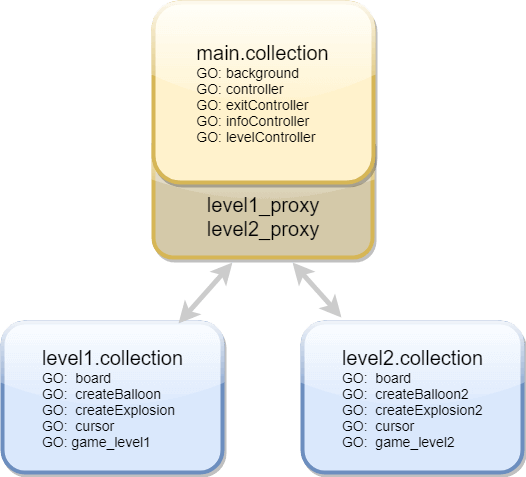
For this Balloon Pop! game, I’ll be using a design structure very similar to our Enhanced Template — though, there are some differences which I’ll highlight as the tutorial proceeds. The project hierarchy is designed to conform with three distinct collections:
For a real game, we’d obviously want to have more then simply two levels – but, I thought this would suffice for a simple game tutorial. At the highest degree of abstraction — the overall game design is as follows:
Please note, that I’ve tried to minimize the use of Global Variables — relying heavily on inter-collection/inter-component messaging for the exchange of parameter related information. This approach emphasizes unit integrity within each of the collections and scripts, aka, the project is designed in increase code cohesion and focuses on loose coupling between scripts/levels.
A more detailed project hierarchy is provided in the following tables which delineate which game objects and their components belong to each of the following three collections.
Collection Components

I’ve structured this game such that the main.collection is initiated upon game start (setup in the bootstrap section of the Defold game.project file). The main.collection initiates a set of animated images depicting the developer and the game logos, followed by display of the main menu. Please note that there are two collection proxies included within the controller Game Object — these will enable us to load those respective game levels based on menu selection by the user. Each of the GUI’s are included within this collection, under a separate Game Object for each.
The level1.collection contains each of the components needed to play this initial game level. At random times and positions, the factory invokes the balloon Prototype as the means for generating balloons to be popped. When a balloon is popped, the other factory creates an animated explosion effect. All these features are controlled by the level1_main.script.
The level2.collection is essentially the same as that for level1 — except that there are slight variations within the sprites and script files to reflect increased difficulty and a separate set of background sprites.
I: PROJECT SETUP
Game.Project Setup
Within the Defold game.project file, several parameters are changed for this project:
Project Atlases
This project uses multiple atlases to accommodate the full set of .png images within the game. The images used within this Balloon Pop! game can be downloaded within a single zipfile by clicking the following button – placing them within the images folder within the Project Explorer.
Attribution: These images are all free assets provided by the following sources: (1) balloon image is from www.openclipart.com; (2) the level1 background image is from craftpix.com, (3) the level3 background image is from pngtree.com, (4) the main menu balloon background is from freepik.com, (5) the restart icon is from the free icon library and (6) the exit icon is from findicons.com.
 The allocation of images to Atlases is displayed within the following table.
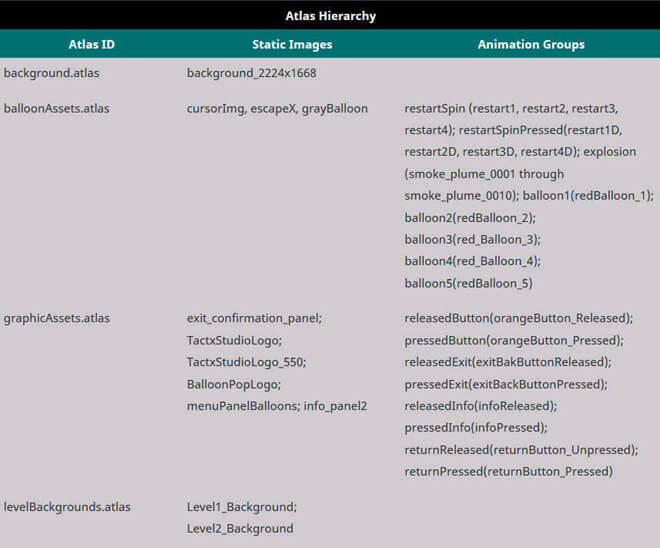
This table shows which images are included within each of the four atlases in this Defold Game Project. Static images are imported to the respective atlases as shown. Flipbook animations are included as Animation Groups — the name of the Animation Group, followed by the component images in parentheses.
You can create each of these Atlases and align both the static images and animation groups into them — consistent with the process described in the previous tutorial.
Custom Fonts
We’ll add a set of custom fonts to this project — as a means to match the tone & style desired for the game. Download this set of custom font files by clicking the following button and place them within a new folder (‘fonts’) within the Project Explorer.
Using the files now added to your ‘fonts’ folder, create the *.fnt files to your project.
Custom Render Script
Bjorn Ritzl of the Defold team has created a custom render script which I’ve found to be very useful — it’s located on Britzl’s github site. This custom script enables you to select either (a) centering content with a maintained aspect ratio, (b) centered content and fitting the content to the screen with a maintained aspect ratio, or (c) stretching the content to fill the entire screen. For this template — I’ve selected the option to stretch the content to fit the screen — but you now have the flexibility (depending upon the type of game being developed) to switch between these options.
This custom rendering script can be downloaded by clicking the following button. Place the two files within a new folder (‘render’) within your Project Explorer.
At this point, you can now add this render script to the project.
game.input_binding
The last step in the initial project setup is configuring the input bindings — we’ll keep it simple, only a ‘touch’ input associated with ‘mouse-button-1’, aka, the left mouse button (or touch on a mobile device).
II: collection level/proxies
As highlighted within the High Level Design Description — the structure of this Balloon Pop! game is organized around three collections (main, level1 and level2). This enables us to easily switch between the two active game levels, as well as switching between an active level and the front-end GUI. Defold uses message passing as the mechanism for controlling the switching between collections.
In this game, a collection proxy is established for the level1 and a second proxy is defined for the level2 collection — the load/unload procedures are controlled using msg.post statements, for example: msg.post(CURRENT_PROXY, “load”) or msg.post(CURRENT_PROXY, “unload”). The status of these collection processes are also based on messages, to include: message_id == hash(“proxy_loaded”) or message_id == hash(“proxy_unloaded”). These message interactions are explained as detailed comments within the source code.
The following subsections identify the Game Objects and Component Elements within each of these three collections:
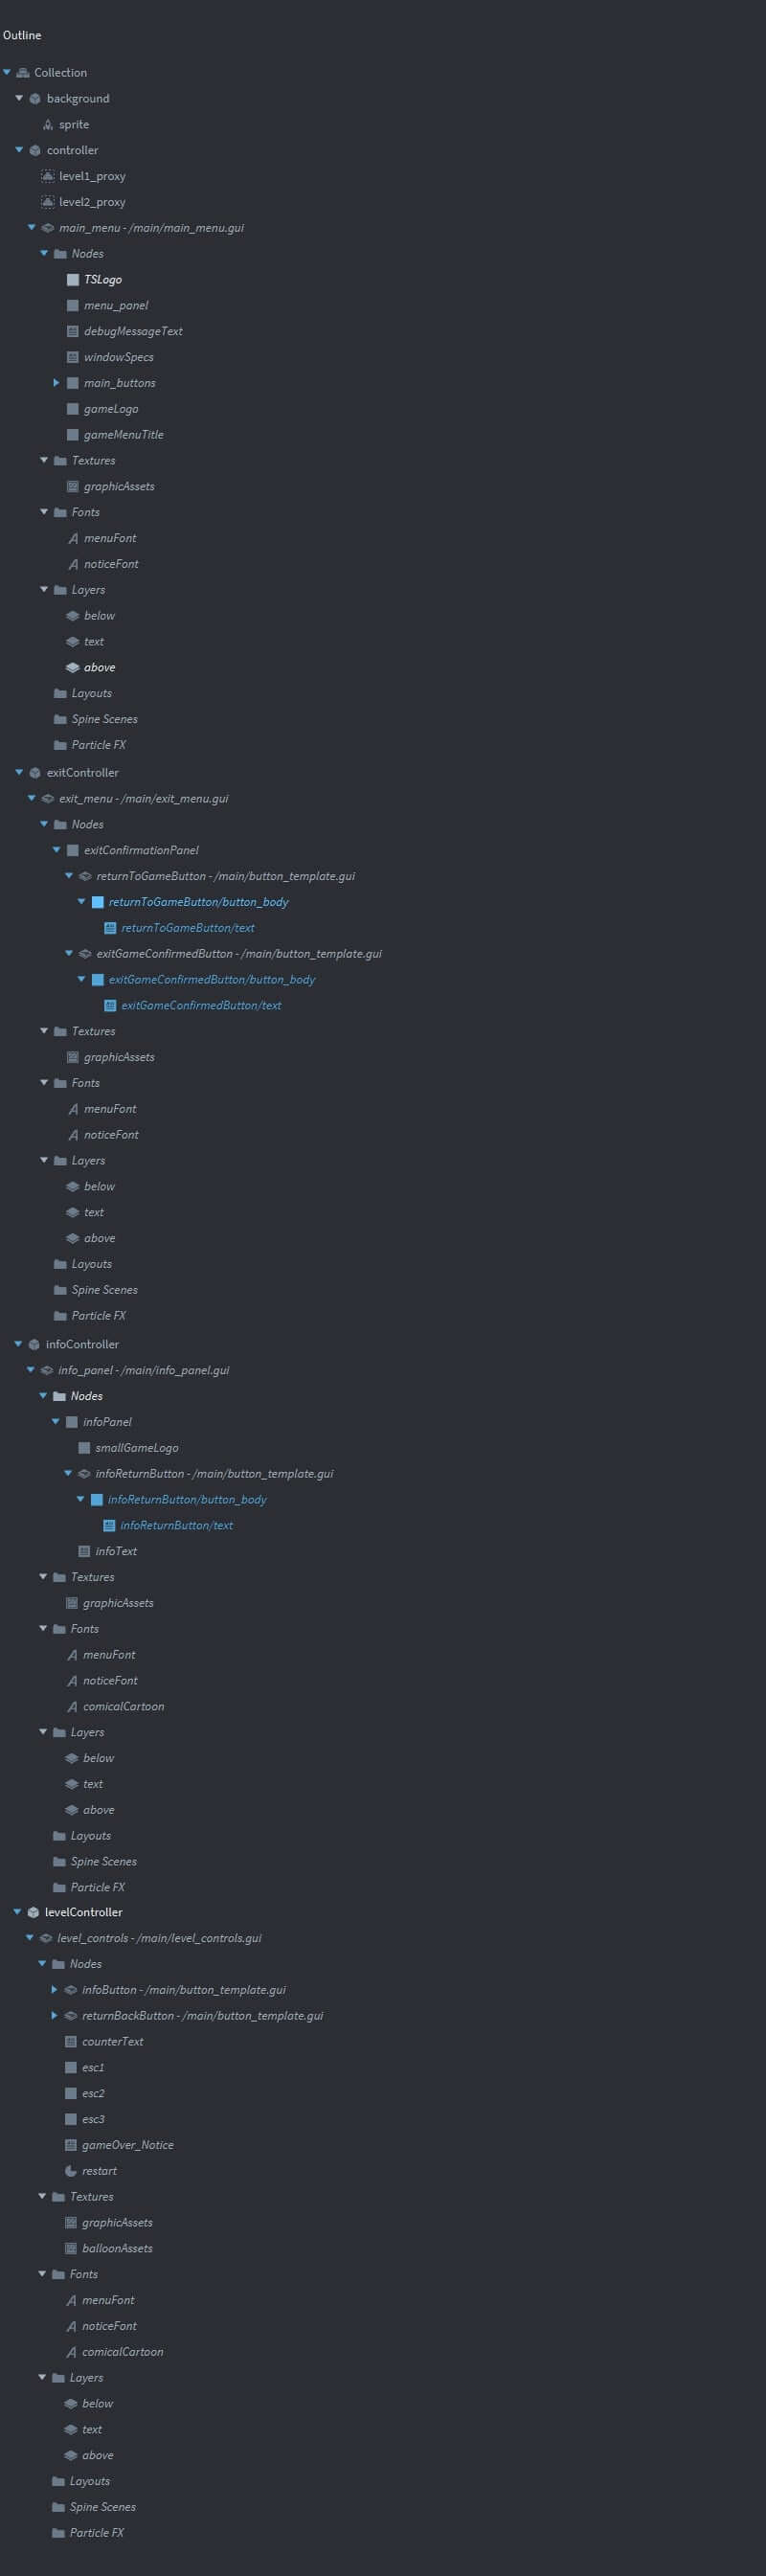
main.collection outline
Within Balloon Pop! — the main.collection is structured around five Defold Game Objects:
The following image depicts the full outline of the main.collection, to include each of the component elements.
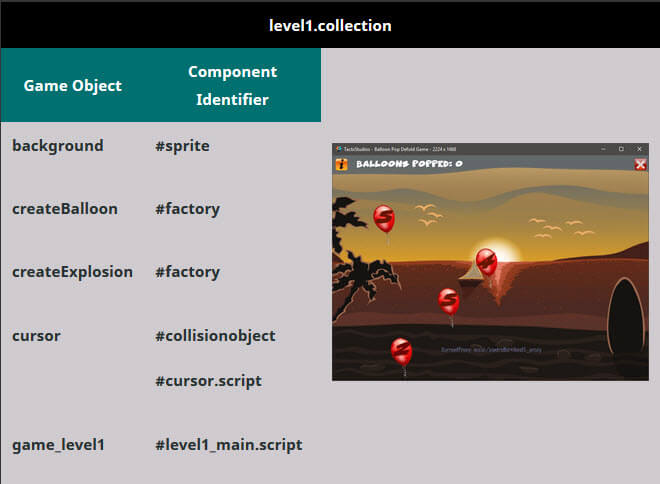
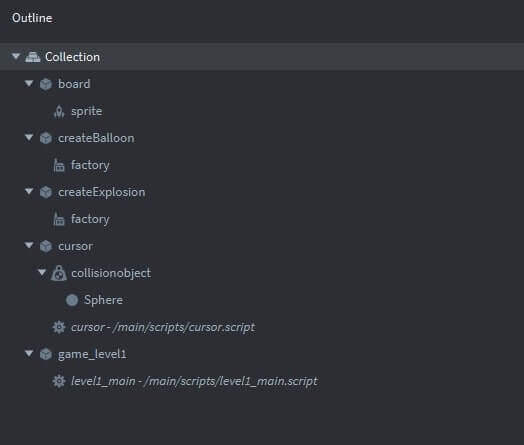
level1.collection outline
The level1.collection is structured around five Defold Game Objects:
The following image depicts the full outline of the level1.collection, to include each of the component elements.
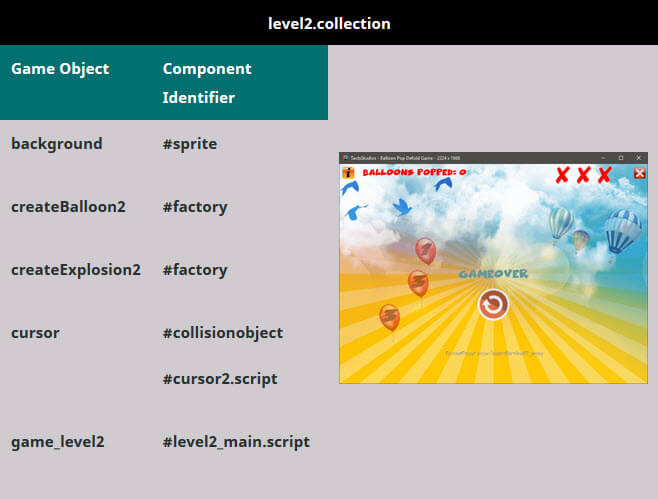
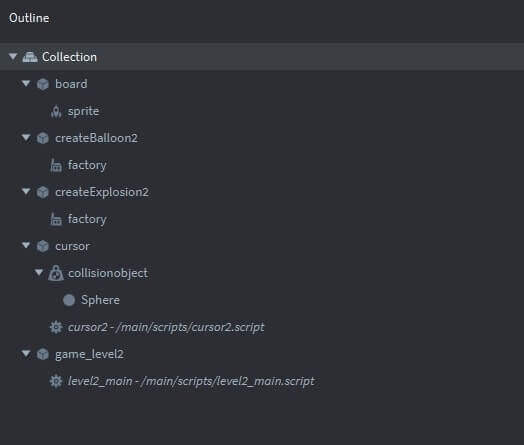
level2.collection outline
The level2.collection is very similar to the level1.collection structure, focused on the same five Defold Game Objects, however, it includes a different board sprite, and different balloon characteristics than level1. The following image depicts the full outline of the level2.collection, to include each of the component elements.
Helpful Hints - Defold Collections
III: gui structure
Within Defold, Graphical User Interfaces (GUI) consist of several standard components: (1) Nodes, (2) Textures, (3) Fonts, (4) Layers, (5) Layouts, and (6) Spine Scenes. For the example within this tutorial, we’ll be using a total of four GUI sets to represent the menu buttons, information panels, popup notices and flag variable status. Those four GUI sets are:
The following illustrations highlight the various GUI nodes which are included within each of these sets:
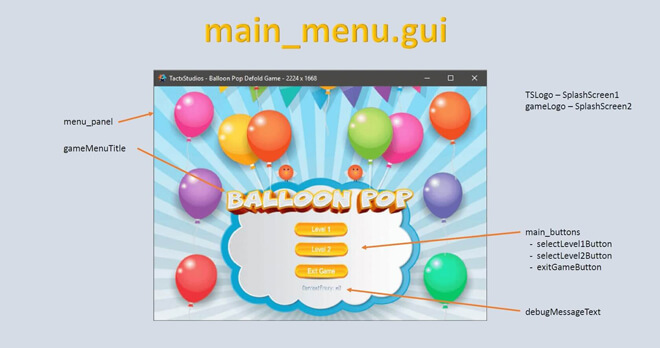
The main_menu.gui controls the introductory logo splashscreens for both the designer and the game logos. It also animates the button elements within the game’s main menu – enabling a user to select Level1, Level2 or Exit the Game. The GUI node ID’s are indicated on the adjacent screenshot.
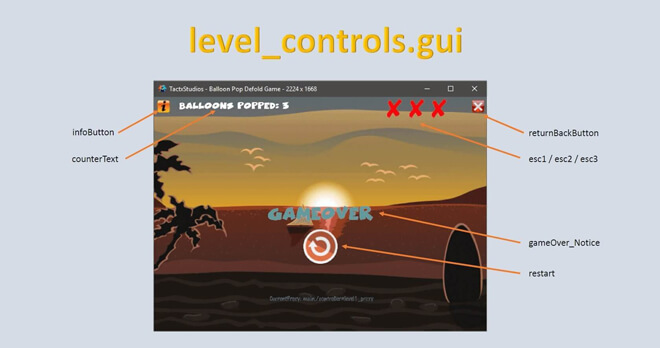
The level_controls.gui provides the interface which a user sees within each of the game levels — including the means for accessing a helpscreen, a return back to the main menu and the current status of both number of balloons popped and flags for the number of balloons that have escaped. The GUI node ID’s are indicated on the adjacent screenshot.
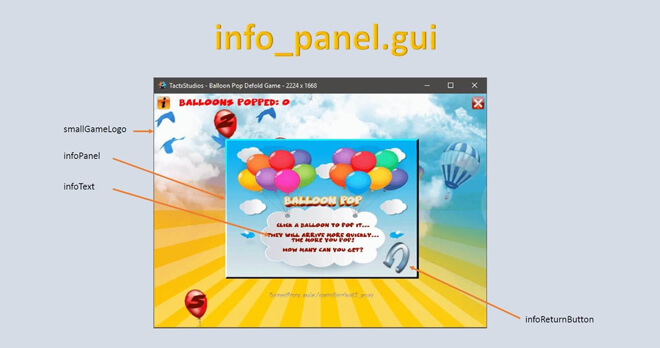
The info_panel.gui controls the helpscreen user interface — containing the specific informational text and a button for returning back to the current game level. The GUI node ID’s are indicated on the adjacent screenshot.
Finally, the exit_menu.gui controls the user entries once they’ve selected ‘Exit the Game’ from the main menu — the buttons here enable a user to change their mind and return to the game, or alternative, it confirms that they want to exit the game. The GUI node ID’s are indicated on the adjacent screenshot.
IV: utility lua modules
For this Balloon Pop! project, I’ve included three Lua Modules – facilitating reuse of these functions across other projects. The three Lua Modules are:
The timer and hash_utils modules are derived from the Defold community assets available at the following Defold Website. The animationFunctions module was developed as a component of the Enhanced Defold Template, introduced in the previous tutorial.
The source code for each of these is provided below. Please note that I’ve set a 500 pixel limit on the display window for each of these, so you’ll need to scroll them to see the full extent of lua code.
Source Code for animationFunctions.lua
Source Code for hash_utils.lua
Source Code for timer.lua
V: script walkthroughs
The following script files are components of the BalloonPop! game — and control the actions related to level1 gameplay, to include:
The specific game functions provided and the manner in which they are implemented are described within comments throughout the source code.
Please note that I’ve only included the level1 game scripts in this section. There is a parallel set of scripts for level2 within the project file. If levels are very similar in terms of functionality, the developer could combine them into another set of lua modules similar to the manner in which animationFunctions.lua has been treated. I have not done that here to highlight how the game developer can structure differing game levels.
Source Code for level1_main.script
Source Code for cursor.script
Source Code for balloonScript.script
Source Code for balloonExplosion.script
VI: GUI Script Walkthroughs
Each of the Graphic User Interface components has a script associated with it – to include:
The Lua Source Code for each is provided below — with the features and implementation techniques highlighted within the embedded comments.
Source Code for main_menu.gui_script
Source Code for level_controls.gui_script
Source Code for info_panel.gui_script
Source Code for exit_menu.gui_script
VI: FINAL RESULT
I hope the overall sequence of build events has been helpful. I’ve tried to condense the length of these tutorials — but still describe the key build steps and the manner in which overall logic is incorporated into this project. At this point our Balloon Pop! Game is complete — and I have included the full project within a zipfile which can be downloaded by pressing the following button
All the best - Dave