
Objectives for this Tutorial
Understanding how to manipulate images within any game engine certainly falls high on any developer's list of priorities. I’m going to be focusing on several aspects of image related processes using the Defold Game Engine:
- An overview of the Defold Building Blocks (Collections, Game Objects and Game Components);
- Adding images to a Defold project, and use of the Atlas feature;
- Creating a Defold collection, adding Game Objects;
- Implementing Sprite Flipbooks as a means for animating sprite behaviour;
- Moving a Game Object within the game window; and
- Building a Game Object animation – focused on GO properties (e.g., the Alpha Property)
NEW - YouTube Version of this Tutorial is now Available
There is now a video version of this Image Procedures Tutorial available on YouTube - please take a look and let me know if you find it helpful.
I: DEFOLD BUILDING BLOCKS
Collections of Game Objects
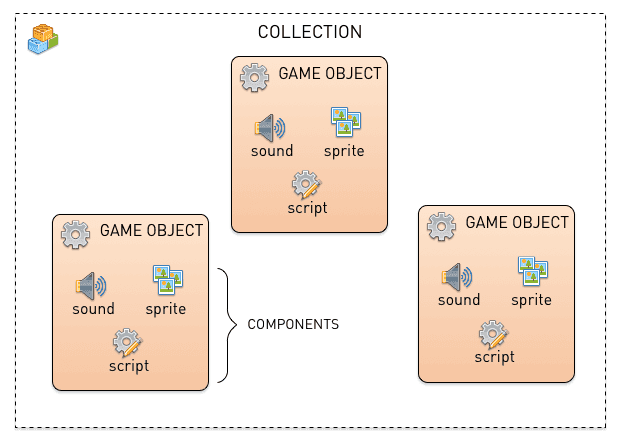
Defold implements a hierarchical structure for all game objects within a project — providing an object orientation which reduces dependencies between Game Objects, Code Modules or Components. Basically, this structure reduces tight coupling and therefore improves overall program quality (and substantively reduces many common sources of bugs within the game). Details of this approach are provided within the Defold online documentation under Building Blocks. For this tutorial, we are going to create a couple in-place instances of a game object, which will consist of both a sprite and a source code component. These game objects will be placed within a collection.
Game Objects (GO) are the fundamental element for building games. A Game Object is essentially a container for the characteristics of an entity within your game. For example, a Game Object can contain a sprite, a Lua Script File, and/or a Sound File. The following diagram pulled from Defold’s Documentation illustrates the relationship between Collection, Game Object and Components within a Defold Project.
For this tutorial, our next step will be to add to our project all the components needed to create a simple Defold application highlighting Game Object movement. The first step is to add some images to the project.
II: ADDING IMAGES TO A PROJECT
Download and Add Images to a Project
Adding images and creating an Atlas file is a very simple process. You can import the selected images by dragging and dropping them from a folder on your PC/Mac onto a folder (e.g., ‘images’) within the Defold Project on the Editor’s Project Explorer.
Images for this tutorial are provided within a zipfile which you can download by clicking the following button.

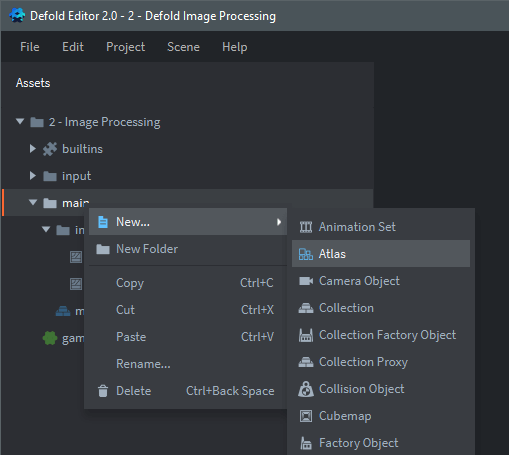
Once images have been added to the project, you can create a new Atlas file as highlighted within the following illustration. The use of this Atlas feature essentially combines all selected images into a single file as a means for saving space and improving overall game performance.
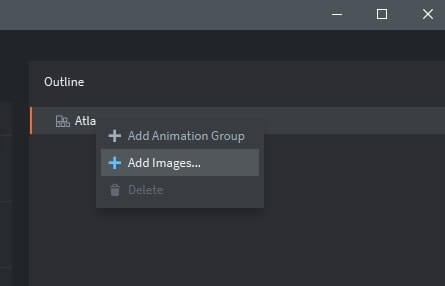
Once the Atlas has been created within the Project Explorer, you can double-click on it within the Explorer window to bring it into focus within the Outline window on the right hand side of the Defold Editor. I’ve changed the name of this atlas to ‘entities.atlas’. After that, you can then add the image files to the Atlas by right-clicking the Atlas within the Defold Outline window as shown below and selecting the desired images from the popup dialog.
Additional information related to Defold’s handling of graphic files is provided within their 2d Graphics Manual.
III: COLLECTION OF GAME OBJECTS
Create a Defold Collection for the Project
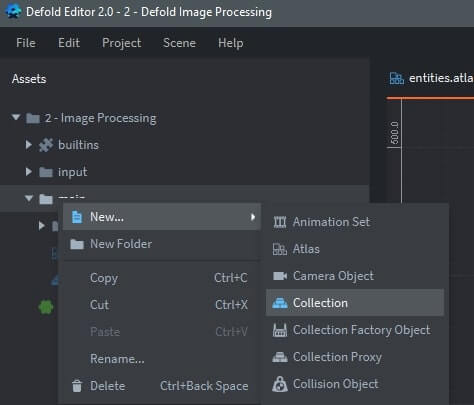
A Collection is Defold’s tree structure for holding Game Objects. For this simple example, we are going to create a collection of game objects which will include a cartoon character and a wheel. Creating this new collection is accomplished by right-clicking the main folder within the Defold Project Explorer | Selecting the New Option | Selecting Collection from the list. A dialog box will ask for a name for this new collection, for this example, I’m using the name: ‘gameEntities’.
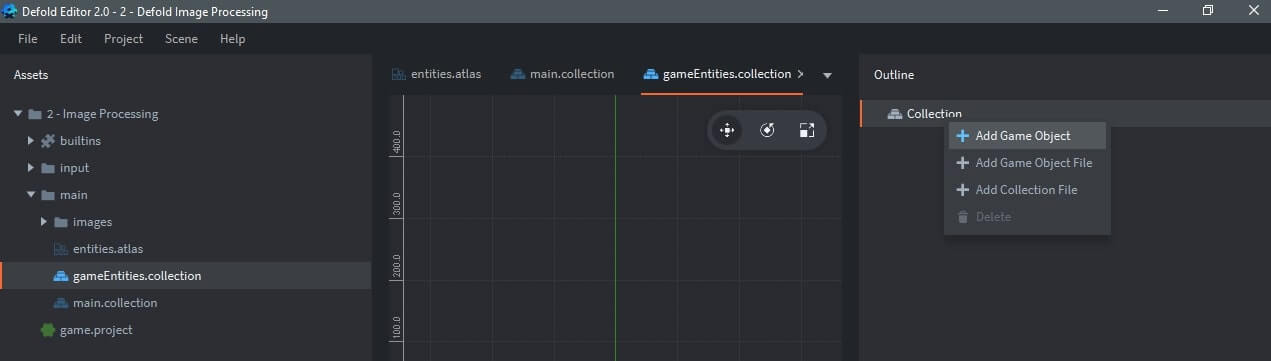
Add a Game Object to the Collection
Once the gameEntities collection is created within the Project Folder, you can double-click it to bring this new collection into focus within the Defold Outline window. Right-Clicking ‘Collection’ within the Outline window enables you to select ‘Add Game Object’.
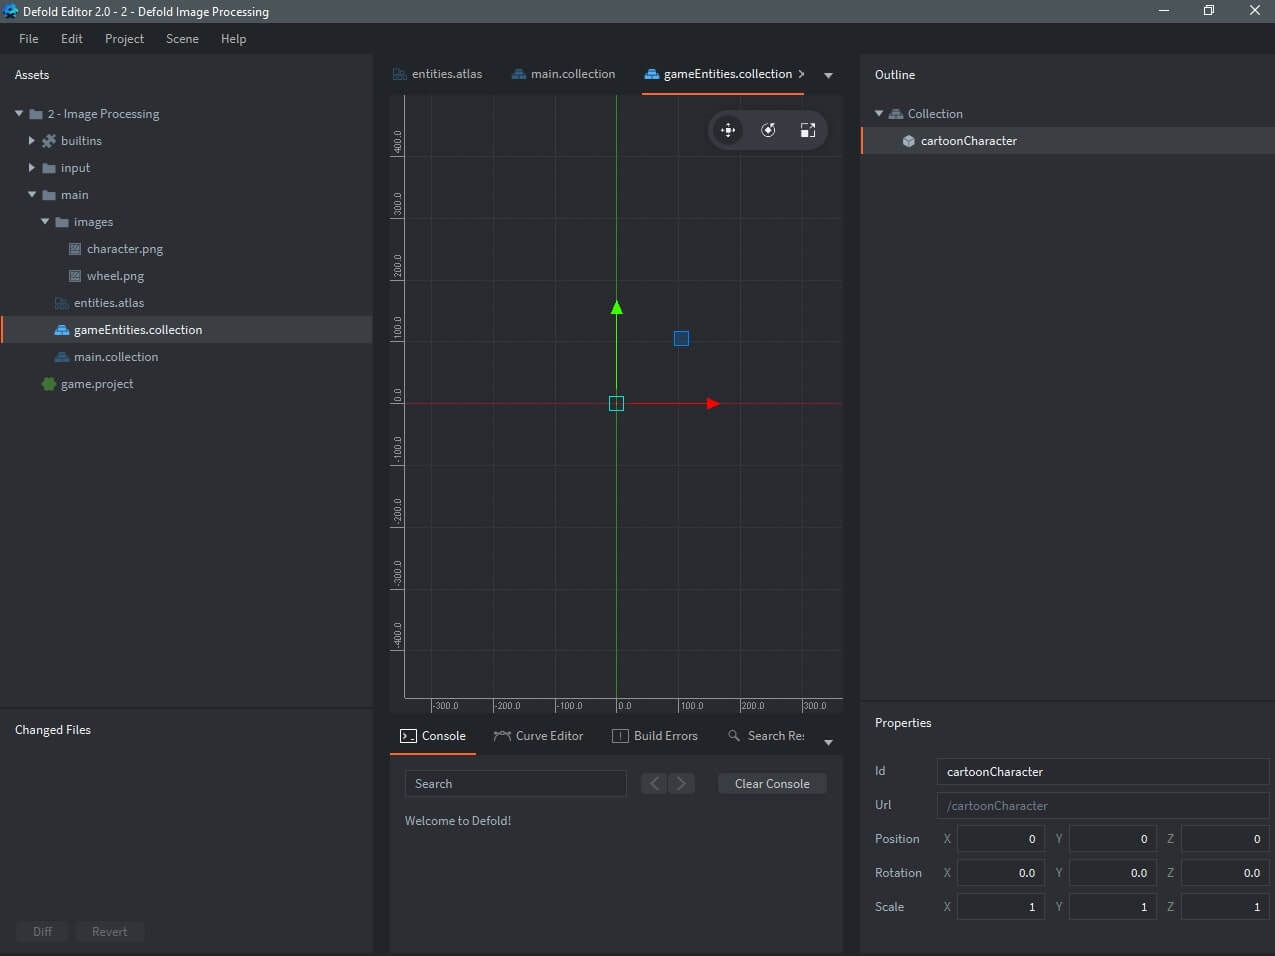
After you select ‘Add Game Object’, you can modify the id of this Game Object within the Properties Window (bottom right of Editor screen). I’ve named this first Game Object as ‘cartoonCharacter’.
Add a Second Game Object to the Collection
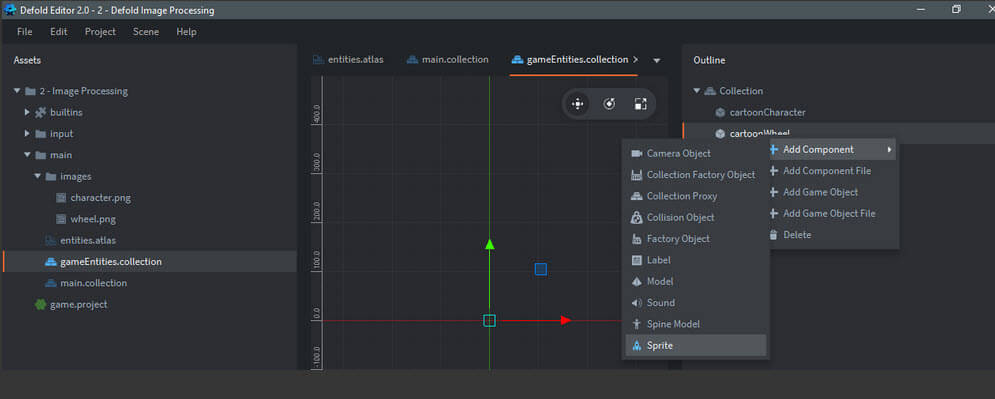
I will repeat this process to add a second Game Object to the collection – with the id: cartoonWheel. Once both Game Objects are created, the next step is to add a Sprite Component to each. As illustrated in the following screenshot, the developer right-clicks a Game Object within the Outline window of the editor | selects the ‘Add Component’ option | Sprite.
At this point, the properties window needs to be updated with the name of the atlas that the image is located within…and the name of the image.
Click the ellipsis next to the Image field and a window will open enabling you to select the atlas where you uploaded the images for this project (entities.atlas).
I can now select the image resource that I want to associate with this sprite by: Selecting the entities.atlas as the image source, then selecting ‘wheel’ under the Default Animation property as illustrated below.
I now perform a similar process for the cartoonCharacter Game Object: Add a Sprite Component | Rename the Sprite id to ‘character’ | Select the entities.atlas as the image source | Select the ‘character’ default animation as the element of the Atlas to use for this sprite.
Finally, I need to add this new gameEntities.collection to the main.collection of the game. This is accomplished by double-clicking main.collection within the Project Explorer | Right-Clicking ‘Collection’ within the Outline window | Selecting ‘Add Collection File’ from the pull-down options, and | Selecting gameEntities.collection from the available elements.
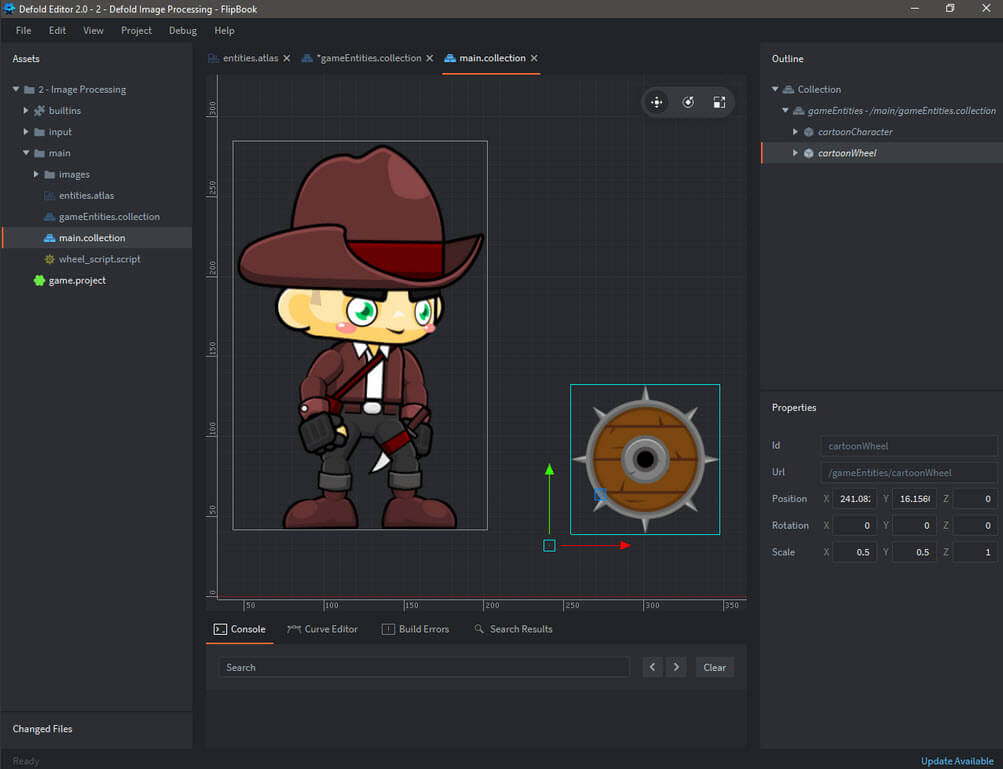
With the Outline focus on main.collection – I can expand the collection by double-clicking ‘collection’, and selecting a game object. A blue rectangle will appear within the Scene Editor (cartoonWheel in the following illustration) and I can move the Game Object around by dragging the yellow control box.
At this point, save the project under the ‘File’ menu item and build the project under the ‘Project’ menu item. The current game will appear in a separate window, consistent with the game dimensions you indicated within the game.project file.
IV: IMPLEMENTING A SPRITE FLIPBOOK
Adding Animations to the Atlas
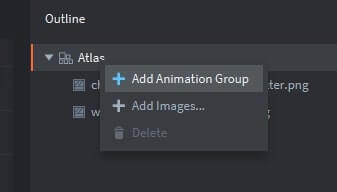
At this point, place the Outline window focus on the entities.atlas. By right-clicking the ‘Atlas’ heading within the Outline window, select the ‘Add Animation Group’ option. Within the Properties window, I’ve renamed the animation group to ‘jumpAnimation’.
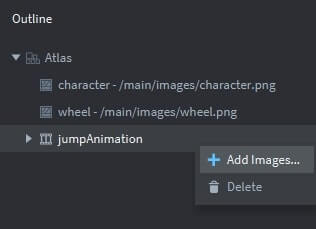
By right-clicking on the ‘jumpAnimation’ element, I can now ‘Add Images’ to this Animation Group. From the images folder, add all the Jump_000.png through Jump_009.png files to the jumpAnimation Animation Group.
Double-click ‘entities.atlas’ in the project folder to see the current contents of the atlas….it should look similar to the following:
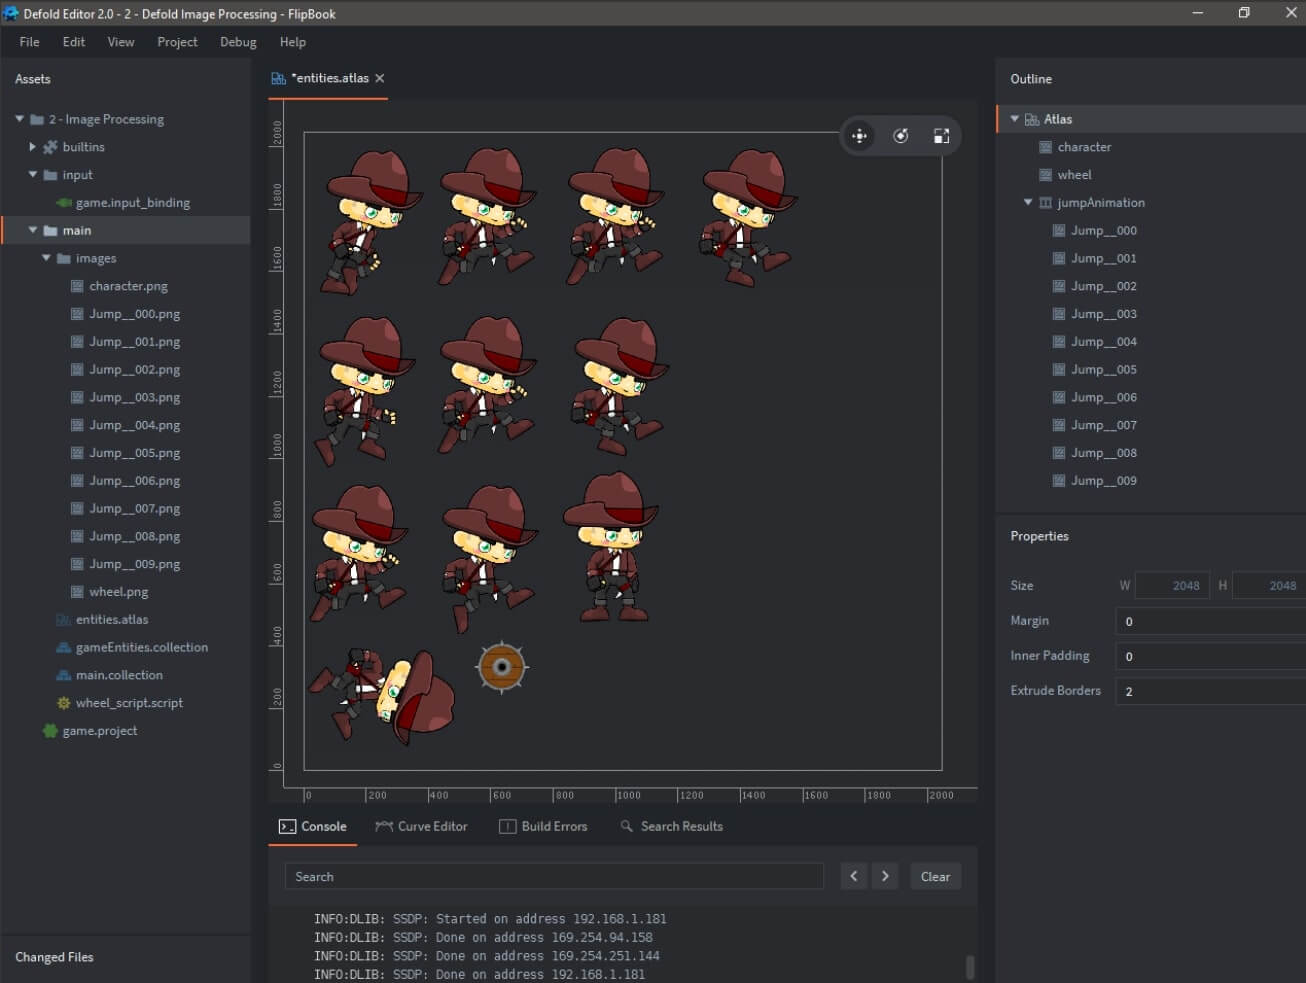
Note: There is a risk that you will experience a visual artifact called edge bleeding if a neighboring image within the Atlas has colored pixels on its edge, their color might bleed over at the edges. The easiest way to fix this problem is to set the Extrude Border property. I have set the ‘Extrude Borders’ parameter (in the Properties Window for the atlas) to 2. This prevents any potential edge bleeding.
Placing an Animated Game Object into the Game
Finally, to place an animated Game Object within the game, the following steps are required:
- Put focus within the Outline Window onto the gameEntities.collection by double-clicking gameEntities.collection within the Project Explorer;
- Create a new Game Object within gameEntities.collection by right-clicking ‘collection’ — and I changed the id of this Game Object to ‘jumper’ within the Property Window;
- Creating a Defold collection, adding Game Objects;
- I’ve added a Sprite to the jumper Game Object within the Outline window by right-clicking the jumper Game Object and selecting ‘Add Component | Sprite’ ;
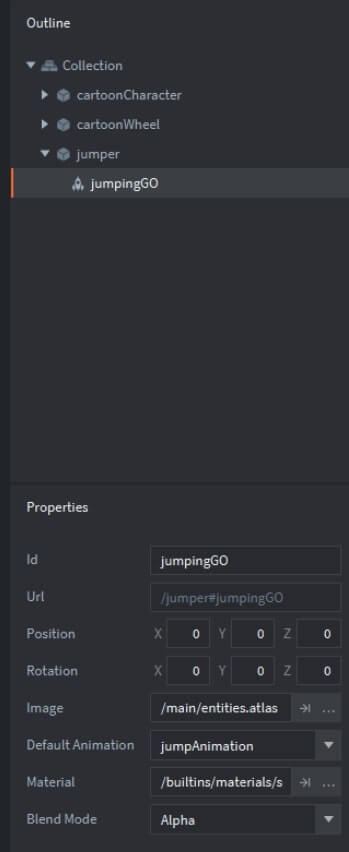
- I’ve changed to id of this new Sprite (in the Properties Window) to ‘jumpingGO’.
- Within the Property Window for jumpingGO, I’ve pointed the Image source to the entities.atlas and have set the Default Animation to ‘jumpAnimation’.
The following Outline highlights the end result of these actions:
Using the Scene Editor, I’ve moved the three Game Objects on the screen to ensure all are visible.
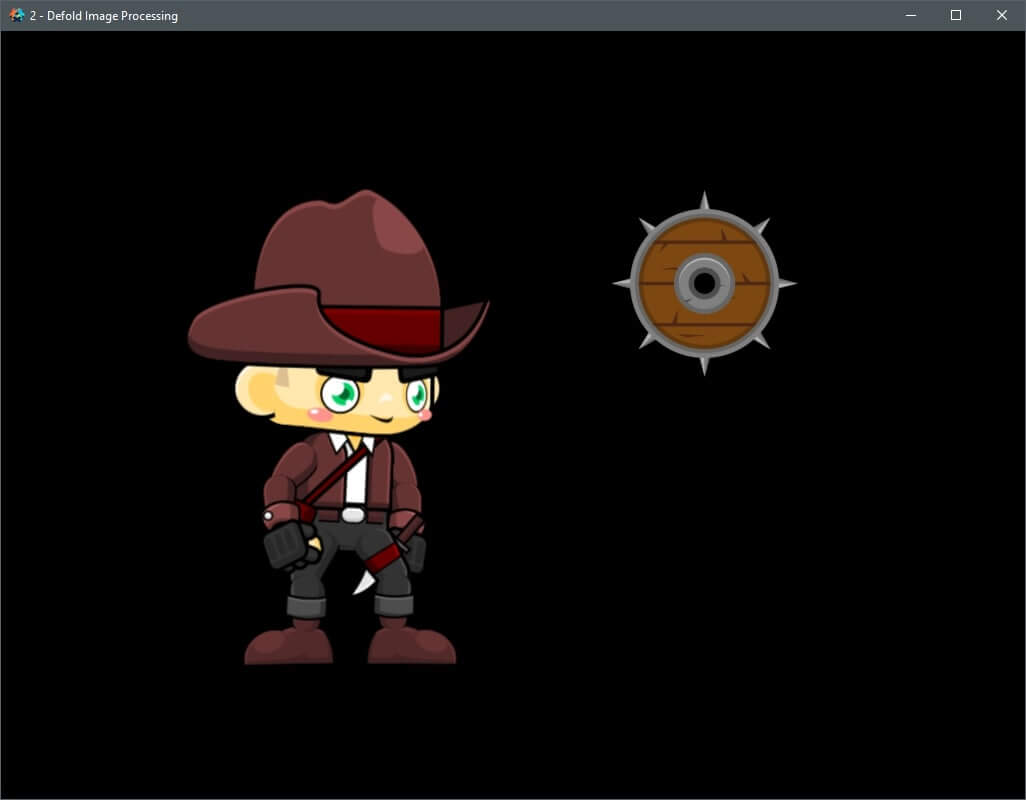
Save All. Let’s build the application to see what it does so far. As seen below, the Game Object on the right is ‘jumper’…which illustrates the animation feature.
Pressing the following thumbnail will pull up an iFrame which shows the actual Defold Application in progress.

V: GAME OBJECT ANIMATIONS
Adding a Property Animation to the Project
The next extension to this short application will be adding Property Animation to the Wheel Game Object. The initial step will be to add a Lua Script File to the project. This can be done by right-clicking the ‘main’ folder within the Project Explorer, and selecting the ‘script’ option as shown below.
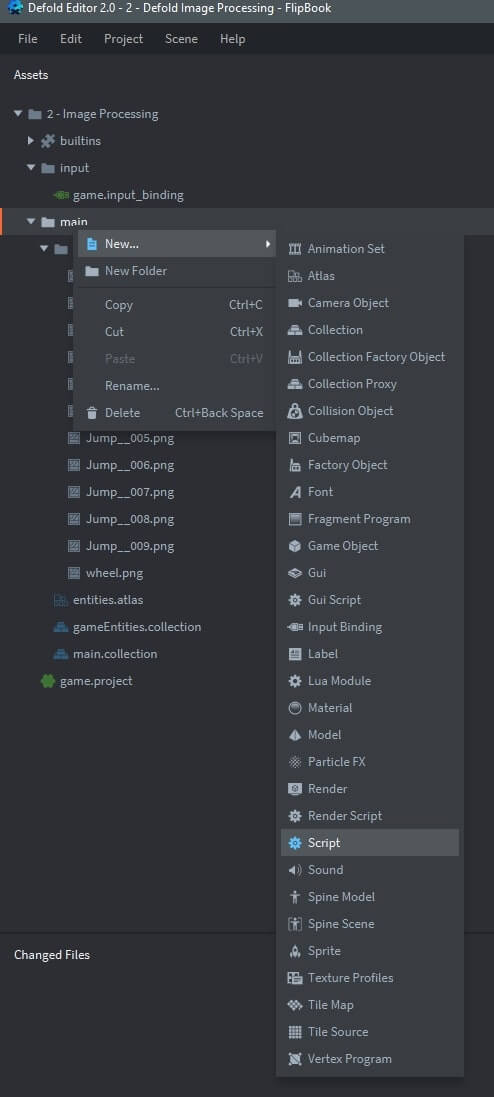
Once ‘script’ is selected, Defold will ask to name the script, I’ve named it ‘wheel_script’ for this example
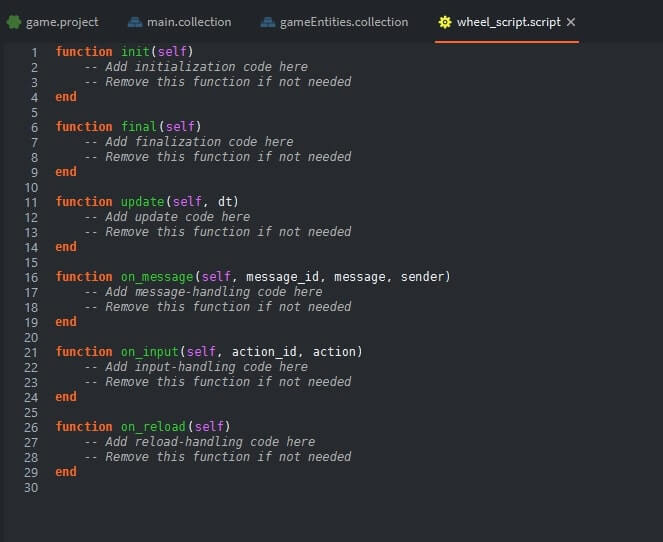
This default template can be deleted and replaced with the following script.
-- Lua Script Property Animation Example
function init(self)
	go.animate('.', "position.y", go.PLAYBACK_LOOP_PINGPONG, 200, go.EASING_INBOUNCE, 2)
end
Finally, this new script must be added to the Wheel Game Object….using the following steps:
- Double-click ‘gameEntities.collection’ in the Project Explorer;
- In the Outline window, right-click the ‘cartoonWheel’ game object;
- Select the ‘Add Component File’ option and pick the wheel_script.script entry
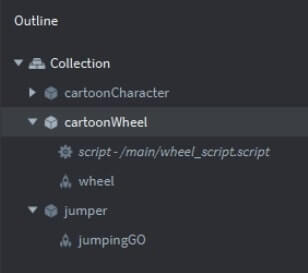
At this point, the ‘cartoonWheel’ game object now consists of two components: (1) a sprite, which includes the image, and (2) a Lua script — as highlighted below:
A quick explanation of the script:
- The first parameter (url) is a reference to the game object, in Defold, ‘.’ refers to the self;
- The second parameter is the property identifier of what will be animated, in this case the wheel’s y-position;
- The third parameter provides the playback mode – in this case, we’re using a PingPong mode (the animation runs forward, and then backward).
- The ‘to’ parameter is the target property value, in this case – a y-position of 200;
- The ‘easing’ parameter defines how the animated value will change over time. This is explained in detail within the Defold Animation Manual.
- Lastly, there is a two-second delay prior to the animation beginning.
Here’s the current app output after we add this script — (1) a stationary cartoon character, (2) a FlipBook Animation of a cartoon jumper, and (3) a property animation of a cartoon wheel. The following iframe provides an inline working version which highlights the Defold features discussed in this post:
To close out this 2nd Tutorial, I have included the full project within a zipfile which can be downloaded by pressing the following button.
VI: TUTORIAL WRAP-UP
I hope you found this tutorial to be useful. If you have any questions on this tutorial -- drop me a note in the comment box below. I'll get right back to you. I look forward to your feedback.
All the best - Dave