
Objectives for this Tutorial
In thinking about all the design elements that are required to develop a viable Defold game, I think having an attractive and functional Graphical User Interface (GUI) is definitely high on the list. In this tutorial, I’m going to describe how to animate components of a menu; in future tutorials, we’ll expand on that concept with other Defold GUI features.
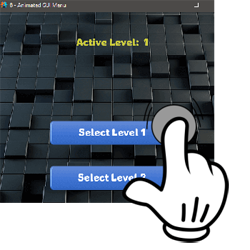
The end result for this tutorial is shown in the following iframe — where animated buttons are displayed (varying both size and opacity) to provide a user with two level options. Upon pressing and releasing a button, a popup is displayed to highlight which level was selected, with an ‘Active Level’ text field at the top of the game window. Additionally, there is GUI script logic to prevent processing double-clicks.
Active Defold Application — Click either button to highlight transition effects.
So…let’s go step-by-step on how to develop these GUI capabilities using the Defold 2D Game Engine.
NEW - YouTube Version of this Tutorial is now Available
There is now a video version of this Tutorial on adding Graphic User Interface (GUI) components to your Defold game is now available on YouTube - please take a look and let me know if you find it helpful. Please note, there may some minor differences between the video vs written tutorials, but the techniques are consistent.
I: PRELIMINARY PROJECT SETUP
As usual, we’ll start with the Defold initial Project Template as provided within Tutorial #1. To simplify our tutorial writeup, I’ll be highlighting the major steps, assuming you’re already familiar with the Project Explorer | Outline Window | Properties Window, etc.
Modify the default game.project File
To start, within the game.project file, you should make the following changes:
Create Input Bindings within the game.input_binding File
Add input bindings to this project within the game.input_binding file (found in the input folder of the Project Explorer) as follows:
Add Images to the Project
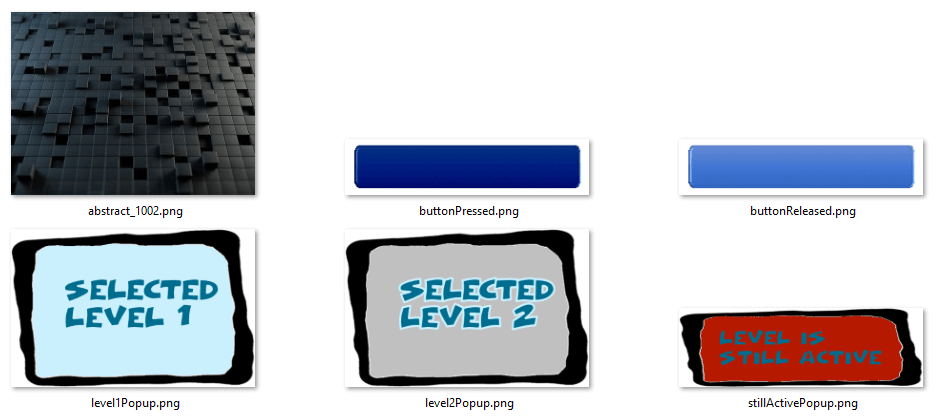
Create an Image Folder within the Main Folder – using the Project Explorer. Add the following images to the image folder.
You can download these images by pressing the download button below which will provide them within a single zipfile.
Attribution: These images are all free assets provided by the following sources: (1) background image is from www.1001freedownloads.com; (2) the buttons are from www.uichest.com; and (3) the popup border is provided by www.clipartbest.com. We thank these sites for providing these graphics.

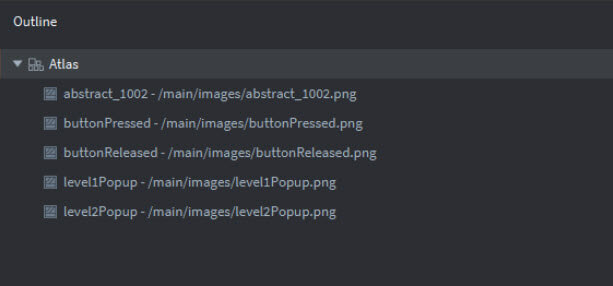
Create an Atlas
The last step in this preliminary setup is to add each of these images into a new ‘graphics.atlas’ file. Once complete, that atlas file should look similar to the following. Don’t forget to make the ‘Extrude Borders’ parameter a 1 (to prevent edge bleeding during animations, as described in Tutorial #4).
Add a Unique Font to the Project
For this project, we’ll be using a unique font as part of the Graphic User Interface. Use the following steps within the Project Explorer:
II: ADDING A BACKGROUND IMAGE
We’ll add the ‘abstract_1002.png’ file as the background for this example. Double-click ‘main.collection’ in our Project Explorer to put it into focus in the Outline Window. In the Outline Window, right-click ‘Collection’ | select ‘Add Game Object’ – rename this GameObject in the Properties Window to ‘menu_panel’.
Right-click ‘menu_panel’ in the Outlook Window | select ‘Add Component’ | select ‘sprite’. In the Property Window, select ‘graphics.atlas’ as the image resource and ‘abstract_1002′ as the Default Animation using the drop-down menu features of the Property Window.
We should also modify the Position in the Properties Window to ensure the background is centered within the Project Window: x = 256 and y=384.
III: CREATING A 'MAIN' GAME OBJECT
Create a GameObject: main.go - and a supporting script: main.script
For this example, we’ll be creating a game object within the main.collection called: ‘main’ — which will serve as the container for all the Graphic User Interface (GUI), background and popup window components. This can be accomplished by bringing ‘main.collection’ into focus within the Outline Window | right-clicking ‘Collection’ | select ‘Add Game Object’ | change the GO id to ‘main’ within the Properties Window.
Within this ‘main’ component’ we’re going to add a script (‘main.script’) which will process two distinct messages — a ‘start_level1’, or a ‘start_level2’. These messages will be initiated when a user presses a button within the GUI….and this main.script will serve as a controller which invokes functionality related to the user selection. For this tutorial, we’re just leaving a ‘stub’ for each level and simply printing to the console that we’ve initiated that level.
We’ll add this new script within the Project Explorer by right-clicking ‘main’ | select ‘New’ | select ‘script’. Replace the default Lua code with the following:
Syntax Highlights
As described within the Defold Documentation, Defold uses a message passing mechanism as the means for objects to communicate between themselves. The ‘on_message’ function is invoked if another object passes a message to it, with the following four parameters:
- [self] – A reference to the script component itself
- [message_id] – Contains the name of the message. The name is hashed.
- [message] – Contains the message data. This is a Lua table
- [sender] – Contains the full URL of the sender.
In the if/then/else logic contained within the on_message function of main.script — it processes two types of received messages: (1) “start_level1”, or (2) “start_level2”. Shortly, we’ll create the object which sends these messages (depending on which button is pressed/released) as the primary output of this project’s Graphical User Interface (GUI).
IV: BUILDING THE MAIN_MENU.GUI
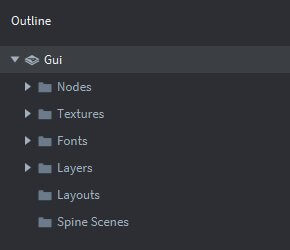
Within Defold, Graphical User Interfaces (GUI) consist of several standard components: (1) Nodes, (2) Textures, (3) Fonts, (4) Layers, (5) Layouts, and (6) Spine Scenes. For the example within this tutorial, we’ll be using GUI nodes to represent the menu buttons, as well as a popup notice and a text message indicating the current level. Additionally, we’ll be including a unique font to the project; using our graphics.atlas file as the basis for the GUI texture; and incorporating Defold’s Layers to control rendering of the GUI nodes.
The following sequence walks through the steps needed to create this GUI.
Create a Graphic User Interface File – main_menu.gui
In order to invoke Defold’s GUI features, the project will need to have a .gui file — therefore, the first step will be to create the GUI object — this is done as follows:
Add the new Font to the GUI
As mentioned earlier, we would like to add a new font to this main_menu.gui. This is accomplished by having ‘main_menu.gui’ in focus in the Outline Window:
Add Layers to the GUI
Defold normally draws the GUI node components in the order that they are listed within the Node folder shown in the Outline Window. This can be overridden by using a set of layers…and assigning nodes to layers. Layers are rendered in the order they’re listed within the Layer folder shown in the Outline Window.
For this project, we’ll use two layers: (1) background and (2) menu….rendering background components first, followed by menu components second – aka, the menu components will be displayed on top of the background (as you would expect).
Layers are added to the Gui by: right-clicking ‘Layers’ | select ‘Add’ | select ‘Layer’. Name the layer within the the popup window — this initial layer will be ‘background’.
Repeat this process to add a layer named: ‘menu’. Please note that the layer rendering order is the order in which you add these layers within the Outline Window.
Designate Graphics.atlas as the GUI Texture
We’ll need to reference our graphics.atlas file within this Defold GUI, which is done within the Outline Window (main_menu.gui in focus) by: right-clicking ‘Textures’ within the main_menu.gui folder | select ‘Add’ | select ‘Textures’ | select the ‘graphics.atlas’ file from the popup list and press ‘OK’.
Add Two Box Nodes to the GUI
GUI Nodes are the basic building blocks for constructing your interface — allowing the addition of box (rectangular) nodes, text nodes, pie nodes, templates and spines. To keep it simple for this initial introduction to Defold GUI features, we’ll focus on box nodes for our menu. With ‘main_menu.gui’ in focus within the Outline Window — right-click ‘Nodes’ | select ‘Add’ | select ‘Box’. Change the Id, Position, Texture and Layer properties of this box node to match the following:
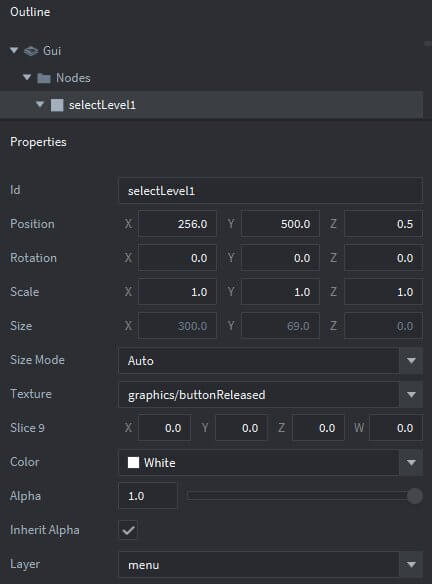
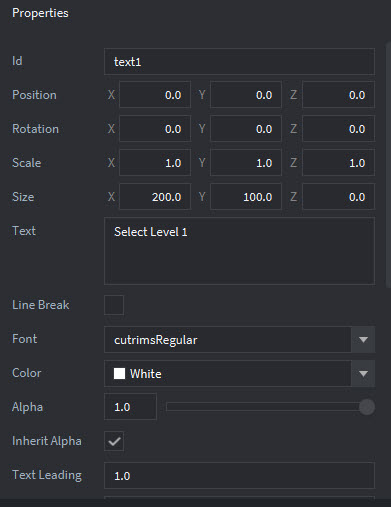
At this point, we’ll add the label for the button by: right-clicking ‘selectLevel1’ within the Outline Window | select ‘Add’ | select ‘Text’. We’ll change several key parameters (Text & Font) within the Property Window as shown below:
Similarly, we’ll add a ‘selectLevel2’ box node to the main_menu.gui — in summary — with ‘main_menu.gui’ in focus within the Outline Window:
Add Two Popups to the GUI
Popup Windows are a frequent component of all games — and this can be easily accomplished within Defold by creating a box node within the GUI; initializing the alpha to zero, making it totally transparent, and changing the alpha parameter to 1 dynamically within your script files whenever you want the popup to appear. For this example, we’re going to have two popup windows: (1) a notice when level1 has been selected, and (2) another notice when level2 has been selected.
With ‘main_menu.gui’ in focus within the Outline Window:
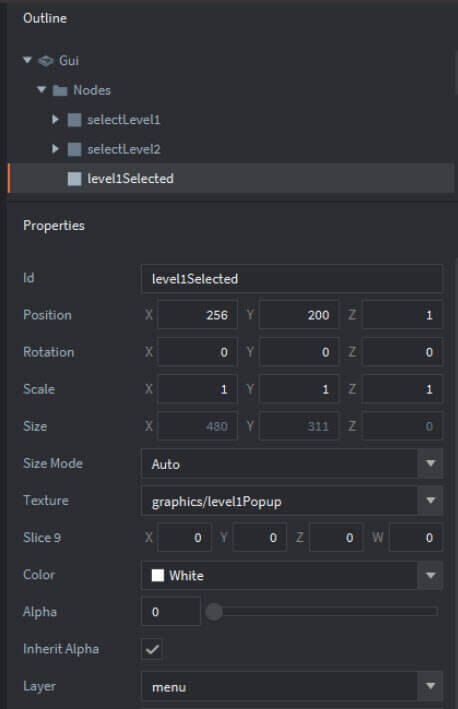
To summarize, you’ve just created a box node, placed it at a location on the screen, identified a .png image from the graphics.atlas to it and set it to fully transparent.
The same process applies to creating a box node named ‘level2Selected’:
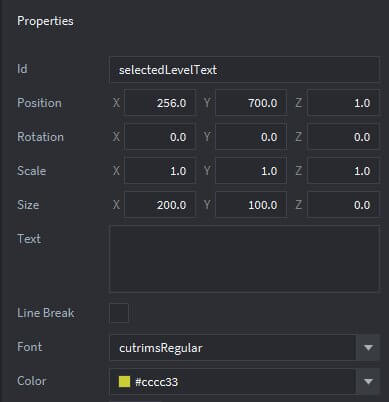
Add a Text Node to the GUI
I thought it would be useful to add a consistent User Notice at the top of the screen which advises the player regarding which level is currently active. This can be done by adding a ‘Text’ Node to main_menu.gui:
V: ADD THE GUI TO MAIN.COLLECTION
At this point, we have added all the necessary components to the ‘main_menu.gui’ file — and it is now ready to be added to the main.collection/main.
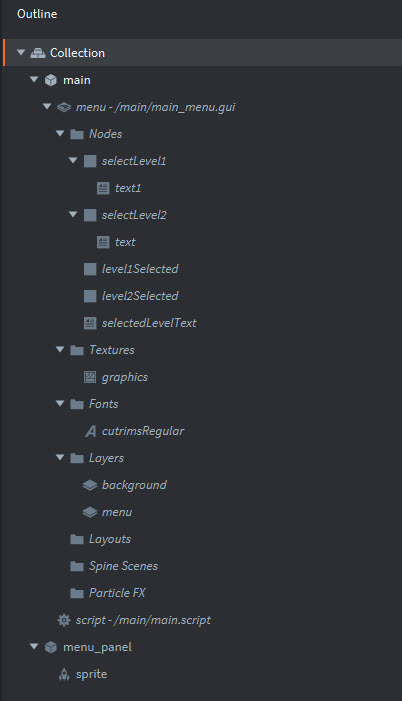
With ‘main.collection’ in focus within the Outline Window: right-click the ‘main’ game object | select ‘Add Component File’ | select ‘main_menu.gui’ from the popup list. Once you’ve done that – the components of main.collection should look like the following within your Outline Window:
VI: ANIMATE THE GUI NODES
Okay – so now comes some of the ‘bling’ that adds excitement to any game application. Closely following the structure outlined within Defold Documentation for Main Menu — we’re going to add some animation as the two menu buttons are initially displayed to the screen — animating both the color and scale of their respective textures. This will be accomplished by using a ‘cascade’ of functions: animateButton, which upon completion calls animateButton2, which upon completion calls animateButton3 which upon completion calls animateButton4.
Create a Lua Script File — main_menu.gui_script
Add a new Gui Script to the ‘main’ folder within the Project Explorer — name it: ‘main_menu.gui_script’. Replace the default code with the following:
Syntax Explanation – Button Animation Functions
The Button Animation Functions provide a cascading sequence of Defold animations – using the gui.animate feature as described within the Defold Documentation.
- [node] – the id of the GUI node to be animated
- [property] – the property to be animated; within a GUI, the following properties can be animated: gui.PROP_POSITION, gui.PROP_ROTATION, gui.PROP_SCALE, gui.PROP_COLOR, gui.PROP_OUTLINE, gui.PROP_SHADOW, gui.PROP_SIZE, gui.PROP_FILL_ANGLE, gui.PROP_INNER_RADIUS, and gui.PROP_SLICE9
- [to] – a Vector3 (or Vector4) target property value
- [easing] – the nature of Easing to be used during the animation
- [duration] – duration of the animation, in seconds
- [delay] – delay before the animation starts, in seconds
- [complete_function] – the function to be called when the animation has completed
- [playback] – playback mode — valid playback modes for a Graphic User Interface are: gui.PLAYBACK_ONCE_FORWARD, gui.PLAYBACK_ONCE_BACKWARD, gui.PLAYBACK_ONCE_PINGPONG, gui.PLAYBACK_LOOP_FORWARD, gui.PLAYBACK_LOOP_BACKWARD, gui.PLAYBACK_LOOP_PINGPONG
Syntax Explanation – Main Functions
- [node] – node to be tested
- [x] – x-coordinate
- [y] – y-coordinate
- [id] – id of the node to be retrieved
Add main_menu.gui_script to the GUI
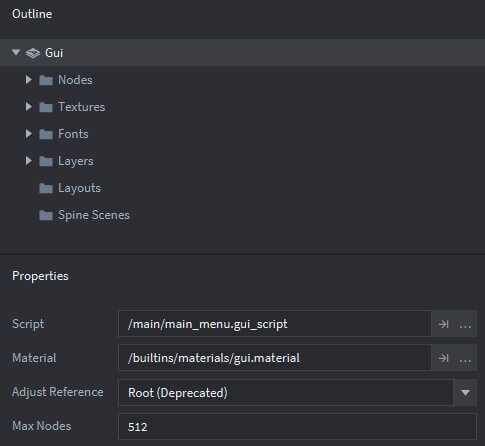
With the main_menu.gui in focus within the Outline Window — change the Script property to point to the main_menu.gui_script that we just built — as shown below:.
VI: TUTORIAL WRAP-UP
Our 7th tutorial is now complete — and I have included the full project within a zipfile which can be downloaded by pressing the following button. Please let me know if you find these tutorials helpful — any feedback via comments would be greatly appreciated.
All the best - Dave