
Objectives for this Tutorial
Within this 4th Defold Tutorial, I’d like to work through several alternative means for moving a Game Object around the play area, to include:
- Use of the keyboard’s left/right/up/down arrow keys to initiate Game Object movement;
- Enabling a user to click (or touch) a location on the screen and have the Game Object move to that location; and
- Have a pre-planned path defined within the game area which the Game Object follows during its movement.
When complete, the project developed during this tutorial will look similar to the following. You’ll be able to move the Wizard up/down/left/right using the keyboard arrow keys. He’s constrained to the bottom portion of the game screen, and his present location is highlighted within a text field on the lower right side of the screen. The Monkey can be moved by clicking (or touching) the cursor anywhere on the screen. Using the go.animate() feature of Defold, the Monkey sprite will move to that new location — with the current position (x/y) shown in the lower right text field. Lastly, a six leg path has been drawn on the playing screen, and the Orkkey sprite travels along this path at a constant speed.
NEW - YouTube Version of this Tutorial is now Available
There is now a video version of this Tutorial on techniques for moving Game Objects available on YouTube - please take a look and let me know if you find it helpful. Please note, there may some minor differences between the video vs written tutorials, but the techniques are consistent.
Click this Thumbnail Icon to see the final product of this tutorial
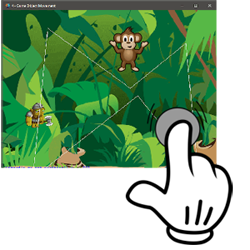
Once the app is opened, click on the App screen to move the monkey and/or press arrow keys to move the wizard.
With these game features in mind, let’s go step-by-step on how to develop these capabilities using the Defold 2D Game Engine.
I: INITIAL PROJECT SETUP
Modify game.project Parameters
Starting with the Defold Initial Template which was developed in Tutorial #1, there are several quick modifications that we’ll apply as a starting point to this Game Object control and movement post. By double-clicking on the ‘game.project’ file within the Project Explorer, we’ll change several attributes, to include, the Project Title and the display size in pixels (it’s set to 1024 px wide and 768 px high). These changes are reflected below:

Create Input Bindings for Left Mouse Button / Left-Right-Up-Down Arrows
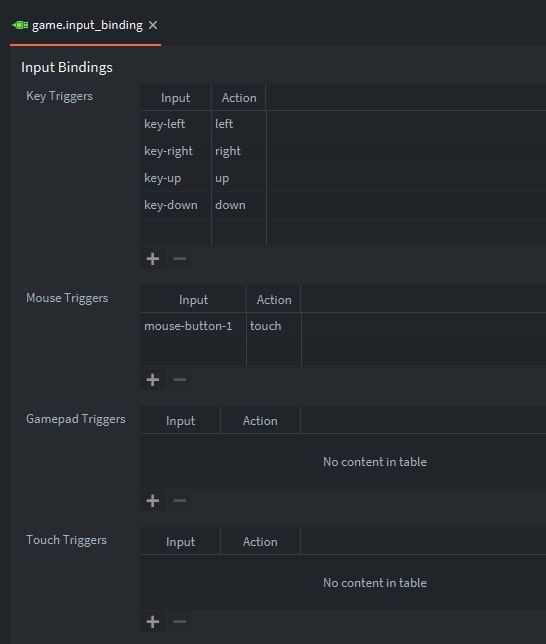
A second step in this preliminary setup is establishing the bindings for several Input Bindings that’ll be used in the project, to include the right/left/up/down arrows, and mouse-clicks. Within the input folder in the Project Explorer is a ‘game.input_binding file – double-click it to bring it into focus in the editor. Within the ‘Key Triggers’ section, press the ‘+’ button. This will place a default key trigger (‘key-space’) in the Input column. Double-Clicking ‘key-space’ will display a pull-down menu of available key triggers — select ‘key-up’. Next, click the column to the right (under the heading ‘Action’) and type in ‘up’. This now binds the up-arrow on the keyboard to the ‘up’ action within script files that we’ll be including within our project.
With that completed, now add bindings for the down/right/left keys. Also add a binding within the Mouse Triggers for the ‘mouse-button-1’ – binding it to a ‘touch’ action. Once complete, the game.input_binding file should look like the following:
If you haven’t already, save all elements of the project via CNTL-S (or the ‘Save All’ entry under the ‘File’ Menu Item — “saving often” is always a good practice 🙂
II: BUILDING THE PROJECT ATLAS
Upload Image (.png/.jpg) files to the Project
There are four primary graphic categories in this project: (1) a background which covers the entire game window, (2) two flip-book animations for the wizard – one when idle, another when he’s walking, (3) a flip-book animation for a Monkey, and (4) a flip-book animation for an Orkkey figure. The images which contribute to those graphics are displayed below.
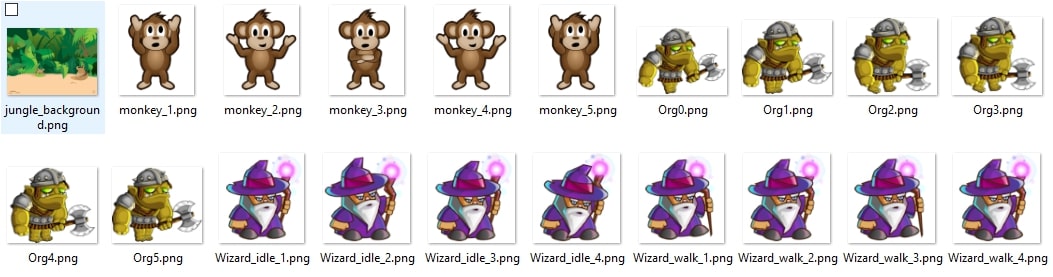
Additionally, you can download these images by pressing the download button below which will provide them within a single zipfile.
Attribution: These images are all free assets provided by the following sources: (1) background image is from www.clipartkid.com; (2) the Wizard and Ork are provided by www.craftpix.net; and (3) the Monkey is provided by www.gameartguppy.com.

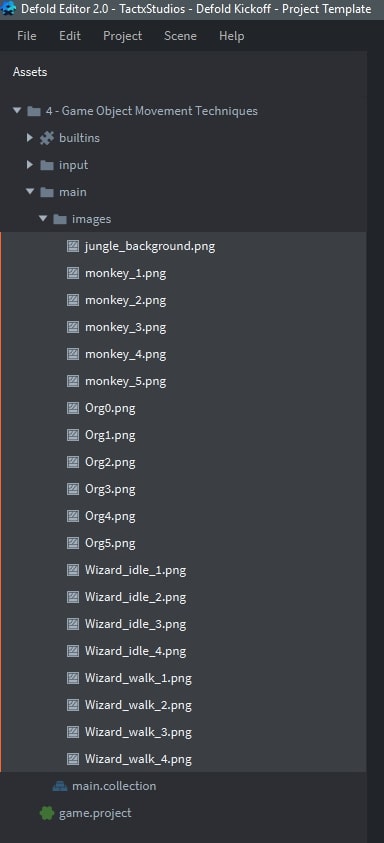
Once you’d downloaded this image zipfile, open it up and drag/drop them into the image folder within the Project Explorer as illustrated below:
Construct an Atlas - Standalone Images
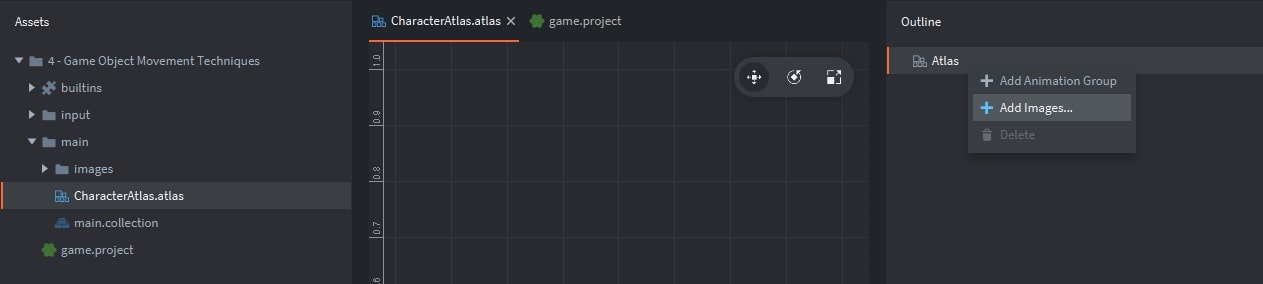
Next, we need to construct an Atlas which contains each of these images. To do that, first right-click the ‘main’ folder shown on the Project Explorer: select ‘New’ | select ‘Atlas | name the Atlas as ‘CharacterAtlas’. Now double-click this newly created Atlas in order to put it into focus within the Outline Window. Right-Click ‘Atlas’ in the Outline Window | select ‘Add Images’ — as highlighted below.
When adding images to a Defold Atlas, there are two general categories to keep in mind: (1) standalone images, similar to our background, and (2) images that are part of an animation.
Our first step in creating this project’s Atlas will be adding the jungle_background.png file. With the Atlas in focus within the Outline Window, right-click ‘Atlas’ | select ‘Add Images” | select ‘jungle_background.png’ from the image list.
Add an Animation Group to the Atlas
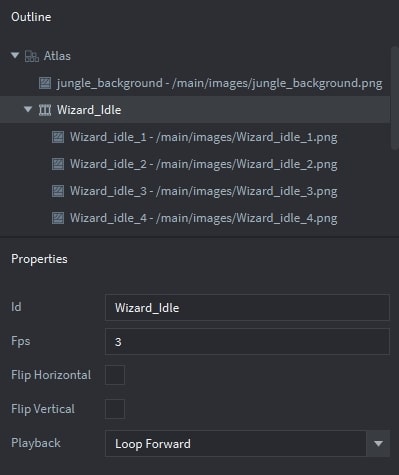
After the background image has been added to the CharacterAtlas.atlas — we’ll want to create several animations for use in our project. Our first step will be to create two animations for the Wizard character: (1) for when it is idle, and (2) when it is walking. With focus on the Atlas within the Outline Window, right-click ‘Atlas’ | Add ‘Animation Group’. A ‘New Animation’ will appear at the bottom of the Atlas outline; you can change the name of it in the Properties Window just below it (I’ve changed it to ‘Wizard_Idle’). I’ve also changed the Frames-Per-Second rate for this animation to 3 — given the number of frames we’ll be adding to this Group.
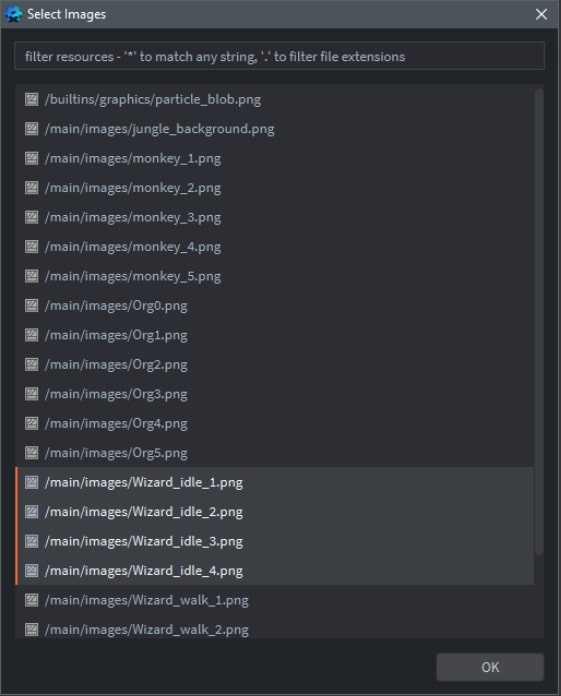
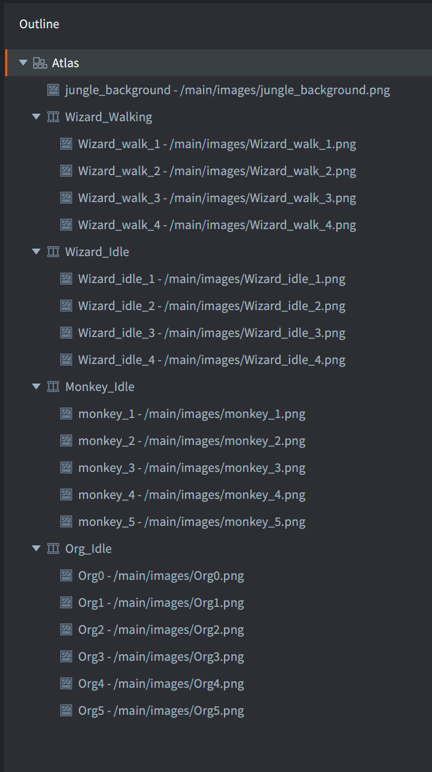
You can now add images to this Animation Group by: right-clicking ‘Wizard_Idle’ | select ‘Add Images’ | identify the four frames related to this activity as shown below:
At this point, the Atlas should look similar to the following:
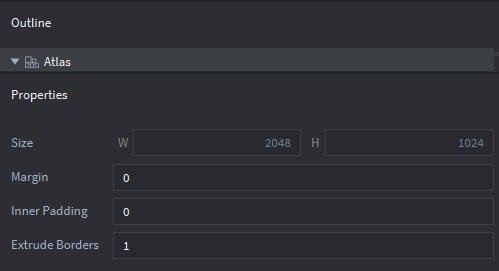
Use Extrude Borders Property to Prevent Image Bleeding
In building this project, I noticed that the Wizard Sprite had a blackline showing on the edge of the animation, even though there was no black line on the image. This is due to a visual artifact called “edge bleeding” — where the edge pixels of neighboring pixels in the Atlas bleed into the image. The solution is very simple, set the Extrude Borders value to 1 in the Atlas Properties Window as highlighted below.
Now we are ready to create each of the Animation Groups needed within the Project using a similar methodology as described above. Once complete, the Atlas should look like the following:
III: ADDING A BACKGROUND GO
Adding a Background Image to the Game
An easy next step will be adding the background image to the project. Double-click ‘main.collection’ in our Project Explorer to put it into focus in the Outline Window. In the Outline Window, right-click ‘Collection’ | select ‘Add Game Object’. In the Properties Window, rename the Game Object as ‘Background’. Finally, right-click ‘Background’ | select ‘Add Component’ | select ‘Sprite’. Once this sprite has been added as a Component to the Background Game Object, within the Properties Window ‘Image’ bar, select ‘CharacterAtlas’ as the image resource and ‘jungle_background’ as the Default Animation using the drop-down menu features of the Property Window.
We’ll modify the Position in the Properties Window to ensure the background is centered within the Project Window: x = 512 and y=384.IV: KEYBOARD BASED MOVEMENT
Add a new Game Object to the Project
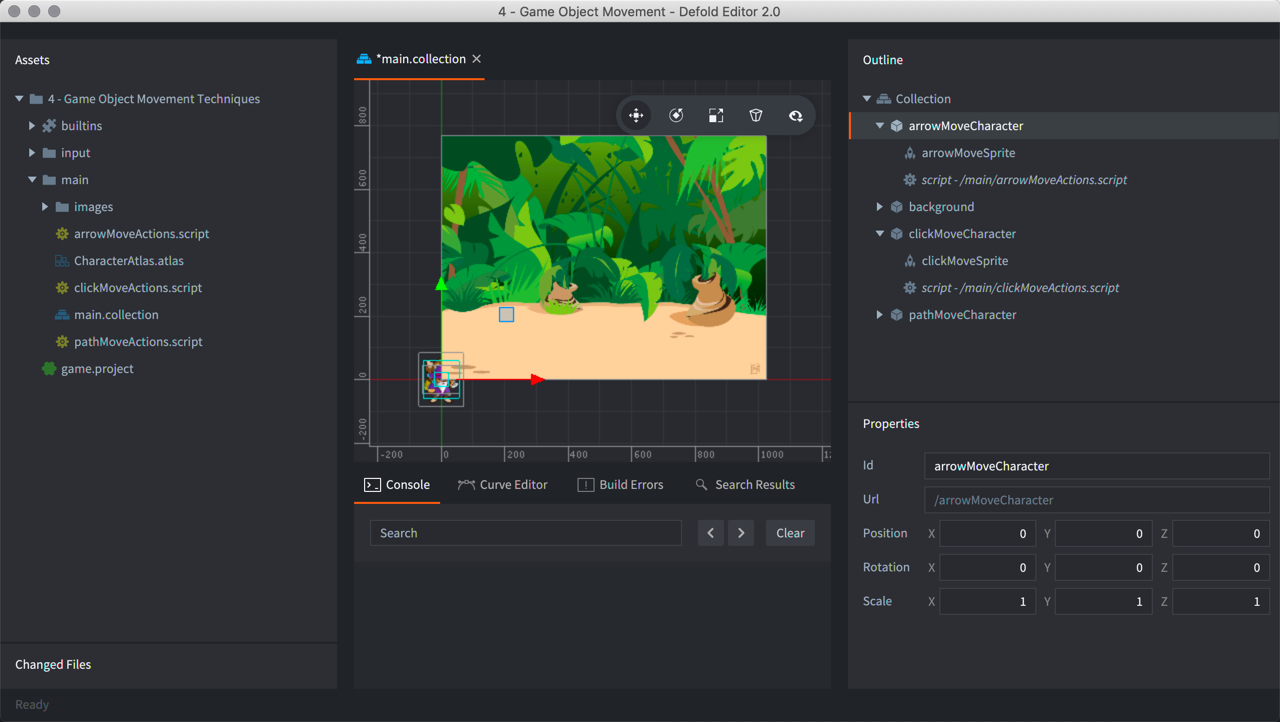
With ‘main.collection’ in focus within the Outline Window, add a new Game Object to the project: right-click ‘Collection’ | select ‘Add Game Object’. Within the the Properties Window, name this GO as ‘arrowMoveCharacter’.
Add a Sprite to this Game Object by right-clicking ‘arrowMoveCharacter’ | select ‘Add Component’ | select ‘Sprite’. Within the Properties window for this new sprite, first change the id of this sprite to arrowMoveSprite. Then identify the Image Resource ‘CharacterAtlas.atlas’…and select the Default Animation to be: ‘Wizard_Idle’
Add a Lua Script to the Game Object - arrowMoveActions.script
At this point, we’re ready to add a Lua Script file to this Wizard Game Object. Within the Project Explorer, right-click ‘main’ | select ‘New’ | select ‘Script’; I’ve changed the name of this script to: ‘arrowMoveActions’. I’ve replaced the default script content with the following.
Syntax Highlights
- As described within the Defold Manual, all ids within the engine are represented as hashes, therefore, a string needs to be hashed before it can be compared with an id.
- The user created function play_animation provides an important feature. It ensures that an animation is only changed when it is different than the animation currently being executed.
The user created function play_animation provides an important feature. It ensures that an animation is only changed when it is different than the animation currently being executed.
- [receiver] - The receiver must be a string in URL-format, a URL object, a hashed string or a nil. Several shorthands are available: (a) “.” is the current Game Object; (b) “#” is the current component; (c) nil the current component
- [message_id] - The id must be a string or a hashed string
- [message] - This is a Lua table with message parameters to send
This function sets horizontal flipping to the provided sprite’s animation — the sprite being identified by its URL.
- [url] - The sprite that should flip its animation.
- [flip] - boolean: ‘true’ if the sprite should flip its animations; ‘false’ if not
Once this Script file has been created (within the Project Explorer), we are now ready to add it to the Wizard Character — aka, to the ‘arrowMoveCharacter’. To do this, with ‘main.collection’ in focus within the Outline Window, right-click ‘arrowMoveCharacter’ | select ‘Add Component File’ | select ‘arrowMoveActions.script’. Press ‘OK’.
V: A CURSOR DRIVEN GAME OBJECT
Add a Game Object to the Project
The Monkey Game Object will move using a point & click approach. As a user, you can click (or touch) anywhere on the game world — and the monkey will move to that new location. This will be accomplished by invoking an animation directly from the script for this Game Object. With the ‘main.collection’ in focus within the Outline Window, this cursor driven Game Object can be created by: right-clicking ‘Collection’ | selecting ‘Add Game Object’. After it is added, within the Properties Window, change the id to ‘clickMoveCharacter’.
The next step will be adding a Sprite as a component to this Game Object as follows: right-click ‘clickMoveCharacter’ in the Outline Window | select ‘Add Component’ | select ‘Sprite’. Once this sprite component has been added, within the Properties Window, change the id to ‘clickMoveSprite’ and select the CharacterAtlas as the Image resource and ‘MonkeyMoves’ as the Default Animation. The Outline Window & Properties Window should look similar to the following:
Add a Lua Script to the GO - clickMoveActions.script
Syntax Highlights
As described within Defold Documentation, this function animates any of the game object (or component) numeric properties.
- [url] - string | hash | url url of the game object or component having the property
- [property] - string | hash id of the property to animate
- [playback] - constant playback mode of the animation: go.PLAYBACK_ONCE_FORWARD | go.PLAYBACK_ONCE_BACKWARD | go.PLAYBACK_ONCE_PINGPONG | go.PLAYBACK_LOOP_FORWARD | go.PLAYBACK_LOOP_BACKWARD | go.PLAYBACK_LOOP_PINGPONG
- [to] - number | vector3 | vector4 | quaternion target property value [easing] - constant | vector easing to use during animation. Either specify a constant, see the animation guide for a complete list, or a vmath.vector with a curve
- [duration] - number duration of the animation in seconds
- [delay] - number delay before the animation starts in seconds
- [complete function] - function(self, url, property) optional function to call when the animation has completed: self – the current object | url – the game object or component instance for which the property is animated | property – the id of the animated property.
Once this Script file has been created (within the Project Explorer), we are now ready to add it to the Monkey Character — aka, to the ‘clickMoveCharacter’. To do this, with ‘main.collection’ in focus within the Outline Window, right-click ‘clickMoveCharacter’ | select ‘Add Component File’ | select ‘clickMoveActions.script’. Press ‘OK’.
VI: PRE-DEFINED PATH MOVEMENT
Add a Game Object to the Project
The final Game Object to be added to this project is an ‘Org’ character — which moves on a pre-defined path.
With the ‘main.collection’ in focus within the Outline Window, this cursor driven Game Object can be created by: right-clicking ‘Collection’ | selecting ‘Add Game Object’. After it is added, within the Properties Window, change the id to ‘pathMoveCharacter’. The next step will be adding a Sprite as a component to this Game Object as follows: right-click ‘pathMoveCharacter’ in the Outline Window | select ‘Add Component’ | select ‘Sprite’. Once this sprite component has been added, within the Properties Window, change the id to ‘pathMoveSprite’ and select the CharacterAtlas as the Image resource and ‘Org_Idle’ as the Default Animation. The Outline Window & Properties Window should look similar to the following:
Add a Lua Script to the Game Object - pathMoveActions.script
We’ll need to add a Script Component File to this Game Object in order to both establish the path and to control the Game Object’s movement along the path….naming it: pathMoveActions. Add the following script within the Project Explorer and then add the script to the ‘pathMoveCharacter’ Game Object.
Syntax Highlights
There are a few important elements within the syntax that merit additional explanation, these explanations are extracted from Defold Manual/Message Passing documentation.
- start_point — a vector3 which designates the position for starting the line
- end_point — a vector3 which designates the position for the end of the line
- color — a vector4 which provides the color of the line
VII: THE FINAL OUTCOME
This completes the project for this fourth tutorial, illustrating several key Defold features, to include: (1) establishing a path and having a Game Object follow the path, (2) setting up controls which enable keyboard bindings to manage Game Object movement, and (3) several techniques associated with animation and sprite flipping. The full project is provided within a zipfile which can be downloaded using the following button.
VIII: TUTORIAL WRAP-UP
I hope you found this tutorial to be useful. If you have any questions on this tutorial -- drop me a note in the comment box below. I'll get right back to you. I look forward to your feedback.
All the best - Dave