
Project Summary
Well -- now that we have the basic splashscreen and level selection GUIs built - it's time for crafting some game specific functionality. This Tower Defense Build II project adds some unique game functionality to the foundation established within Build I -- focusing primarily on enemy unit movement. Additionally, I've included the addition of unique mapsheets for Levels 2 and 3.
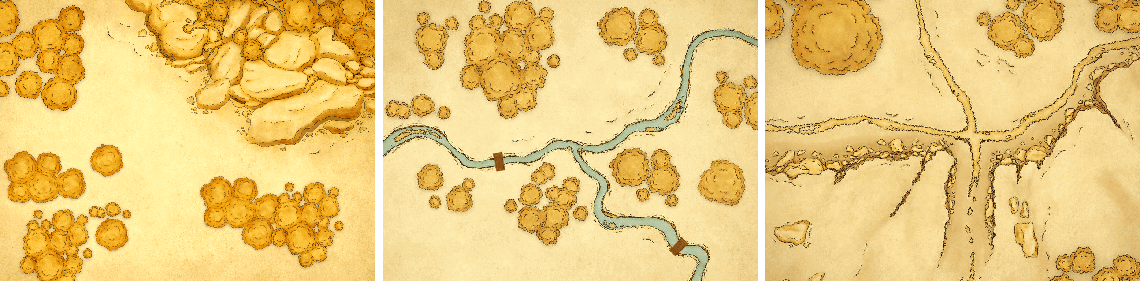
Here's a snapshot of the three mapsheets that'll be used in the game and which have been incorporated within this Build II project. Within each game level, there will be enemy strikes coming along three distinct paths, heading toward a designated enemy objective.
I: Build II - OVERVIEW
BUILD II GAME FEATURES
The following table provides a summary of the new game features that have been incorporated into this second build of the Tower Defense project. The details related to how each are developed will be provided within the next section of this tutorial.
- LEVEL SELECTION MENU: – Within the Level Selection Menu, players are locked out of a level until the preceding level has been successfully completed; and
- MULTIPLE MAPSHEETS: – Unique mapsheets have been developed for each of the three game levels.
- STRIKE PATHS: – This Build II establishes a set of 'Strike Paths' for enemy tank game objects to follow as they approach the enemy objective. Within each path, specific game positions are defined for enemy unit starting locations and vertices along alternative strike paths; A set of alternative Strike Paths are defined based on parametric Waypoints;
- ENEMY OBJECTIVE: – An objective game object and position is defined - this is the destination for oncoming enemy strikes;
- TANK COLLECTIONS: – Tank Collections are created as the basis for three distinct enemy unit types;
- SPAWNED ENEMY TANK GAME OBJECTS: – A spawning procedure for generating enemy units on a given strike path as well as a means for deleting spawned objects;
- SPAWNED ENEMY BULLET GAME OBJECTS: – This build includes the spawning of bullet Game Objects which (for this build) are directed at the final enemy Objective. They are oriented to point to the objective and travel a trajectory to that objective;
- ANIMATED HIGHLIGHTS: – An animated graphic highlight has been added to emphasize when an enemy unit reaches the players objective;
BUILD II DEMONSTRATION
This build processes oncoming enemy units, moving them along a pre-defined path toward a final objective point and having each enemy unit fire bullets upon the final objective location. No player (friendly) units have been introduced at this point in the build cycle. My sense is that this is probably the most aggressive tutorial application within this series to date = so I'm writing this tutorial to describe the development process 'one step at a time'.
Here's what the final Build II result of Tower Defense looks like:
Go ahead -- click the following thumbnail. Please note that for this build, I've set a control variable that bypasses the opening splashscreens. That way, you can get to the gameplay more quickly. We'll reset it so that the full opening splashscreen sequence is included for our final build.
BUILD II PROJECT FILES
Go ahead and download the full project for Build II within a zipfile by clicking the following button. Once extracted to a folder on your desktop, you'll be able to open it up in the Defold Editor and follow along as we walk through the design specifics.

II: Build II - design techniques
Within this section, we'll walk through some of the Defold Techniques that have been used in this build. I've included a set of robust comments throughout the script files included in the Project Folder which you downloaded earlier - they explain most of the logic within the game. That said, there are a few topics where I thought I'd provide a little extra explanation. The following table summarizes these 'Special Interest Topics' and provides a hotlink to get to the explanation of each.
Several Design Techniques used in tower Defense - build ii
| Game Control Techniques | Collection/GameObject Techniques | Defold Design Elements |
|---|---|---|
| GamePlay Sequencing | tankCollection / collectionFactory | Constant Speed Movement |
| Level Selection Bars | Collision Response | Randomization Techniques |
| Game Parameters | spawnedObjects Table | Debugging Techniques |
| Script Properties for GUI Nodes | Game Object Rotation |
GamePlay Sequencing
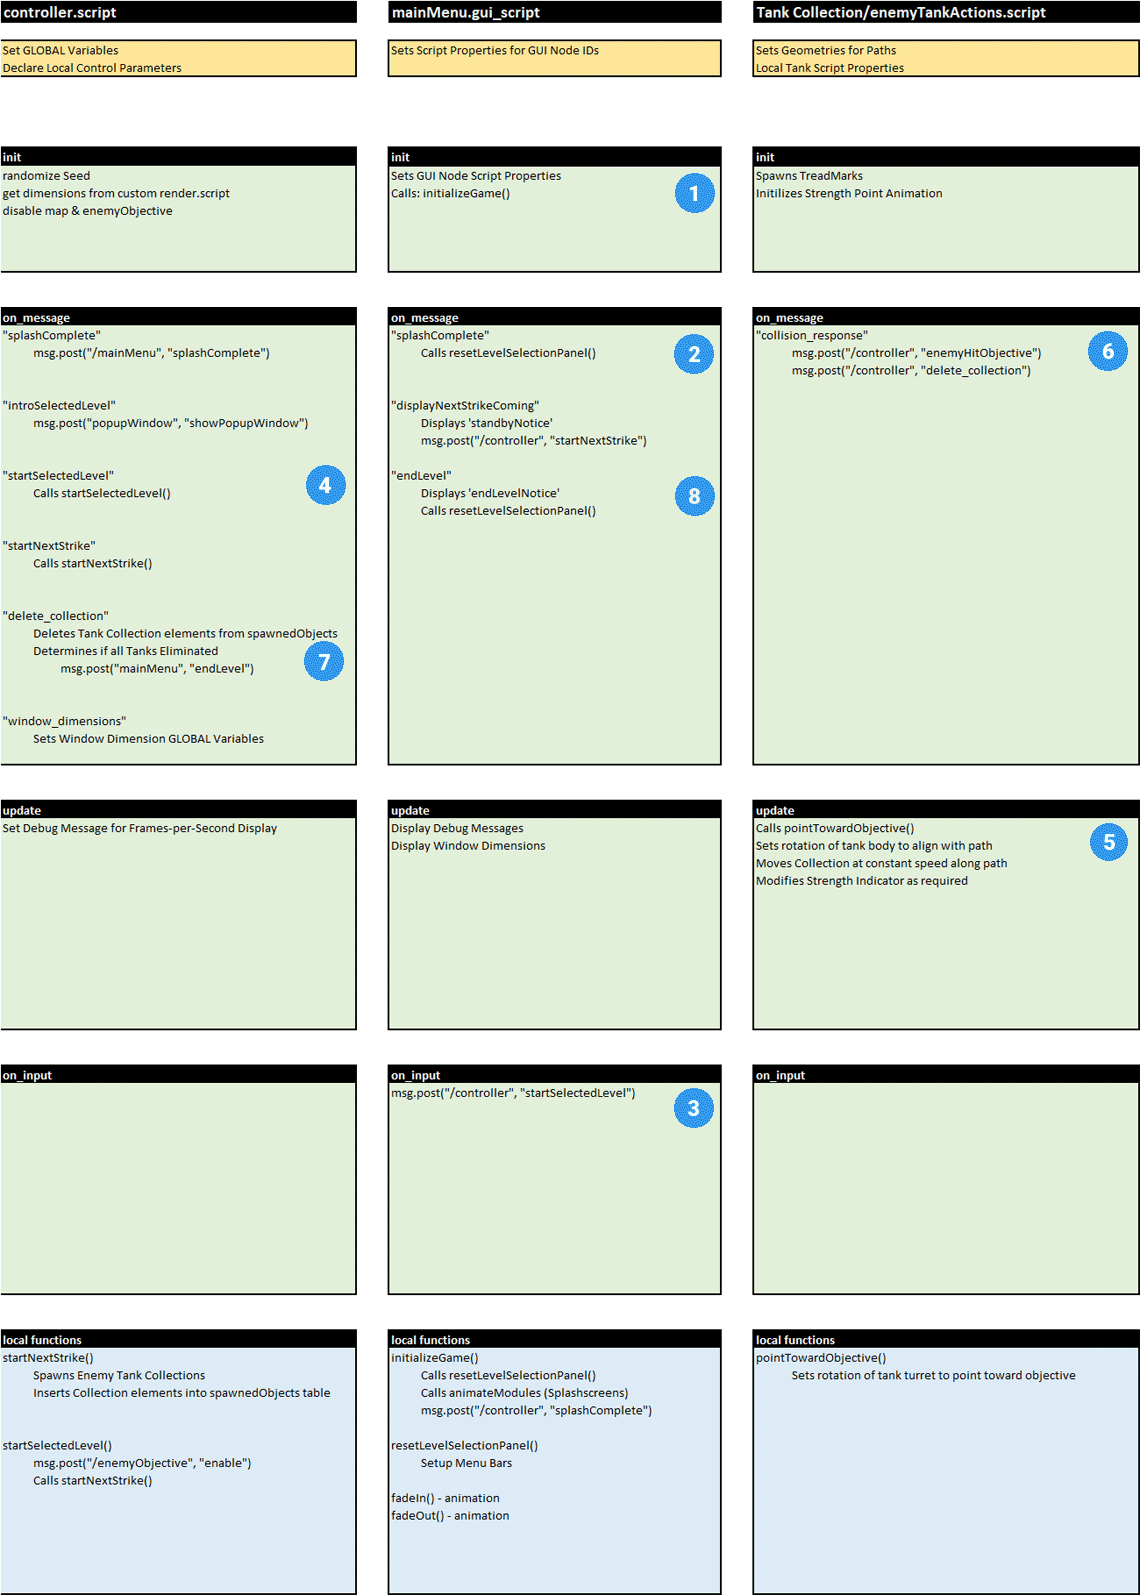
I'm providing a Game Sequencing Diagram for this tutorial. I'm hoping it helps the reader understand the general logic flow within the game, which is principally between the controller.script, the mainMenu.gui_script and the tankActions.script (which is a component file within each spawned Tank Collection.
For these three components, the following diagram depicts key functions and message exchange. In it's most summary form, game flow follows this general theme:
- The mainMenu GUI starts the game within init by calling the function initializeGame, which initiates the opening SplashScreens.
- Upon completion of the SplashScreens, resetLevelSelection Panel is called which sets up the Level Selection Menu.
- Upon a player clicking (on_input) a Level Selection Bar, mainMenu sends a msg to the controller to start the selected level.
- The controller calls the local function startSelectedLevel which enables game play to begin, which then calls the startNextStrike function. startNextStrike begins the spawning of enemy tank collections, which move along waypoint designated paths toward the objective.
- The update function within enemyTankActions.script moves the tank along a predefined path and rotates both the tank body and tank turret child game objects.
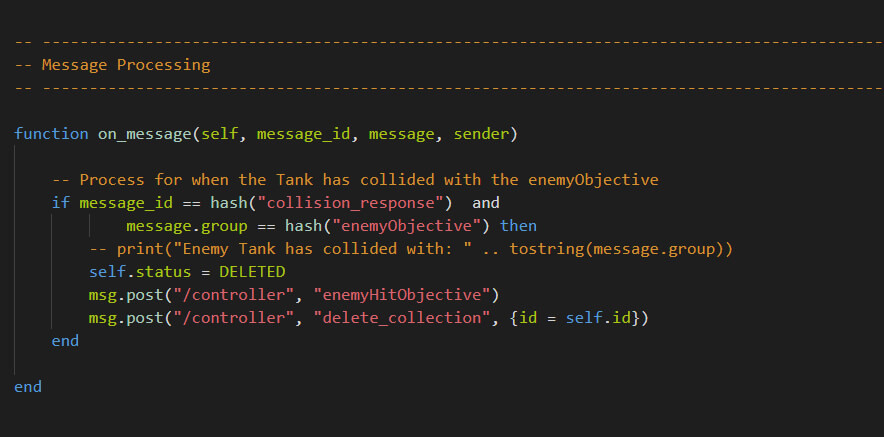
- When an enemy tank receives a collision_response from the enemyObjective, it sends an advisory msg to the controller.
- When the controller receives a msg that an enemy tank collection has arrived at its objective, it deletes all elements of the collection from the spawnedObjects table. It also checks to see if there are still active tanks within play. If all tanks have been deleted, the controller sends a msg to the mainMenu to end the level.
- Upon receipt of an 'endLevel' msg from the controller, the mainMenu displays an 'endLevel' notice on the screen and then resets the Level Selection Menu (unlocking the next available level).
You can follow this logic flow on the following Game Sequencing Diagram.
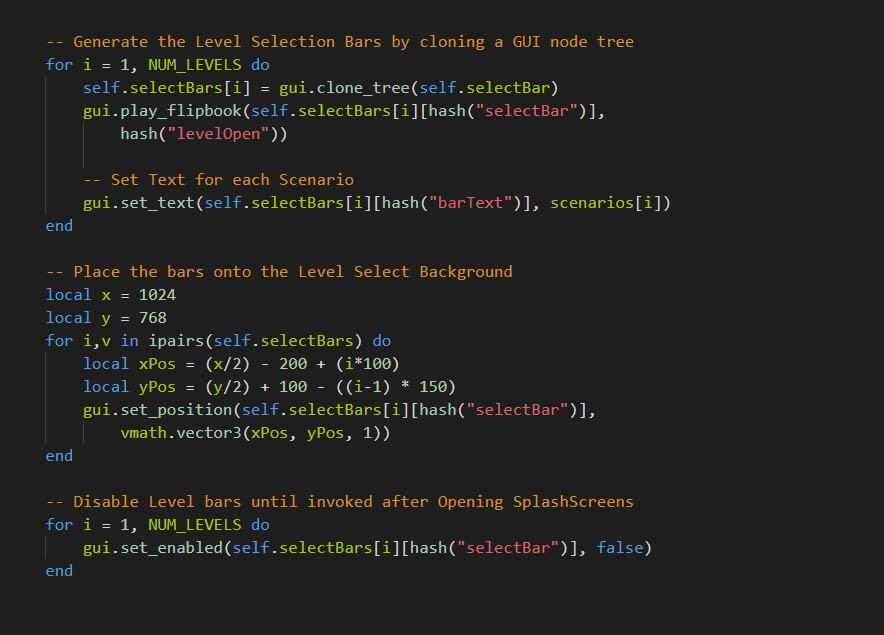
Level Selection Bars
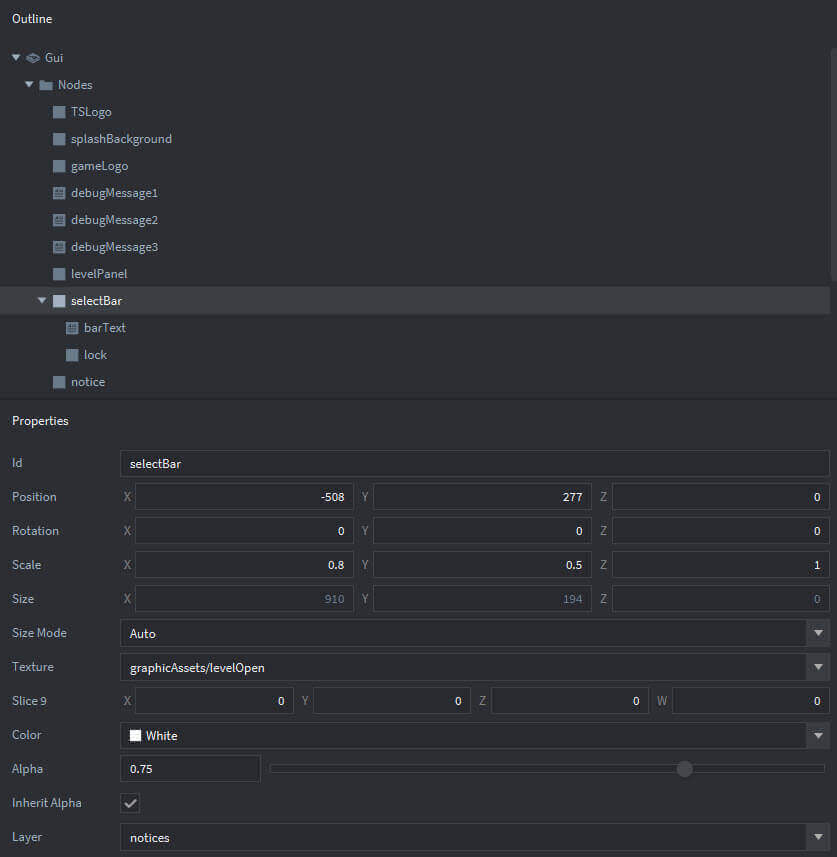
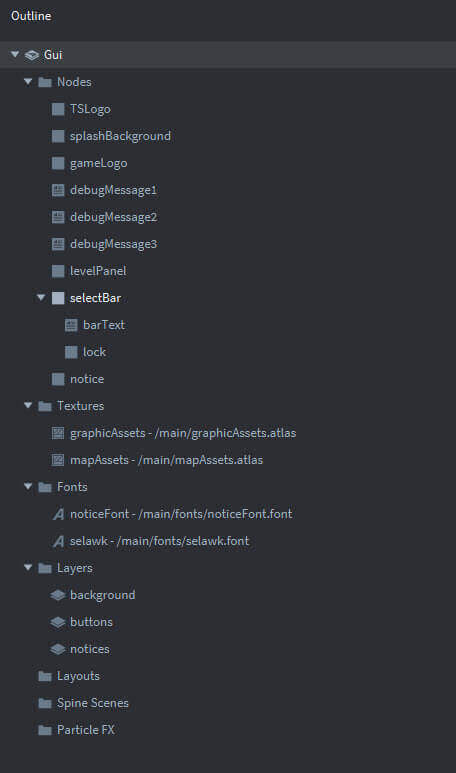
For the menu in this game, a GUI node consisting of multiple components was created within mainMenu.gui. These GUI nodes and their components are illustrated in the mainMenu.gui outline shown below, with properties shown for the selectBar node:
In order to clone both the node and the child components of that GUI node, Build II uses the gui.clone_tree function as seen in the following script extract. Within this extract, you can also see how the application sets text within each Selection Bar to the title of scenario; uses the gui.play_flipbook to initialize the camouflage background to levelOpen (aka, the bar is not being pressed); and places the cloned selection bar onto the GUI.
Game Parameters
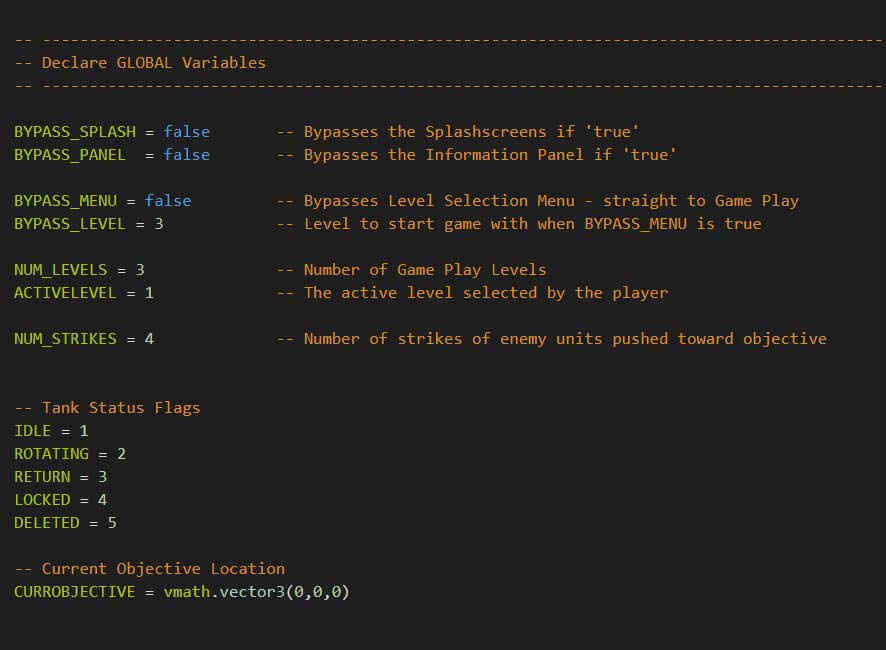
I've confined the declaration of GLOBAL variables to the controller.script and have attempted to constrain them to a minimum number. There are three categories of game parameters declared: (a) bypass flags which enable the developer to bypass certain features (e.g., the opening splashscreens, or the information panel) to facilitate program pinpointing, (b) game characteristics related to the number of levels within the game and the number of enemy strikes within each level, and finally, and (c) status constants for the tank game objects.
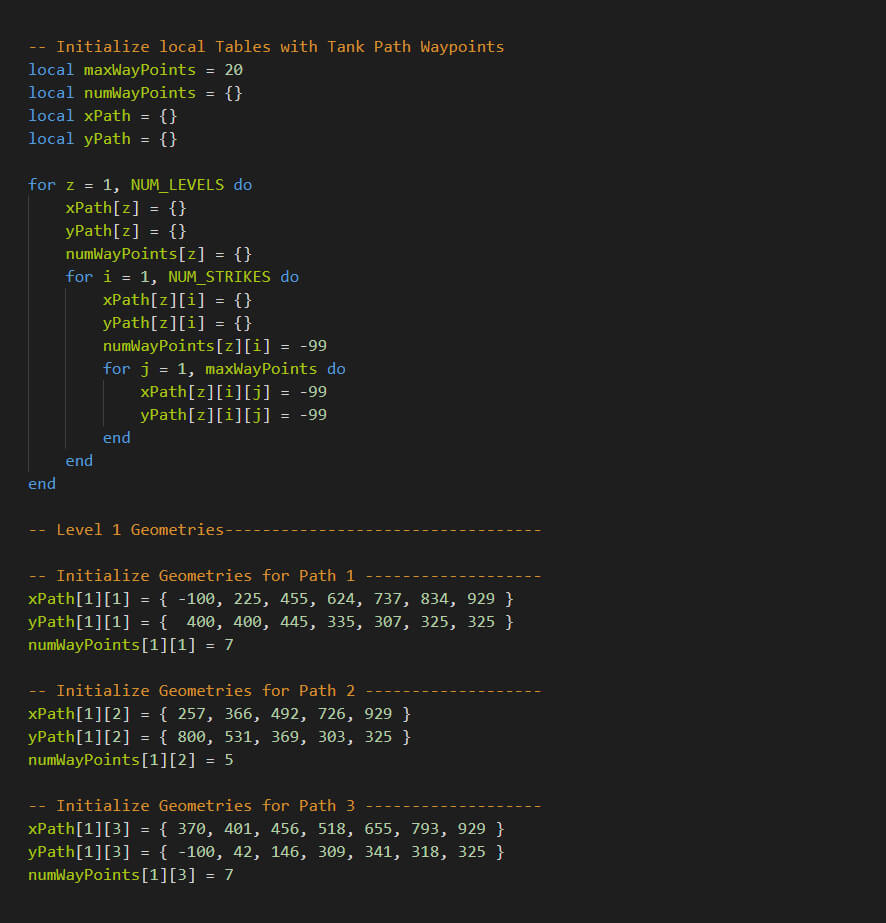
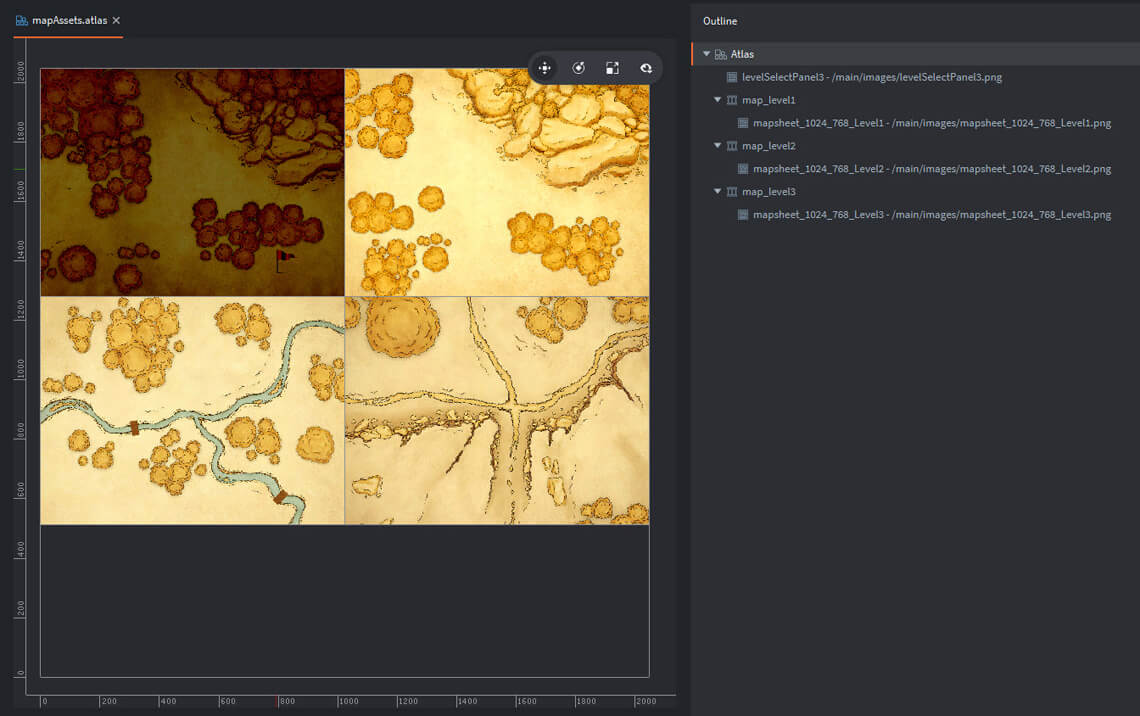
The design declares a set of local variables within enemyTankActions.script which establish tables with x and y coordinates for the paths that each enemy tank will follow. A unique path is set for each strike, within each level (Level 1 is shown below, Levels 2 and 3 are in the project files)
Based on this setup, to refer to a specific waypoint within a path by its x and y coordinates, you'd need to call:
x = xPath[ACTIVELEVEL][CURRENTSTRIKE][WAYPOINT]
y = yPath[ACTIVELEVEL][CURRENTSTRIKE][WAYPOINT]
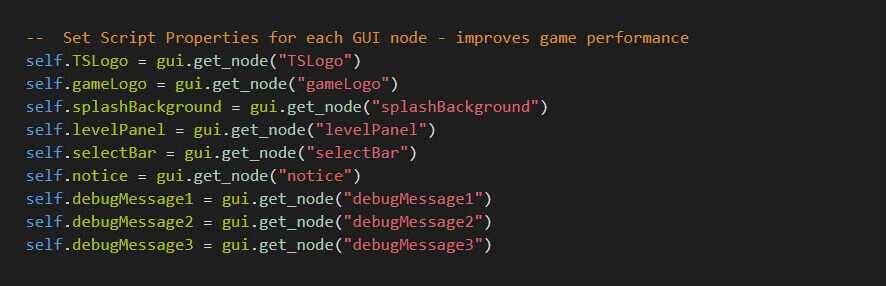
Script Properties for GUI Node IDs
Within mainMenu.gui_script, a script property is set for the id of each of the nodes within the Graphic User Interface. This greatly improves performance.
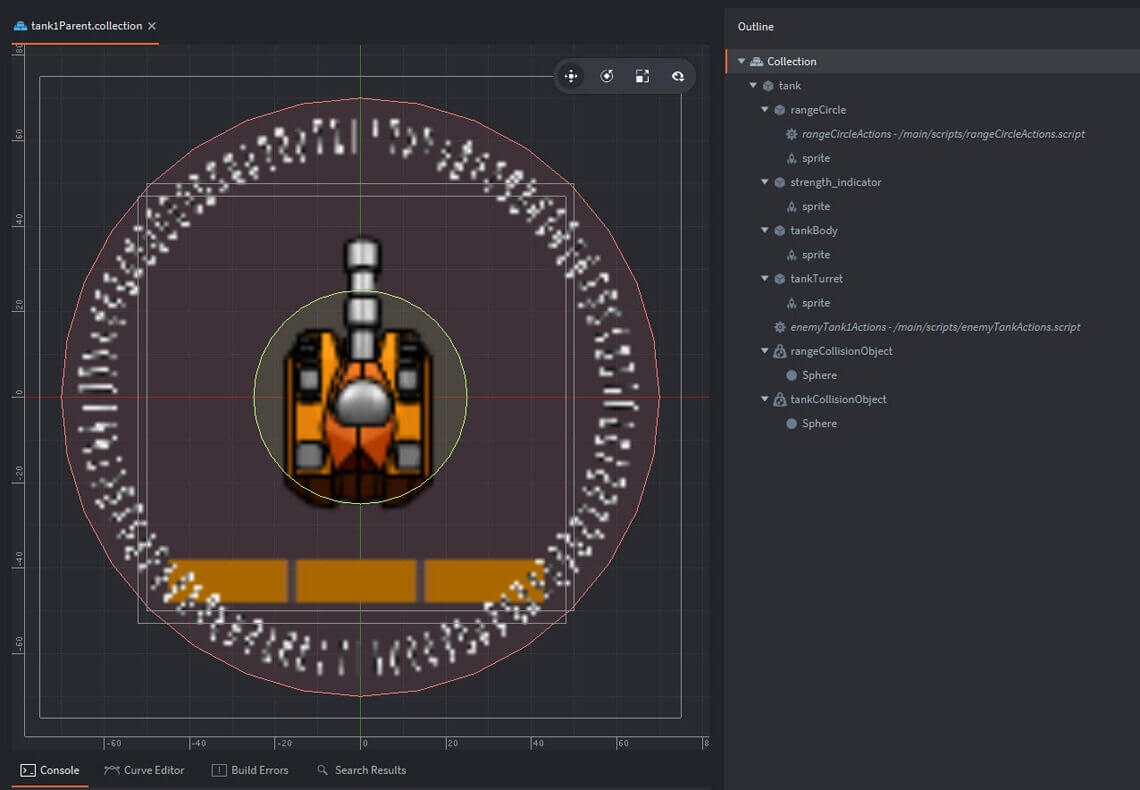
Tank Collection/Collection Factory
The Enemy Tank Units are comprised of a set of Game Objects contained within a Tank Collection. Within main.collection - there are three collections: tank1Parent, tank2Parent and tank3Parent. Each parent consists of separate game objects for the tank body, the turret, a strength indicator, a range circle which depicts how far the tank fire is effective with a collision object for both the tank itself, and the effective range.
Collision Response
When an instance of the enemy Tank Collection receives a 'collision_response' -- and the message.group == hash("enemyObjective") -- that tank instance has arrived at the designated objective. At that point, messages are sent to the controller to indicate that the enemy has hit the objective, and at that point the controller deletes this entire collection from the spawnedObject table.
Spawned Objects
Each enemy tank consists of a collection of game objects as described above. Each instance of that collection can be spawned by calling a collectionfactory.create() function - passing path and nomenclature parameters. When spawning a collection, you can pass property parameters to each game object by constructing a table where the keys are object ids and the values are tables with the script properties to set. The props table is used here for passing these parameters to the collection factory.
Importantly, the program captures the id of this spawned collection within a spawnedObjects table -- which will allow us to delete a specific enemy tank collection based on game play factors.
The following extract from the controller.script depicts how this is accomplished within Build II. Please take a look at the collectionfactory.create call -- where the script concatenates several string elements to establish the appropriate parameter for the parent tank collection designated for this strike (Tank1, Tank2 or Tank3).

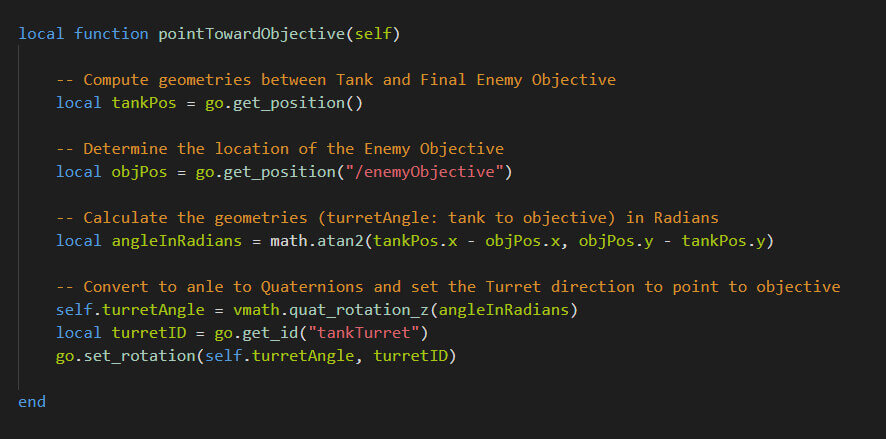
Game Object Rotation
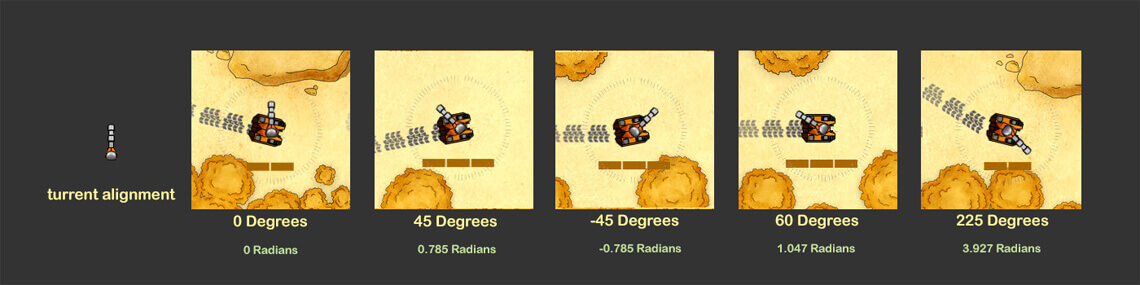
Rotation techniques and the underlying trigonometry can be a challenge in any game. A quick step-by-step for Build II follows. First, the following illustration highlights how various angles (in degrees and radians) are reflected on a game object. For the turret, the first snapshot is how the turret image is oriented within the graphicsAssets.atlas file -- pointing straight up. The other snapshots in this row, show the direction that the turret points in for various angles -- 0 Degrees | 45 Degrees | -45 Degrees, etc.
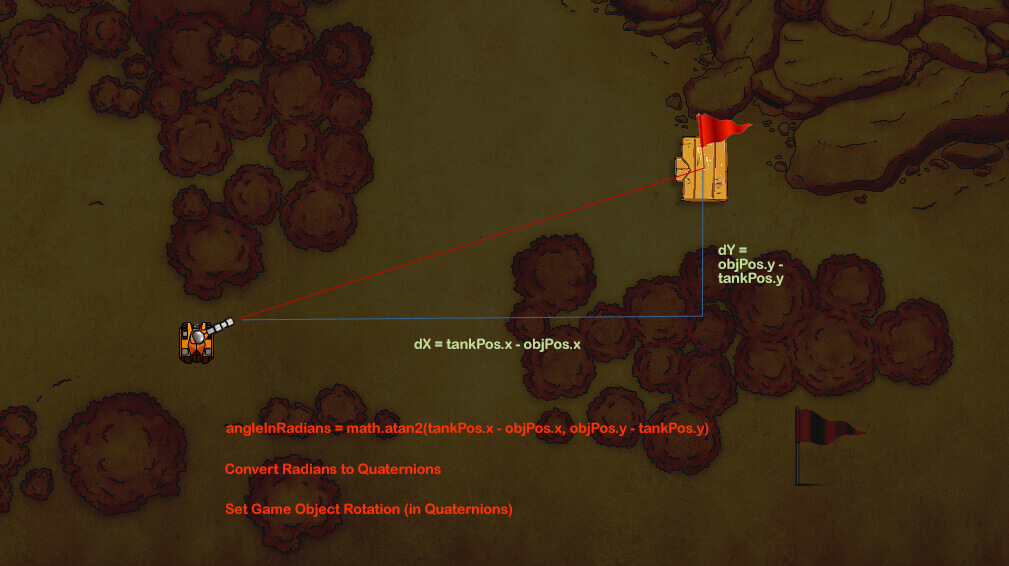
The following diagram highlights the geometries we will use to determine the needed rotation to have a turret point at an objective location. The Lua math function (math.atan2) is used to find the arctangent of the angle (in radians), converting that to quaternions and then using that quaternion to set the Game Object Rotation.
Here's an extract from the script file that illustrates how this has been implemented in the Build II application.
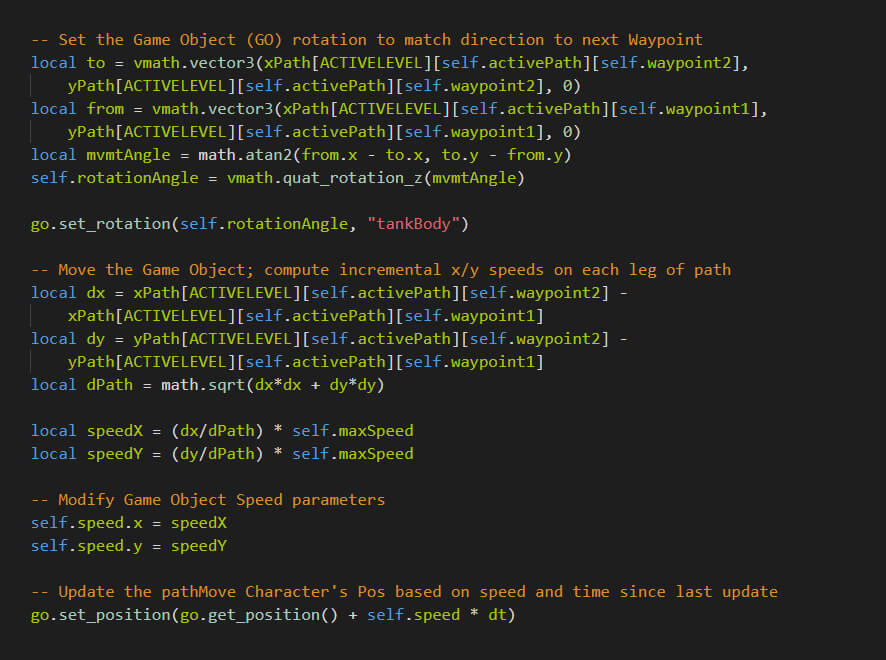
Constant Speed Movement
One of the key computations in the enemyTankAction.script is related to determining the x and y speeds associated with the tank -- ensuring that the combined vector speed is a constant. The following diagram depicts the vector components of this calculation. The tank is moving from Waypoint1 to Waypoint2 at a constant speed of self.maxSpeed.
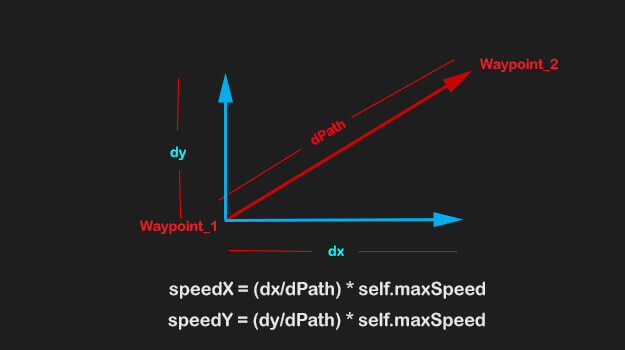
The following Lua code reflects how this computation is included within the enemyTankAction.script file, using the path tables declared in that script.
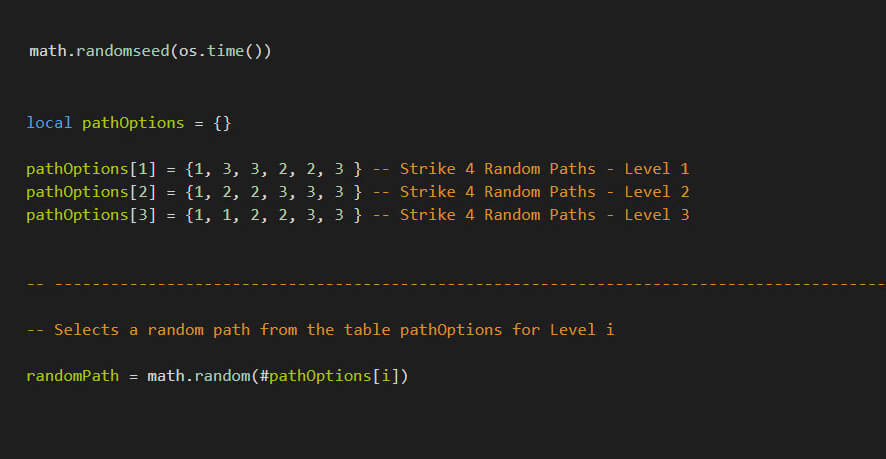
Randomization Techniques
Throughout this game, similar to needs in most games, there are many occasions where you want to select a random element from within a table. An example of that in this project is picking a random path for enemy tanks to transit. As illustrated below -- initially, you randomize the seed using os.time. This will generate a series of random numbers that will be different every time you run the application. The pathOption tables establish a selection pool to pull from -- the math.random function pulls a random entry from that table. containing potential paths (multiple entries of the same path would result in an increased chance of that path being selected):
Debugging Techniques
Consistent with some of the previous tutorials, I've applied several techniques in this build that I use to assist throughout the debugging process -- to include the following:
III: Build II - Development
Now that we’ve introduced the design constructs that really drive the structure of the overall project – we’re ready to start the development of Build II — walking through the following key steps in enhancing what was developed in the previous Build I tutorial project:
| Defold Game Feature | Description |
|---|---|
| Project Setup | Setup initial parameters within the game.project file (Title, Version, Render, Display); |
| Images/Atlases | Load image folder and create Defold Atlases (graphicAssets, mapAssets & popupAssets). |
| Image Attribution | Acknowledge sources for each of the images used within the application. |
| Main Collection | Create the main.collection for the project. |
| Main Menu | Create the Graphic User Interface for the Splashscreens and Level Selection Menu. |
| Opening Popup Window | Create the Graphic User Interface for the Popup Information Panel. |
| Tank Parent Collections | Create the Tank1/2/3 Parent Collections (tankBody, tankTurret, rangeCircle, collision objects...). |
| Tread Prototype | Create the prototype for the tread animations that will spawned to trail behind tank units. |
| Enemy Highlight Prototype | Create the prototype for the rotating highlight at the objective when an enemy unit reaches it. |
Project Setup
Once you've opened the full project within your Defold Editor v2 -- within the Defold game.project file, you’ll notice that the following key parameters apply:
Images/Atlases
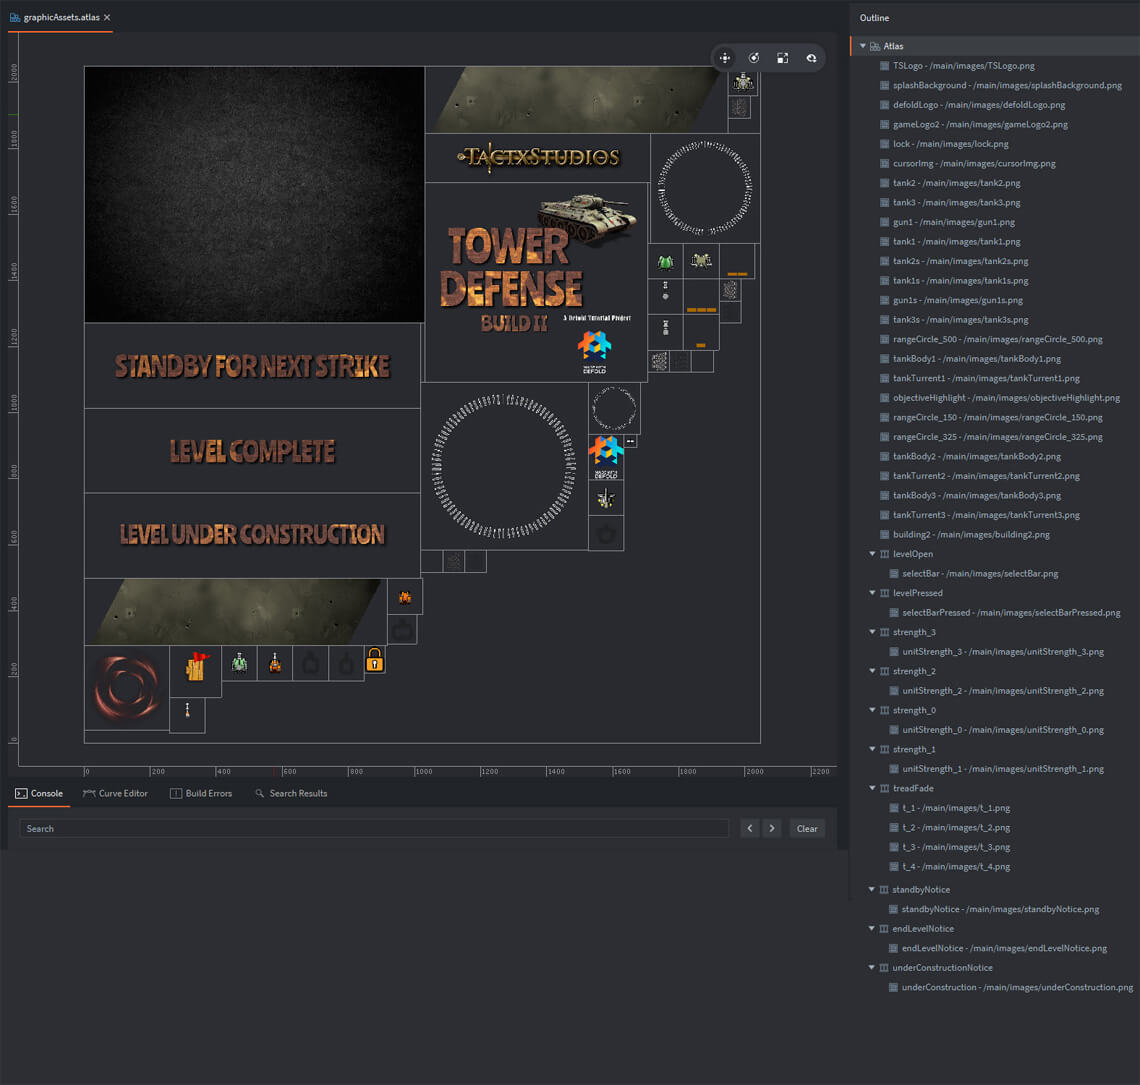
The Build II project uses multiple atlases to accommodate the full set of images within the game. The images are contained within an ‘images’ subfolder under ‘main’ as you can see in the project explorer window. There are three atlases: (a) graphicAssets.atlas, (b) mapassets.atlas, and (c) popupAssets.atlas.
Elements within the Build II graphicAssets.atlas
Elements within the Build II mapassets.atlas
Elements within the Build II popupAssets.atlas
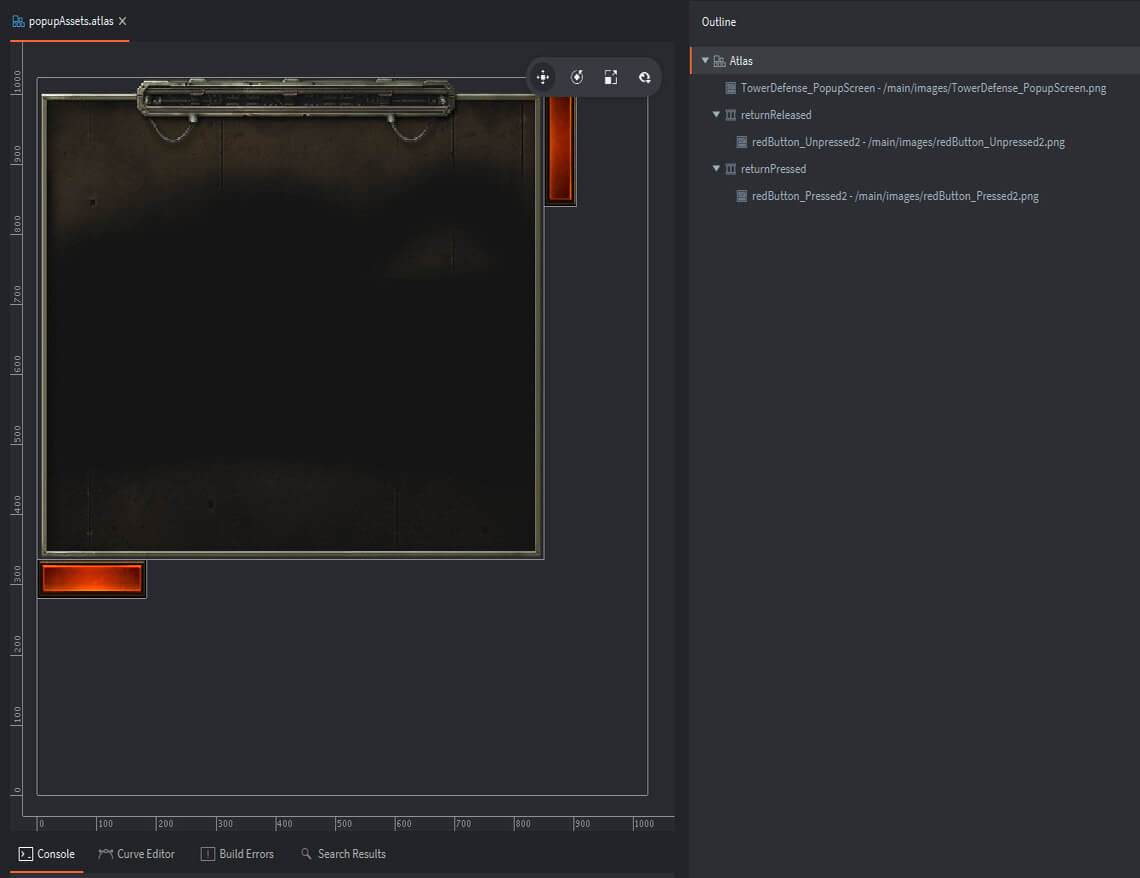
Image Attribution
These images are all free assets provided by the following sources: (a) splashBackground – publicdomainvectors.org, (b) map assets – Ink & Bone at roll20.com, (c) lock on Select Bar - clipartmax.com, (d) tank sprites and towers - freegameassets.com, (e) bullet images - opengameart.org, (f) red pennant - pngtree.com and (g) T-34 tank in logo - nicepng.com. The game logo and notice text images were created using the free utility available at textures4photoshop.com. The remaining assets were created using Photoshop Elements 2018.
Main Collection
The main.collection is the only collection in this project – keeping the project structure pretty straight-forward. It contains game objects containing components for the controller, gameMap, and enemy Objective. There is a series of game object containers for collection factories - createEnemyHighlight, createTank1Collection, createTank2Collection, createTank3Collection; factory containers - createTreadMarks and createBullets. Finally, there are two Graphic User Interface containers: mainMenu and popupWindow.
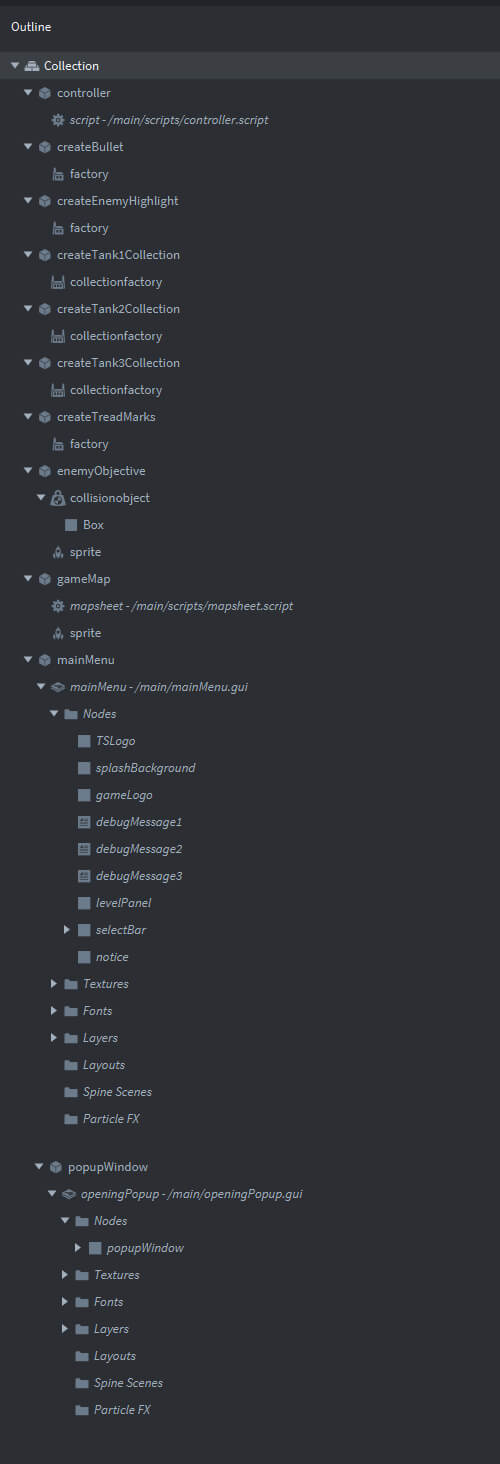
Main Menu
The mainMenu.gui supports both nodes for the introductory splashscreens, as well as nodes for the level selection panel/bars and game notices. Both the textures and fonts are also referenced.
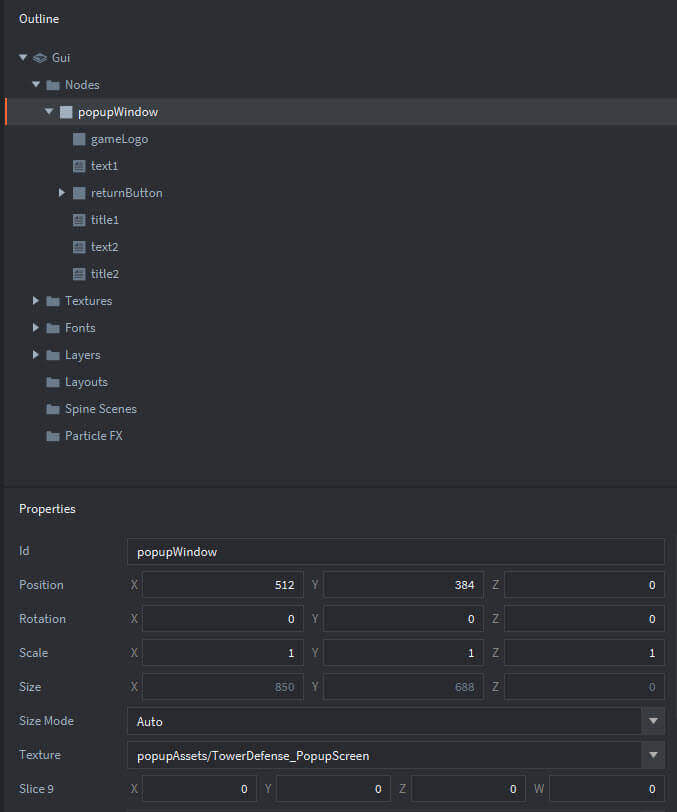
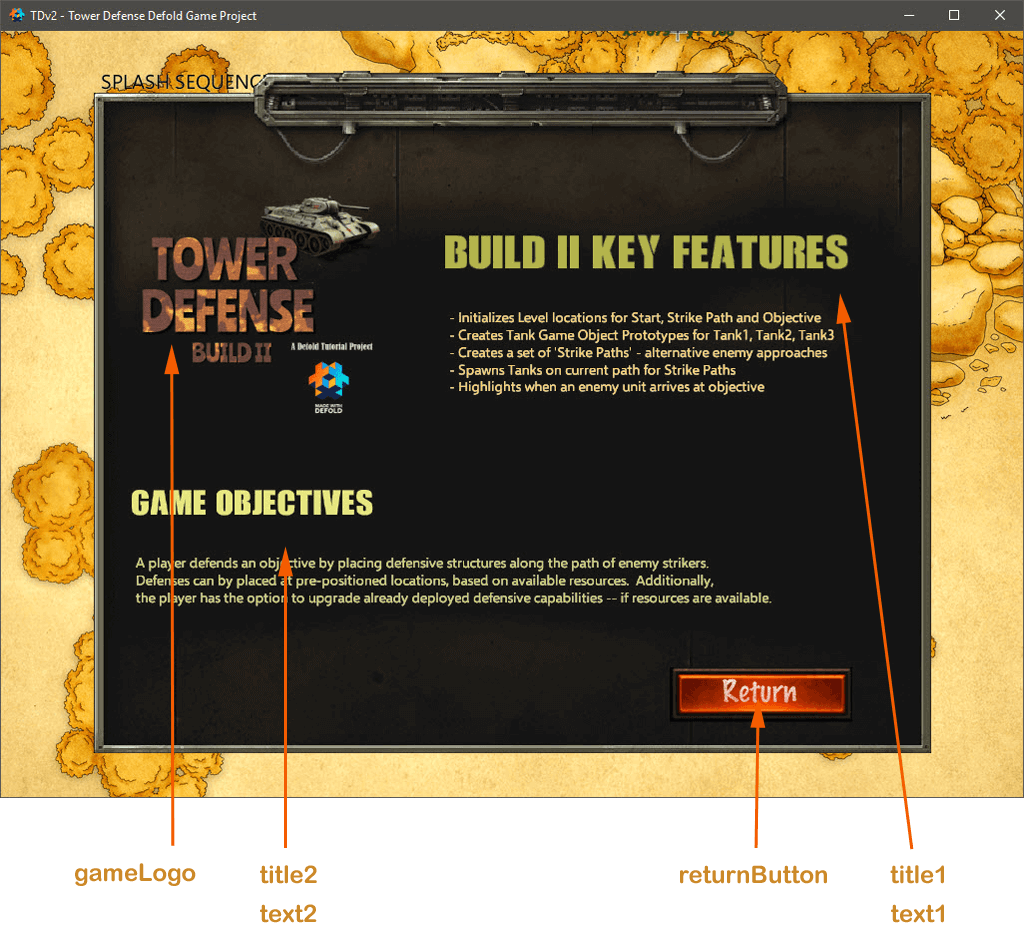
Opening Popup Window
For Build II, there is a second Graphic User Interface -- which displays general information related to the game. It is pretty straight-forward, consisting of nodes for the popup background, game logo, title and text fields.
Tank Parent Collection
There are three Tank Parent Collection within the project (Tank1, Tank2 and Tank3). The principal component is the '/tank' game object. This game object consists of several child game objects for the tankBody, tankTurret, rangeCircle and strength_indicator. Additionally, the tank game object has two collision objects: (a) a range collision object for determining when another object is within range, and (b) a tank collision object when another object collides with the tank body. Finally, the collection also has a script file (enemyTankActions.script).
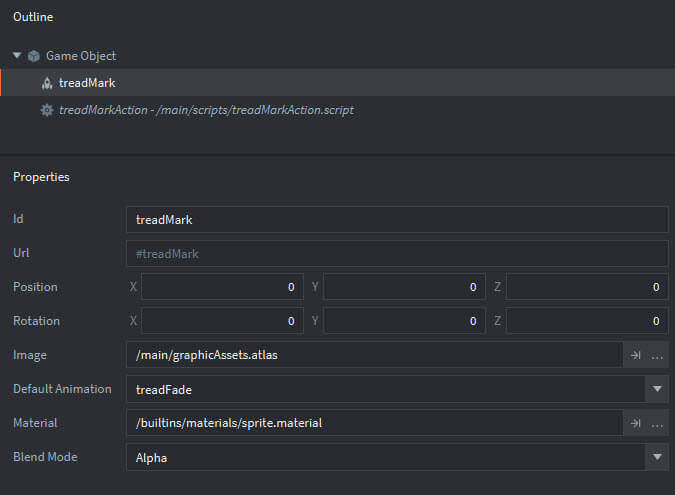
Tread Prototype
The Tread Prototype is relatively simple - consisting of a script file and a sprite. The sprite uses an animation (treadFade) which consists of a series of treadmarks that fade out. The script receives a msg to initiate the animation; upon completion of the animation, it deletes the game object.
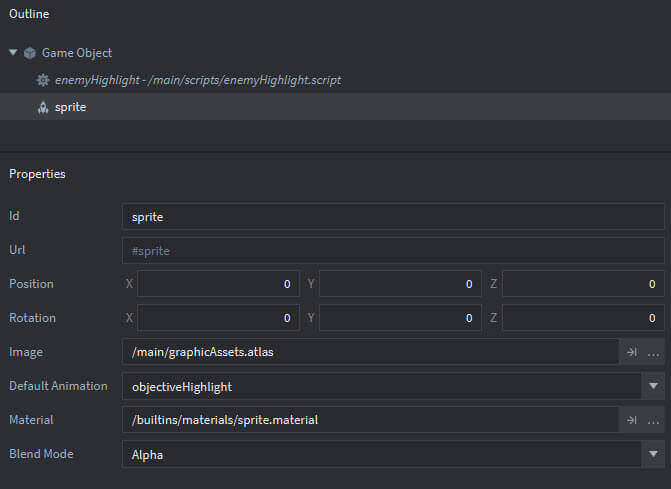
Enemy Highlight Prototype
The Enemy Highlight Prototype is also pretty simple - consisting of a script file and a sprite. The sprite consists of a swirl effect image. The script receives a msg to initiate an animation which rotates the sprite around its z axis for a few seconds, then deletes the game object.
IV: Build II - Script Walkthroughs
The following files control gameplay actions and support the Graphic User Interface within Build II of the Tower Defense project. I have included embedded comments throughout the source code to assist in easily walking through the logic.
| Defold Script File | Description |
|---|---|
| controller.script | Support functions related to coordinating all game actions. |
| enemyTankActions.script | Tank Path Setting, Turret Rotation and Movement along Path Waypoints. |
| bulletAction.script | Initializes bullet and controls movement along trajectory. |
| enemyHighlight.script | Provides rotating swirl effect upon enemy reaching objective. |
| rangeCircleActions.script | Initializes the tint for this game object. |
| treadMarkAction.script | InitialSetup of treadMarks behind a tank game object - using animations. |
| mapsheet.script | Provides the ability to switch mapsheets reflecting Levels; setup of gameMap using animations. |
| mainMenu.gui_script | Controls the main_menu GUI -- opening SplashScreens and the Play Selection Menu. |
| popupWindow.gui_script | Provides control over the popupWindow GUI -- includes opening an Information Panel. |
controller.script
- Initializes all GLOBAL variables, to include window dimensions, Number of Game Levels, Active Level, and Debug Messaging. Initializes local variables related to objective location and tank counts per level, per strike.
- Includes the startSelectedLevel() and startNextStrike functions.
- Spawns Tank Collections within a Timer function; captures collection IDs within a Lua table and deletes the table entries upon Tank Collection being destroyed.
I’ve included a copy of the commented source code below:
enemyTankActions.script
- Initializes local tables containing Tank Path coordinates - per Level, per Strike, per Waypoint
- Moves the entire Tank Collection and rotates the tank body game object to conform to the current direction on the path, continuously points the turret at the enemy Objective
- Spawns Tank Tread Marks behind the tank during movement along the path.
- Manages collision with enemy Objective as trigger to delete the tank collection.
I’ve included a copy of the commented source code below:
bulletAction.script
- Calculates the rotation (orientation) for the bullet to be fired at an enemy objective
- Moves the bullet along the defined trajectory at a constant speed.
- Manages collision with another objective to trigger bullet deletion.
I’ve included a copy of the commented source code below:
enemyHighlight.script
- Sets up game object animation to create a swirl effect around the enemy objective.
I’ve included a copy of the commented source code below:
rangeCircleActions.script
- Sets opacity for the range circle
I’ve included a copy of the commented source code below:
treadMarkAction.script
- Upon initialization, launches an animation which creates tread marks that 'erode' over time.
I’ve included a copy of the commented source code below:
mapsheet.script
- Controls the changing of animations to reflect the current mapsheet - based on ACTIVELEVEL.
I’ve included a copy of the commented source code below:
mainMenu.gui_script
- Display of animated Introductory SplashScreens
- Initialization of the Level Selection Bars by cloning a GUI Node Tree; modifying a sprite texture based on whether the level is open or locked; and placing the bars on a dulled mapsheet background.
- Sets Script Properties for each GUI Node (to improve overall game performance) and enables/disables them as appropriate. .
- Processes the following messages: splashComplete | window_dimensions.
- Set/Resets the Level Selection Panel and Selection Bars; leverages tree cloning in initial setup.
- Processes on_input when a Level Selection Bar is touched .
I’ve included a copy of the commented source code below:
popupWindow.gui_script
- Upon msg receipt, shows the Popup Information Window, component fields are passed as parameters from the controller.
- Upon pressing the 'return' button, the popup window fades away and is disabled.
I’ve included a copy of the commented source code below:
V: Completion of Build II
We've come a long way -- although not quite a game yet -- you can see how the components that are now built will fit into the larger game framework. We now have a design structure that supports (a) a three level, four strikes per level game play; (b) three distinct enemy tank unit profiles, with their own identities in terms of body/turret sprites, type of ammo/bullets fired, rate of fire and effective range; and (c) pre-defined paths defined for each game level consistent with three distinct map sheets.
When you're ready, please go head over to Build III -- it will be equally exciting. In Build III - we will be adding the functionality associated with the players units, to include: (a) resource availability, (b) alternative player tower assets, (c) drag/drop features to move towers to designated loiter positions, and (d) engagement fires between enemy tanks and the player's towers -- when they are in range of each other.
All the best, David
Goto Build I Goto Build II Goto Build III Goto Build IV