
Objectives for this Tutorial
For this Defold Tutorial, I’d like to work through some capabilities that are similar to those found in many casual games, to include:
- Incorporation of Collision Objects with our Defold Game Objects as a basis for modeling the physical impacts of the effects of gravity – weight, friction and restitution (bounce);
- Placement of Boundaries to constrain Game Objects to the ‘world’;
- Leveraging the on_input feature of Defold to control cursor/game object spawning actions.
- Use of the Factory Component to a Game Object as the means for creating (spawning) new game objects consistent with a Prototype at user selected locations;
- Animated surfaces affecting collision effects;
- Script logic driven deletion of a Game Object, and
- Inclusion of an explosion effect upon deleting a Game Object.
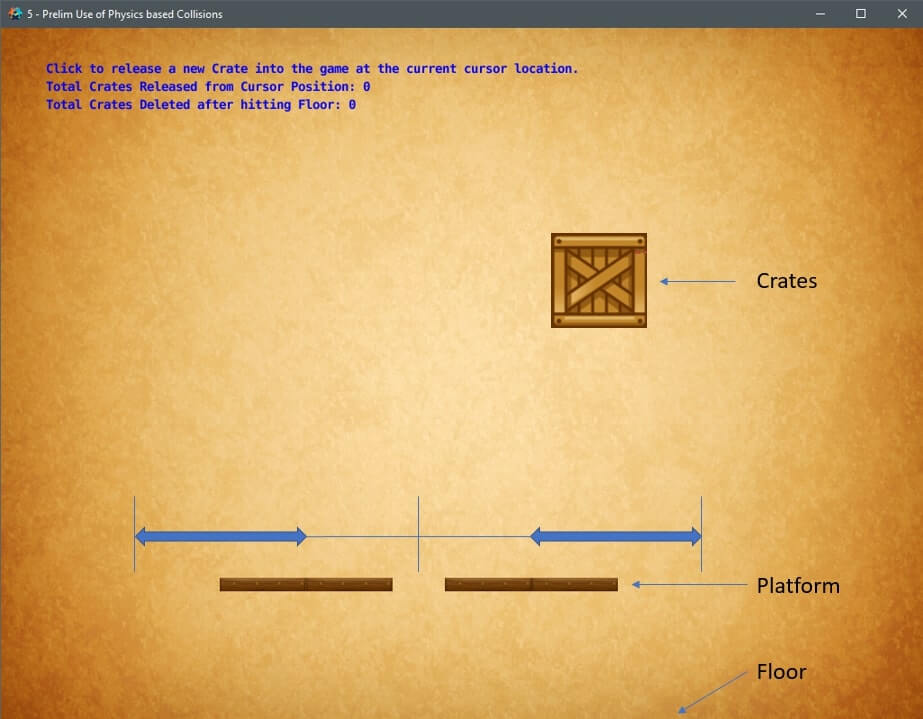
The end result of this tutorial is shown in the following advanced iframe. It’s not even close to a true game at this point, but (hopefully) it does highlight some key features that many games might include. To highlight these features, click the mouse button (or touch) anywhere within the game area and the application will create a wooden box game object, which then starts to fall based on 2d Physics.
Click this Thumbnail Icon to see the final product of this tutorial
Click on the application's screen to spawn a new crate, which will begin to fall due to gravity.
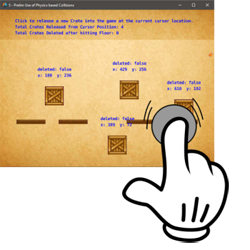
Please note — I have intentionally retained some of my debugging messages (e.g., cursor/game object positions, etc.)….primarily to illustrate how I’m using them in the development of these examples. They’re easily deleted when the project is release ready. So…let’s walk through the steps required to develop this Defold Project.
NEW - YouTube Version of this Tutorial is now Available
There is now a video version of this Tutorial on the application of Physics to your game is now available on YouTube - please take a look and let me know if you find it helpful. Please note, the information provided within both Tutorial #5a and #5b are combined into a single video tutorial...and there may some minor differences between the video vs written tutorials, but the techniques are consistent.
I: INITIAL PROJECT SETUP
Modify game.project Parameters
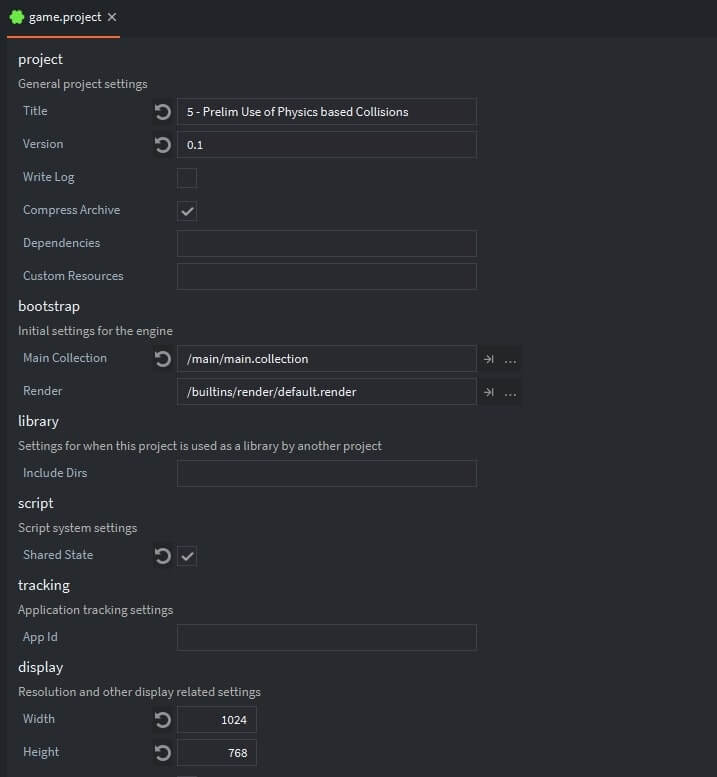
We’ll start by using the Defold Initial Template which was introduced within Tutorial #1. Our first step will be to modify the game.project file to reflect the new Title, bootstrap collection and display resolution associated with this project. I’ve decided to stay with the 1024px width/768px height screen size, in that it reflects the aspect ratio used on an iPad – while fitting with the iFrame I’m using on this website. In future tutorials, I’ll experiment with sizing/scaling features to illustrate how to best accommodate other popular screen resolutions. The following screenshot shows the project settings I’ve used for this example, within the game.project file.
Create Input Bindings for Left Mouse Button
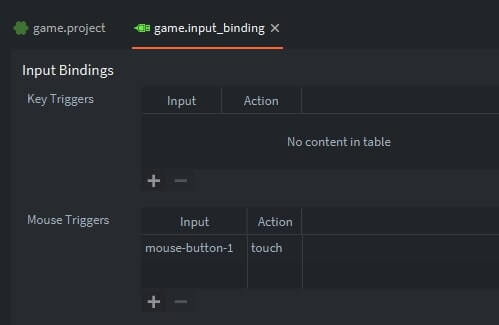
The next step will be to configure the game.input.binding file (located within the input folder within the Project Explorer). Within the Mouse Triggers section, click the ‘+’ button and add a binding for the ‘mouse-button-1’ trigger – setting it to a ‘touch’ action. Once complete, your game.input.binding file should look like the following:
II: BUILDING THE PROJECT ATLAS
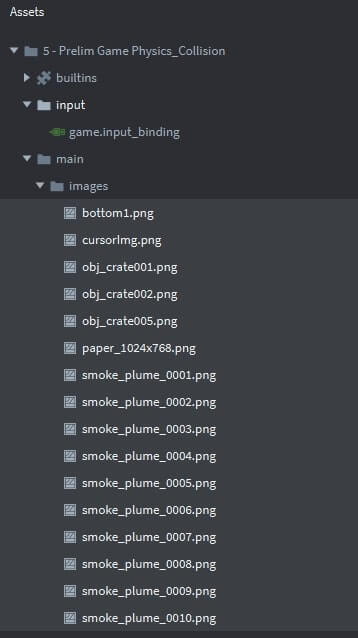
Upload Image files to the Project
With basic project configurations applied to the game.project and game.input.binding files, we’re ready to start building the atlas. Here are the .png image files to be used within this project — to include (1) a paper texture as the background, (2) a bottom image which will represent the floor of a stage, (3) several box/crate images and (4) as set of smoke images which will serve as the basis of an explosion animation.
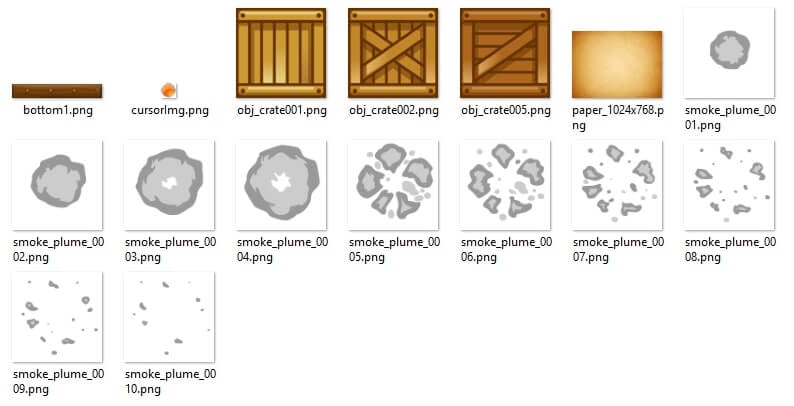
Attribution — many thanks for the ability to use the free graphic resources provided from the following sources: (a) www.powstudios.com, and (b) www.2dgameartforfree.blogspot.com. Each of these sites is a great resource for 2d art assets – I highly recommend them.
You can download a zipfile containing these images by clicking the following ‘Download Now’ button.

Drag and drop each of these .png files into the images folder within the Project Explorer as highlighted below:
Construct an Atlas
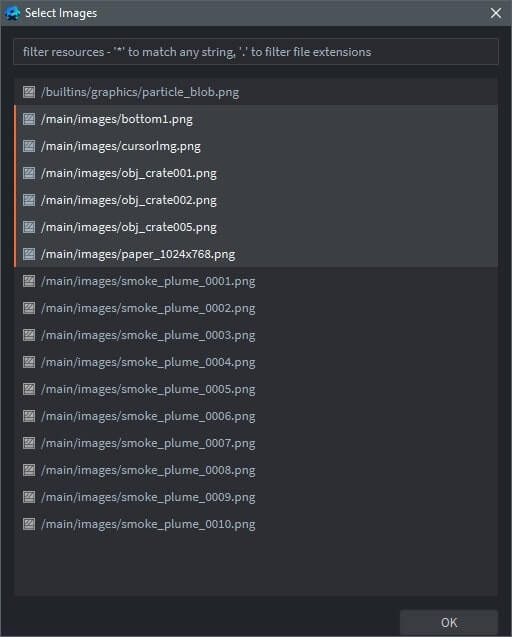
As described in Tutorial #4, we need to construct an Atlas which contains each of these images. When adding images to a Defold Atlas, there are two general categories to keep in mind: (1) standalone images, similar to our background, and (2) images that are part of an animation.
Just to repeat how we did it in that tutorial, first right-click the ‘main’ folder shown on the Project Explorer: select ‘New’ | select ‘Atlas | name the Atlas as ‘graphics’. Now double-click this newly created Atlas in order to put it into focus within the Outline Window. Right-Click ‘Atlas’ in the Outline Window | select ‘Add Images’ . At this point, select those images which are not part of any animation, as shown below.
Add an Animation Group to the Atlas
Next, we can create within the Atlas an animation which will reflect an explosion. With focus on the Atlas within the Outline Window, right-click ‘Atlas’ | Add ‘Animation Group’. A ‘New Animation’ will appear at the bottom of the Atlas outline; you can change the name of it in the Properties Window just below it (I’ve changed it to ‘explosion’). I’ve also changed the Frames-Per-Second rate for this animation to 10 — given the number of frames we’ll be adding to this Group. I’ve also set the Playback to ‘OnceForward’ — since we’ll only want the animation to play once for each time an explosion occurs.
You can now add images to this Animation Group by: right-clicking ‘explosion’ | select ‘Add Images’ | identify the ten frames related to this activity. Once complete, the Atlas should look like the following:
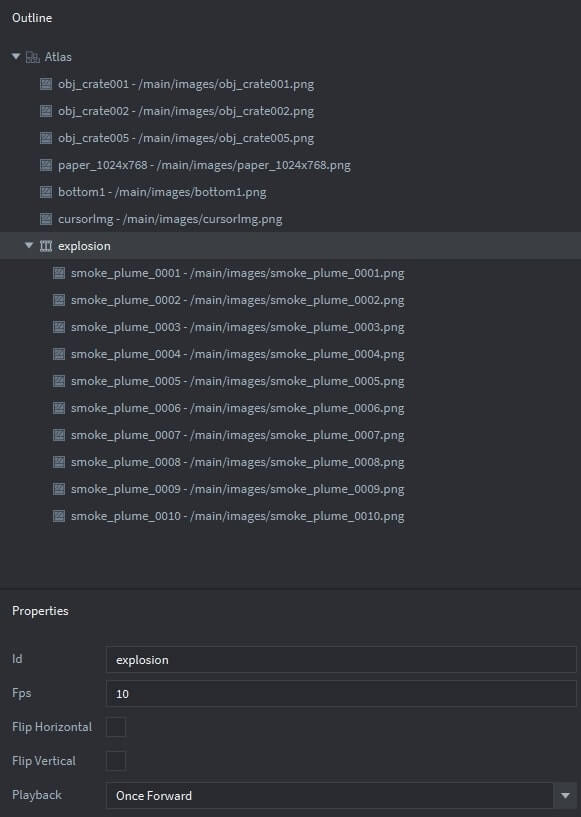
A final set in setting up the Atlas — as described in a previous tutorial: We want to avoid any “edge bleeding” — where the edge pixels of neighboring pixels in the Atlas bleed into the image. We’ll do this by setting the Extrude Borders value to 1 in the Atlas Properties Window.
III: ADDING A BACKGROUND GAME OBJECT
Adding a Background Image to the Game
Now we can start adding Game Objects and Game Components to our project. Adding a background is pretty straight-forward. Double-click ‘main.collection’ in our Project Explorer to put it into focus in the Outline Window. In the Outline Window, right-click ‘Collection’ | select ‘Add Game Object’. In the Properties Window, rename the Game Object as ‘background’…..we’ll also want to edit the Game Object’s position within the Properties Window to ensure the background is centered within the Project Window: x = 512 and y=384. Finally, right-click ‘background’ | select ‘Add Component’ | select ‘Sprite’. Once this sprite has been added as a Component to the Background Game Object, within the Properties Window ‘Image’ bar, select ‘graphics.atlas’ as the image resource and ‘paper_1024x768’ as the Default Animation using the drop-down menu features of the Property Window.
IV: PLACEMENT OF A MOVING PLATFORM
Establishing Background Dimensions
I thought it would be interesting to add a set of raised platforms, which move back and forth — as a means to better understand the impact they would have on boxes dropping due to gravity. As illustrated below, the stage is divided into two parts — one of which moves from the center to the left, the other from center to the right. To enable some future extensibility, I constructed each side of this platform using four Game Objects: (1) bottom_1 and bottom_2 on the left, (2) bottom_3 and bottom_4 on the right. In the final project, crates will be spawned anywhere within the play world, and will fall based on gravity — hitting either the platform and/or the floor.
Create a Game Object within the 'Platform'
Each of the platform Game Objects consists of three components: (1) a sprite, to include an image, (2) a collisionobject, which will control the physics based impacts of a crate colliding with the platform, and a script file to contain required game logic.
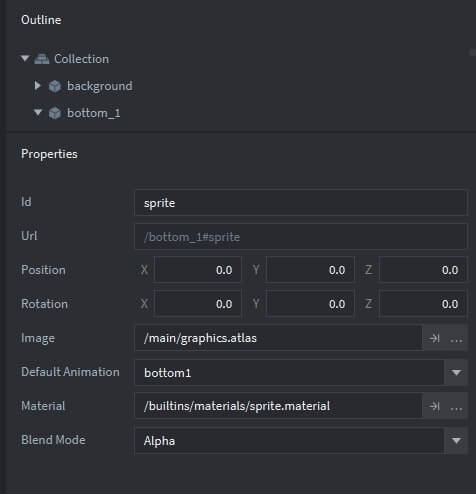
With ‘main.collection’ in focus within the Outline Window, add a new Game Object to the project: right-click ‘Collection’ | select ‘Add Game Object’ | in the Properties Window, name this GO as ‘bottom_1’. Add a Sprite to this Game Object by right-clicking ‘bottom_1’ | select ‘Add Component’ | select ‘Sprite’. Within the Properties window for this new sprite, identify the Image Resource ‘graphics.atlas’…and select the Default Animation to be: ‘bottom1’. Within the Outline and Properties windows, main.collection should look similar to the following.
Add a Collision Object to the Platform
Now we’re going to add a Collision Object to the bottom_1 Game Object. As described within the Defold Documentation, a collision object is a component you use to extend a game object with physical behavior. A collision object has different physical properties (like weight, restitution and friction) and its spatial extension is defined by one or more shapes that you attach to the component. Defold supports the following types of collision objects:
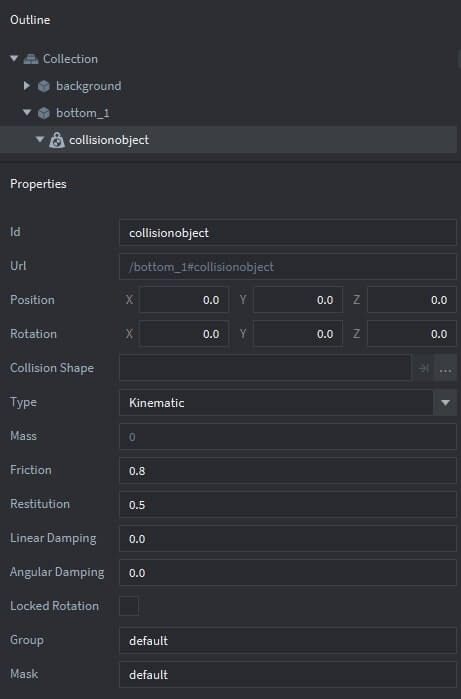
For this project, we’ll be using a Kinematic type for the platform. To do this within the Outline Window (with main.collection in focus), right-click ‘bottom_1’ | select ‘Add Component’ | select ‘Collision Object’. Click on the newly created collisionobject and change its properties as follows:
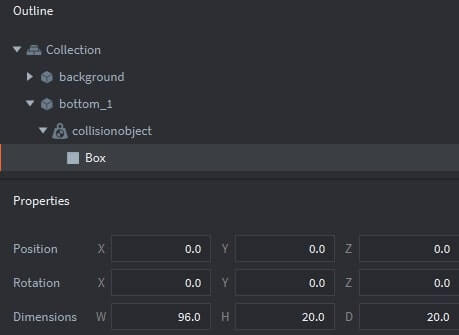
To incorporate the shape for which collisions are to be determined associated with this Game Object, a shape needs to be added to the collision object. We can do this by: clicking ‘collisionobject’ | selecting ‘Add Shape’ | selecting ‘box’. We’ll set the dimensions of this box within its Properties Window as follows:
Add a Lua Script to the Platform Game Object
The final step in creating all the components of the ‘bottom_1’ Game Object is to add a script file. Within the Project Explorer, right-click ‘main’ | select ‘New’ | select ‘Script’; I’ve changed the name of this script to: ‘bottomLeft’. I’ve replaced the default script content with the following.
The ‘go.animate’ function call will move the x position of this Game Object to the left by 100 pixels and then return to center every 5 seconds.
Create Game Objects for Rest of Platform
The ‘bottom_2’ Game Object is created using the same approach as just described for ‘bottom_1’.
The ‘bottom_3’ and ‘bottom_4’ Game Objects are also created using the same approach, however, they will use the following script file which moves them to the right.
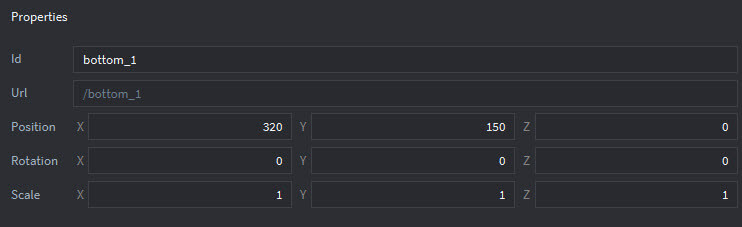
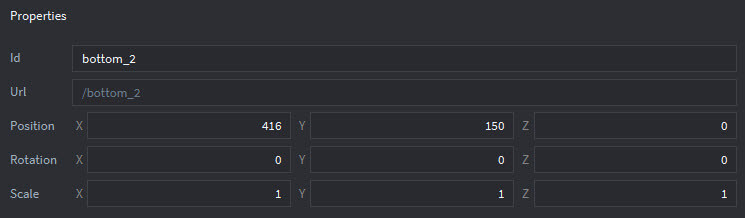
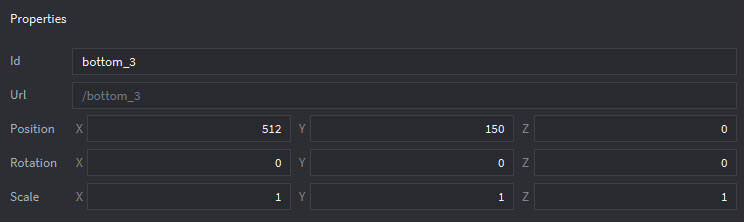
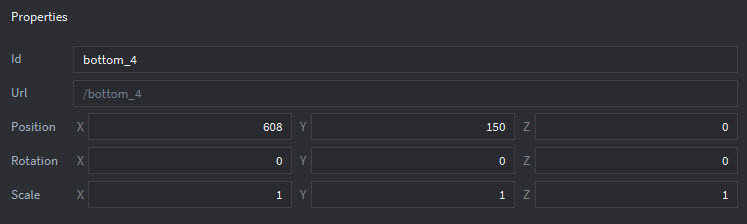
The final step in creating the platform is to position each of these Game Objects to line them appropriately on the screen. I’ve used the following positions, which are set in the Properties Window for Game Objects: ‘bottom_1’, ‘bottom_2’, ‘bottom_3’ and ‘bottom_4’.
V: ADDING A STATIC FLOOR AND SIDES
We want to add two features that are common to many games: (1) we want to establish walls on the left and right side of the screen, so that any crates being dropped remain within the game world, and (2) we’ll need to establish a floor, as a bottom to the game world.
Adding a Floor to the Project
The procedure for creating a game floor begins with adding a game object — double-click ‘main.collection’ within the Project Explorer to place it in focus within the Outline Window | right-click ‘collection’ | select ‘Add Game Object’. I’ve named this Game Object as ‘floorBoundary’. Within the properties window, set the x-position to 512 and the y-position to -15. This will locate the GO – centered at the bottom of the screen.
Within the Outline Window, let’s add a Collision Object by: right-clicking ‘floorBoundary’ | selecting ‘Add Game Component’ | select ‘Collision Object’…..we’ll add a box shape to this collision object by: right-clicking ‘collisionobject’ | select ‘Add Shape’ | select ‘Box’….and set it’s properties as follows.

Finally, we’ll need to add a short script to the floor, to capture it’s id to a global variable (floorID) — that’ll be used as a basis for only deleting crates that hit the floor (and not the sides, the raised platform or other crates).
Adding a Left & Right Side to the Project
The process for adding these sides is relatively simple – we’ll create two Game Objects within main.collection – one for each side, adding a Collision Object to each, using a Box Shape.
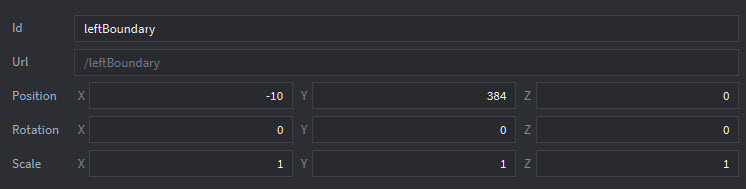
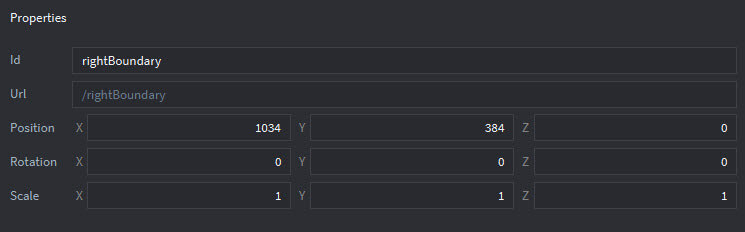
Double-click ‘main.collection’ within the Project Explorer to place it in focus within the Outline Window | right-click ‘collection’ | select ‘Add Game Object’. I’ve named the first of these Game Objects as ‘leftBoundary’. Similarly, add another Game Object named ‘rightBoundary’. Within the properties window, set the the positions for these Game Objects as follows:
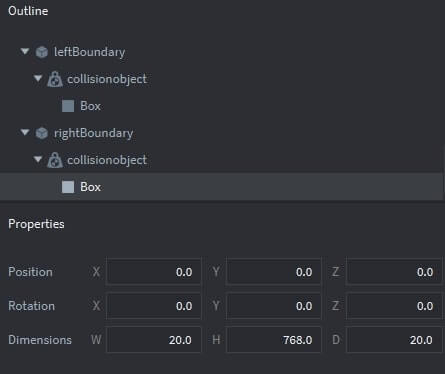
Within the Outline Window, let’s add a Collision Object by: right-clicking ‘leftBoundary’ | selecting ‘Add Game Component’ | select ‘Collision Object’…..we’ll add a box shape to this collision object by: right-clicking ‘collisionobject’ | select ‘Add Shape’ | select ‘Box’. Set the Dimensions of ‘box’ to x: 20 and y: 768. Now you can add a collisionobject to the rightBoundary with the same shape and box dimensions.
VI: CREATING A CRATE SPAWNING FACTORY
The initial step in creating a factory for this project will be to develop a Game Object Prototype related to a Crate. Within the Project Explorer, create a new Game Object named ‘cratePrototype’. You can do this by: right-clicking on the ‘main’ folder | select ‘New’ | select ‘Game Object’. Name that object ‘cratePrototype’. We’ll be adding three components to ‘cratePrototype’.
Add a Sprite to the Crate Prototype
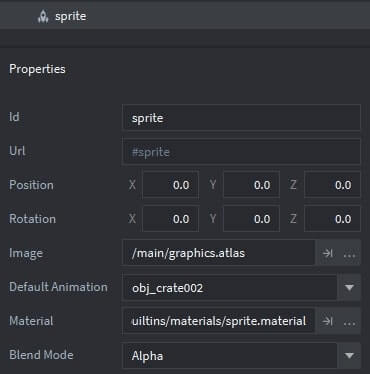
By double-clicking on the newly created ‘cratePrototype’ within the Project Explorer – you place it in focus within the Outline Window. Right-click ‘Game Object’ and select ‘Add Component’ | select ‘Sprite’. Set the sprite properties as shown in the following figure:
Add a Collision Object to cratePrototype
We’ll add a collision box to control how 2d physics impacts this crate. Right-click ‘Game Object’ in the Outline Window | select ‘Add Component’ | select ‘Collision Object’ and set its properties as shown in this screenshot.
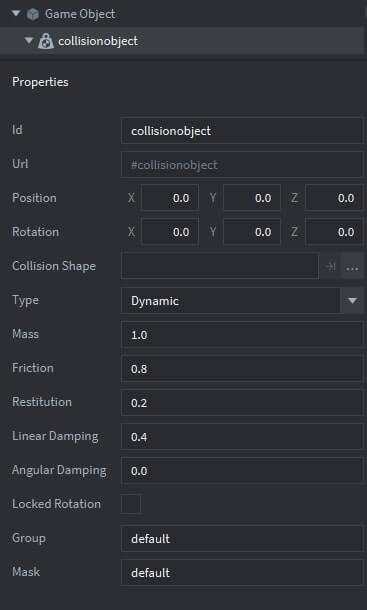
Then we’ll add a box shape to control when collisions occur: right-click ‘collisionobject’ | select ‘Add Shape’ | select ‘Box’….then set the box’s properties as shown below.
in this screenshot.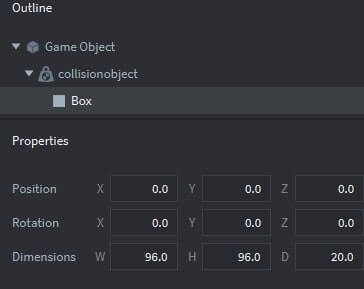
Add a Lua Script to the cratePrototype
Create a new script (named ‘boxScript’) in the main folder within the Project Explorer (right-click the ‘main’ folder | select ‘New’ | select ‘Script’ | name the script in the dialog). Replace the default Lua code with the following:
Syntax Highlights
As described within the Defold Documentation, in this project we establish a set of script properties which are used to control various characteristics of the game object; to include:
- go.property(“fading”, false) — this property is used as a means to determine the state of the crate: initialized to ‘false’ upon it being spawned, and will be set to ‘true’ once it collides with the floor (a precursor to it being destroyed).
- go.property(“start”, 0) — this property is set to the time at which the Game Object is spawned. It can be used to control the timing of explosions, deletion from the game, etc.
- go.property(“explodeStarted”, false) — this property reflects whether an explosion has been spawned related to this crate Game Object – initialized to ‘false’.
Within the update function – local variables are defined which reflect the x and y position of the crate Game Object — which will be used as locations for the message text that is shown above the Game Object during execution.
- local xPos = math.floor(go.get_position().x)
- local yPos = math.floor(go.get_position().y)
When the crate Game Object receives a message from the Defold Game Engine that reflects a collision — AND — that collision is associated with the floor (‘i.e., message.other_id == floorID) then a series of steps is taken:
- The ‘fading’ script property is set to true;
- The current position of the crate Game Object is captured into a local variable (boxPos);
- An explosion Game Object is spawned at the boxPos location;
- The crate Game Object is deleted; and
- A Tally of how many crates have hit the floor is updated.
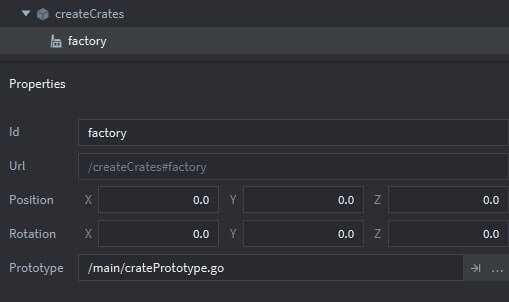
Create a createCrates GameObject and Factory
Once the ‘cratePrototype’ Game Object has been created, we need to add a factory to the project. With ‘main.collection’ in focus within the Outline Window, add a new Game Object – named ‘createCrates’. Within this game object, add a Factory Object Component – you can retain the default id: factory. Set the Prototype to ‘cratePrototype.go’ — the prototype you just developed at the beginning of this step — see below:
Add a Lua Script to createCrates
Using the Project Explorer, add a new script within the ‘main’ folder…name it: ‘spawnCrates’….and replace the default Lua code with the following:
The primary role of this script is to initialize the global variables: crateCount (how many crates have been spawned)….and crateHitFloor (how many crates have fallen all the way to the floor). I’ve also captured the current game display width and height — to be used for a future project extension.
VII: ADDING A CURSOR-POSITION DRIVER
Add a Cursor GameObject with a Collision Object
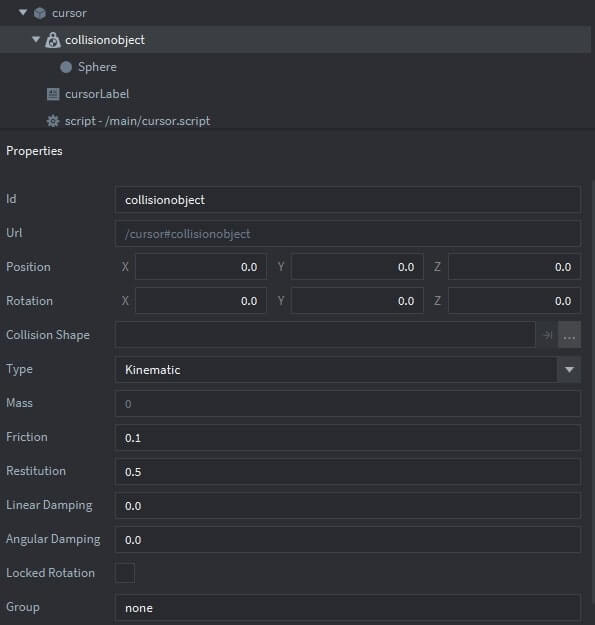
Similar to the procedure used in Tutorial #3, we are adding a cursor Game Object to this project, to include a Kinematic Collision Object with a sphere shape; a cursor label which will echo the current x/y location on the screen, and a script file. With the ‘main.collection’ in focus within the Outline Window, right-click ‘collection’ | select ‘Add Game Object’ | name this GO as ‘cursor’ within the Properties Window. Add a Collision Object to ‘cursor’ as shown below. Note that the Collision Type is set to ‘Kinematic’ — aka, it will collide with other objects, but all logic related to that collision is performed in our script file. Add a Sphere shape to this Collision Object. (right-click ‘collisionobject’ | select ‘Add Shape’ | select ‘Sphere’.
Add a label to the ‘cursor’ Game Object and set its properties as follows:

Add a Lua Script to the Cursor Game Object
Finally, within the Project Explorer — add a script file named: cursor. Replace the default Lua code with the following:
Comments within the above script file explain the major actions taken — updating the cursor location and posting a message with user instructions during each frame cycle. The on_input function captures the current machine cursor location and uses it as the position for spawning a new crate Game Object if the user presses the mouse button. A count of the total number of crates created is also updated.
Within the Outline Window, add this script as a Component File to the ‘cursor’ Game Object.
VIiI: EXPLODE WHEN CRATE HITS FLOOR
To quickly complete the last step in this project, we’re going to create the factory which will spawn explosions. A short summary of the actions to do this includes: (1) create a explosionPrototype Game Object, (2) add an explosion script, and (3) create a factory.
Create an Explosion Prototype GameObject
Within the Project Explorer, add a new Game Object to the ‘main’ folder with the id: ‘explosionPrototype’. Within the Outline Window, modify the properties as follows:

Add a Lua Script to the Explosion Prototype
Add a new script to the ‘main’ folder of the Project Explorer named: ‘explosion’. Replace the default code with the following:
With the explosionPrototype.go in focus within the Outline Window — add this script to that game object.
Add a createExplosion Factory to the Explosion Game Object
Double-click ‘main.collection’ to place it in focus within the Outline Window. Right-click ‘Collection’ and add a new Game Object, changing the id of this GO to ‘createExplosion’. Add a factory to createExplosion (right-click ‘createExplosion | select ‘Add Component’ | select ‘Factory Object’. Set the properties for this factory object as follows — linking the explosionPrototype to this factory.

VIII: TUTORIAL WRAP-UP
At this point, we should be ready to build the entire project. Actually, I would strongly suggest that you save frequently as you build out each of the game objects/game components throughout the tutorial and build at each step — this will let you capture any potential syntax errors along the way. The final project can be downloaded by clicking the following button.
All the best - Dave