
Objectives for this Tutorial
This next Defold Introductory Tutorial is focused on the concept of a Game Level. This is an important feature that enables the game developer to have separate scenes for introductions, game instructions, progressive game levels, etc. Key features explained within this tutorial include:
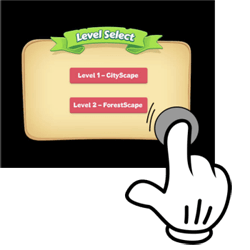
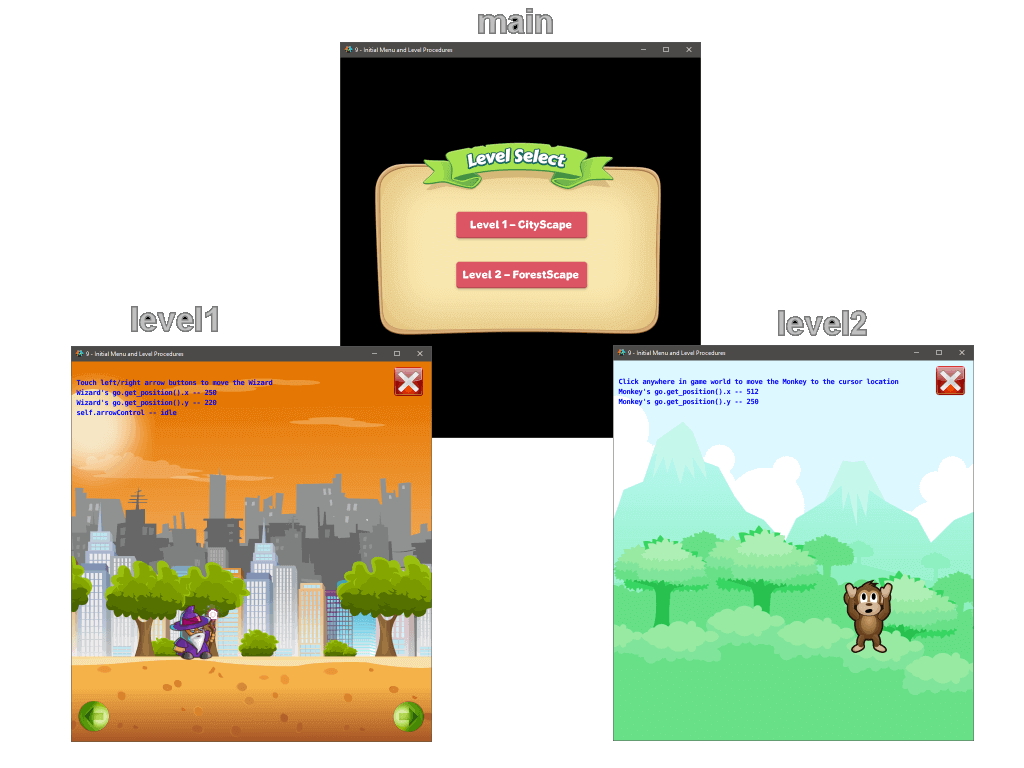
To illustrate these capabilities, the end result for this tutorial is shown in the following iframe — where animated buttons are displayed to provide a user with the choice between two level options. Upon pressing and releasing a button, the user to taken to the designated Level.
Active Defold Application — Click either button to transition to its associated Game Level.
Okay…let’s walkthrough step-by-step on how to develop these capabilities using the Defold 2D Game Engine.
NEW - YouTube Version of this Tutorial is now Available
There is now a video version of this Tutorial on incorporating Levels within your Defold game is now available on YouTube - please take a look and let me know if you find it helpful. Please note, there may some minor differences between the video vs written tutorials, but the techniques are consistent.
I: PRELIMINARY PROJECT SETUP
As usual, we’ll start with the Defold initial Project Template as provided within Tutorial #1. To simplify our tutorial writeup, I’ll be highlighting the major steps, assuming you’re already familiar with the Project Explorer | Outline Window | Properties Window, etc.
Modify the default game.project File
To start, within the game.project file, you should make the following changes:
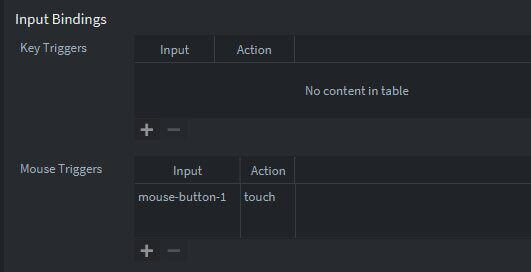
Create Input Bindings within the game.input_binding File
A second element of Project Setup is to add a binding within the Mouse Triggers for the ‘mouse-button-1’ – binding it to a ‘touch’ action. Once complete, the game.input_binding file should look like the following:
Add Images to the Project
There are four primary graphic categories in this project: (1) background images for each of the three game levels, covering the entire game window, (2) two flip-book animations, one for the wizard, and one for a Monkey, and (3) control icons supporting level selection on the main menu, level exit, and left/right movement of the wizard. These images are displayed below..
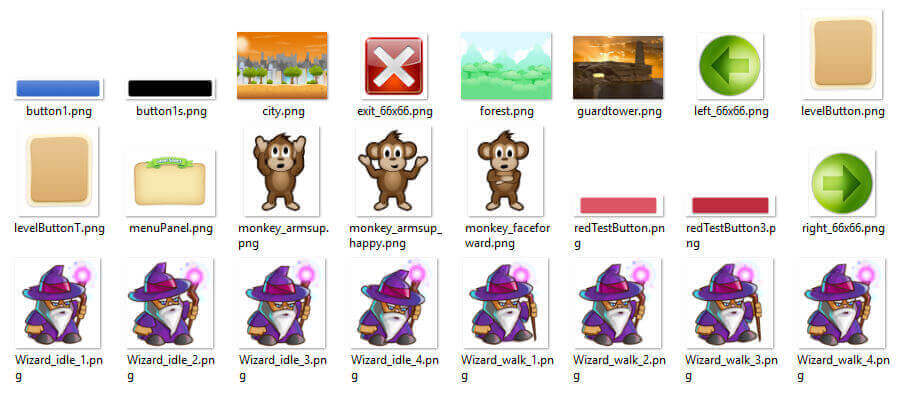
You can download these images by pressing the download button below which will provide them within a single zipfile.
Attribution: These images are all free assets provided by the following sources: (1) background images are from www.clipartkid.com; (2) the Wizard and Ork are provided by www.craftpix.net; (3) the Monkey is provided by www.gameartguppy.com and (4) the Level Select Panel is from www.freepik.com. We thank these sites for providing these free graphic assets.

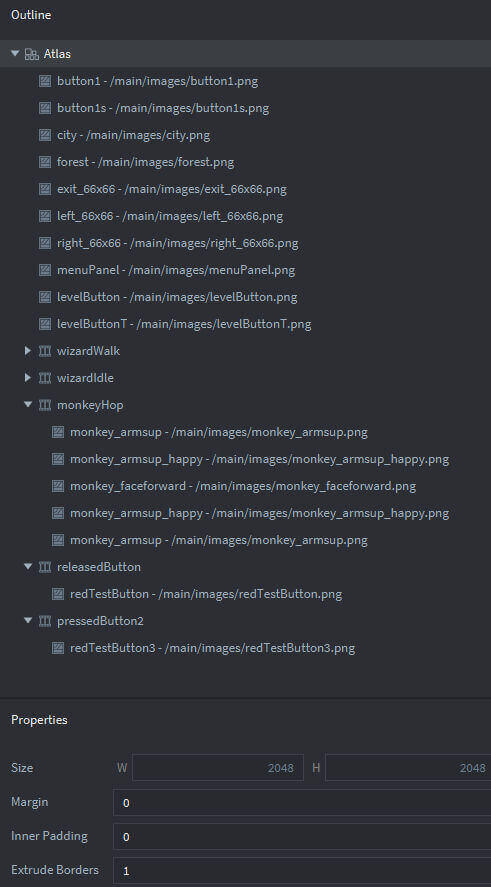
Create an Atlas
The last step in this preliminary setup is to add each of these images into a new ‘graphics.atlas’ file. Once complete, that atlas file should look similar to the following. Don’t forget to make the ‘Extrude Borders’ parameter a 1 (to prevent edge bleeding during animations, as described in Tutorial #4).
If you haven’t already, save all elements of the project via CNTL-S (or the ‘Save All’ entry under the ‘File’ Menu Item — “saving often” is always a good practice 🙂
Add a Unique Font to the Project
For this project, we’ll be using a unique font as part of the Graphic User Interface. Use the following steps within the Project Explorer:
II: MULTIPLE GAME LEVELS
Description of Collection Switching Within this Project
As described within the Defold Documentation and as specified in our game.project file – when Defold starts up, it will load and initiate the top level collection: main.collection.
We’ll be designing this project so that when the user clicks either of the two buttons on the menu contained on the main screen, the application will unload main and load either the level1 collection, or the level2 collection – depending upon which button is pressed. Conversely, when the user is on either Level 1 or Level 2, if the (s)he clicks the exit control in the upper right-hand corner, the application will unload that level and return to the main screen by reloading the main.collection.
Our next step will be to create three Defold Collections — each of these collections will contain a background, a set of GUI Nodes (Buttons), and specific script files representing the three distinct ‘worlds’ to be included in this example. At this point, we’re ready to start putting together the components of this project — we’ll start by building each of the levels (level1.collection and level2.collection). In the next section, we’ll build the components within the main.collection. The relationship between these collections is depicted below:
Collection Proxies
Defold uses the concept of a ‘Collection Proxy’ as the means for a game application having multiple collections….but not needing to load all the collections in order to effect message communication between them — thus saving on the need to simultaneously load very large components that consume lots of memory. The ‘Collection Proxy’ is the component that you can send messages to directing the loading, enabling, disabling, finalizing or unloading of a collection. This allows the developer to organize the project to support switching between multiple game levels and/or switching between a Game Level and a top-level GUI (Menu).
The Defold Manual provides a very detailed explanation of this concept -- and now on to the mechanics on how to build each of the components of this project.
III: CREATING THE LEVEL1.COLLECTION
Build the new level1.collection.
Within the project window, right-click the ‘main’ folder, select New… and select ‘Collection’. In the popup window, name this collection ‘level1’. Double-click on the new ‘level1’ entry to bring it up in the Outline Window so we can populate it with (a) a Background, (b) a Level1 Control Script, (c) a Wizard Game Object and a (d) Graphic User Interface.
Add a Background Object to level1.collection.
Within the Outline Window, with level1.collection in focus — right-click ‘Collection’ | select ‘Add Game Object’ | change the id within the Properties Window to ‘background’. Right-Click the new ‘background’ Game Object | select ‘Add Component’ | select ‘Sprite’. Within the Properties Window, change the Position to center the background image on the screen, change Image to reflect the graphics.atlas we created earlier and set the Default Animation attribute to city – the .png file which is a background for level1.
Add a Control Script to level1.collection.
We will add the following Lua script as a controller for this level. Add a Lua Script file within the Project Explorer, then add it to ‘level1.collection’ within the Outline Window.
Add a Wizard Game Object to level1.collection.
With the ‘level1.collection’ in focus within the Outline Window, add a new Game Object to the project: right-click ‘Collection’ | select ‘Add Game Object’ | in the Properties Window, name this GO as ‘wizard’. Add a Sprite to this Game Object by right-clicking ‘wizard’ | select ‘Add Component’ | select ‘Sprite’. Within the Properties window for this new sprite: (a) change the id to ‘wizardSprite’, (b) identify the Image resource ‘graphics.atlas’…and (c) select the Default Animation to be: ‘Wizard_Idle’.
The wizard properties should look like the following:
Add a Wizard Lua Script File – wizardActions.script.
We want there to be some gameplay on this level, but we’ll keep it simple for now. For this project, we’ll add the ability for the wizard to be moved left and right using either arrow keys or by pressing arrow buttons on the screen — and we’ll change it’s flipbook animation between ‘idle’ and ‘walking’ depending upon the sprite’s status. This is accomplished via the following Lua Script file:
Add the Graphic User Interface to level1.collection
The first step will be to create a new .gui file within the Project Explorer. Right-click ‘main’; select ‘New’; select ‘gui’; change the name to ‘level1Controls’
Double-clicking ‘level1Controls’ within the Project Explorer will put it into focus within the Outline Window.
At this point, we’re ready to add the major components which comprise the level1.collection — (a) a control script, and (b) three GUI Nodes which are controls which support Exiting from the level and returning to the main menu, Left and Right Direction controls which direct the wizard sprites movement.
Add a Lua GUI Script – level1.gui_script
Within the Project Explorer: Right-click ‘main | select ‘New’ | select ‘Gui Script’ — name this script ‘level1.gui_script’. Replace the default Lua code with the following:
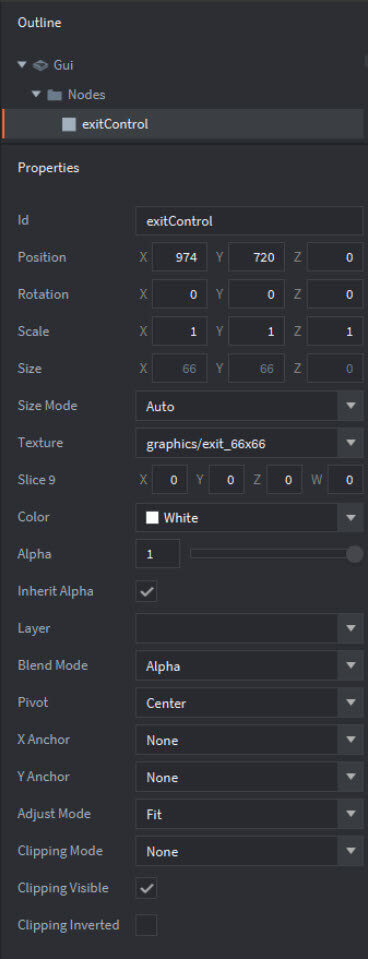
Add an ‘Exit Control Node to the GUI.
Within the Outlook Window — right-click the ‘Node’ folder within the Gui | select ‘Add’ | select ‘Box’
At this point, you can change the attributes within the Property Window as shown below – to include: (a) Id, (b) Position, and (c) Texture
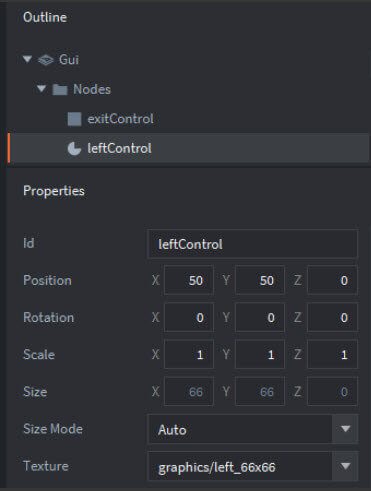
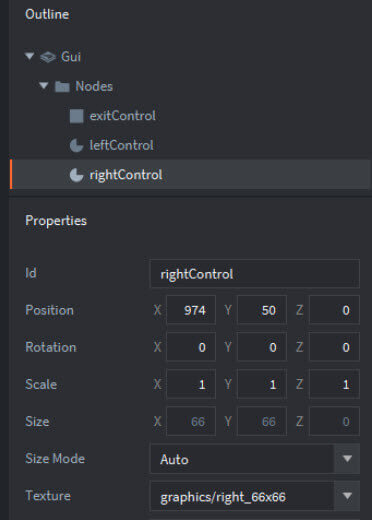
Similarly, you need to add a Node for ‘left Control’ and another for ‘rightControl’. The properties of these two nodes are shown below:
Reference the Atlas within the GUI Textures.
The last step will be to provide a reference to our Atlas file within this GUI. This can be accomplished by:
That completes the steps necessary to create a level1 collection. On to level2, which will be very analogous.
IV: CREATING THE LEVEL2 COLLECTION
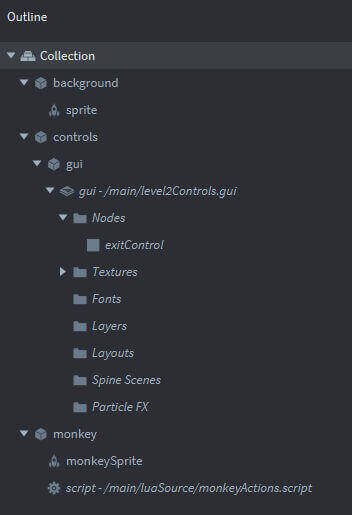
The following screenshot of the Defold Outline Window highlights the major components which comprise the level2.collection — (a) a background sprite, (b) a single Node within the GUI to support exiting, and (c) the sprite and script associated with a monkey which can be moved by clicking a new location within the game world. (The movement of the monkey here is a derivative of the Game Object Movement example which was described in detail within Tutorial 4).
Follow these steps to add the level2 collection to this project….they are very similar to what was conducted to build level1.collection, so I’ll be abbreviating the instructions.
Create the level2.collection
This is accomplished by:
Add a Background Object to the level2.collection
With level2.collection in focus within the Outline Window:
Add a Control Script to level2.collection
Within the Project Window:
Add a Monkey Game Object to level2.collection
With ‘level2.collection’ in focus within the Outline Window:
Add a Monkey Lua Script to level2.collection – ‘monkeyActions.script’
Add a Graphic User Interface (GUI) to level2.collection
Within the Project Explorer:
Add an ‘Exit’ Control Node to the GUI
Within the Outlook Window:
V: CREATING THE MAIN.COLLECTION
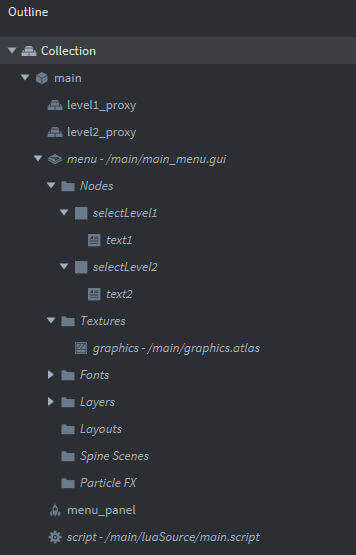
The following screenshot of the Defold Outline Window highlights the major components which will comprise a ‘main’ control game object within the ‘main.collection’ — (a) two collection proxies, which we’ll describe shortly, (b) a GUI with two Nodes, a unique Font, and two layers; (c) a menu_panel sprite and (d) a Lua script.
The following subsections describe the process for building each of these components of the main.collection.
Adding a ‘menu_panel’ sprite to ‘main.collection’
This is a pretty straightforward process — with the ‘main.collection’ in focus within the Outline Window:
Add a Graphic User Interface (GUI) to ‘main.collection’
The first step will be to create a new .gui file within the Project Explorer.
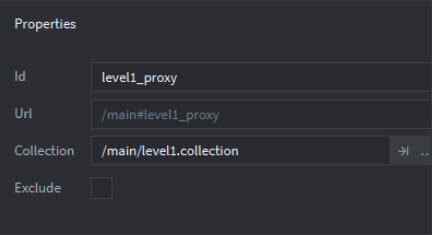
Add two Collection Proxies to ‘main.collection’
To add these two collection proxies:
Add a Lua Script to ‘main.collection’ — ‘main.script’
This step will add the code which controls all actions related to the main screen’s menu and the inter-relationship with the two level proxies.
We’ll add this new script within the Project Explorer by right-clicking ‘main’ | select ‘New’ | select ‘script’ | change the name to ‘main’.
Replace the default code with the following:
Syntax Highlights
As described within the Defold Documentation, Defold uses a message passing mechanism as the means for objects to communicate between themselves. The ‘on_message’ function is invoked if another object passes a message to it, with the following four parameters:
- [XXX_proxy] - A reference to the Collection Proxy to which the message will be sent
- [load] - Loading a Collection through a proxy is accomplished by sending it a ‘load’ message
The proxy will send back a message ‘proxy_loaded’ once the loading is complete — and then you can initialize and enable the collection: using the following messages passed back to the sender:
Additionally, we send a message back to the proxy to be processed by that level’s control script on_message function.
VI: TUTORIAL WRAP-UP
ur 9th tutorial is now complete — and I have included the full project within a zipfile which can be downloaded by pressing the following button. Please let me know if you find these tutorials helpful — any feedback via comments would be greatly appreciated.
All the best - Dave